SmartRF Studio PERL Extension
Introduction
This page describes the use of the PERL interface to the Device Access Layer (DAL) API. The PERL interface makes it possible to run scheduled and automated tasks on DAL database and even on connected evaluation boards with RF modules attached. The PERL interface is also a useful tool for automated testing of hardware and RF performance. Please note that the script interface only implements parts of the functionality found in SmartRF Studio.
Prerequisites
It is assumed that anyone intending to use the script module for accessing RF devices is familiar with the PERL scripting language. If PERL is not already installed on your machine: please download and install Strawberry PERL 5.16 . It is also possible to use PERL 5.12 and PERL 5.14. Active State PERL can be used, but versions before PERL 5.18 is only available as Business or Enterprise Editions.
Important! You MUST use the 32-bit version of PERL, also on 64-bit machines.
It is advisable to add the PERL execution path to the Windows PATH variable. Then you can just type perl <script name> to execute the script. If you also associate the .pl extension with PERL script files, you can start a script by simply typing the name of it. These choices are prompted for during the installation of Active State PERL.
Installation
The script module is by default part of the Smart RF Studio 7 installation. The PERL module and examples scripts are installed as follows:
| Windows 10 | <User folder>/Documents/Texas Instruments/SmartRF Studio v7/scripts |
| Windows 7 | <User folder>/Documents/Texas Instruments/SmartRF Studio v7/scripts |
Note for users of PERL 5.12 or PERL 5.14 : in the script directory, please copy dal_ext_512.dll or dal_ext_514.dll to dal_ext.dll .
Features
- Create DAL object (a single PERL object encapsulating the entire script module).
- Read properties of the DAL object.
- Enumerate connected Evaluation boards.
- Create Evaluation Board objects (SmartRF04EB, SmartRF05EB, CC Debugger and TrxEB).
- Read EB properties.
- Read RF device properties (device description, register information, easy mode settings and typical mode settings.
- Read and write registers.
- Send and receive packets.
API Reference
The DAL extension API is imported into PERL scripts by using the module dal_ext.pm . It contains the classes DALExt and DALExtDevice with their public variables and methods. In order to use the PERL script module, the line use dal_ext; must be included at the start of the script.
Class DALExt
This is the main class representing the Device Access Layer. It should be instantiated only once.
DALExt
DALExtDALExt CONFIGPATH
This is the constructor of the DAL extension object. The pointer to this object can be used to access the Device Configuration Database, Evaluation Boards and RF devices.
If the constructor is called without an argument, the configuration path is set to the default ../config/xml/ . This works for all installations of SmartRF Studio. The only reason to change this would be if a user wants to experiment with an alternative set of configuraton files.
use dal_ext;

$dal= new dal_ext::DALExt();    # Create DAL object
getStatus
getStatus
Returns the status of the last operation on the object or a child object. This function returns 0 upon successs. The table below shows the possible return values and the strings returned from getErrorMessage .
| Value | Description |
| 0 | Success |
| 1 | File opened failed |
| 2 | XML DOM parse failed |
| 3 | Device access failed |
| 4 | Invalid settings name |
| 5 | Configuration parameter error |
| 6 | Unknown RF device |
| 7 | Read only register |
| * | Unknown error |
This example shows how to check for and process the status of a call to DALExt. The code snippets exists the script on failure, and displays the error code returned from DALExt.
$dal= new dal_ext::DALExt();    # Create DAL object
$status=  $dal->getStatus();
die "DAL creation failed (status=$status)" unless $status eq 0;
getErrorMessage
getErrorMessagegetErrorMessage ERRORNUMBER
Returns a string which corresponds to the error number given as argument. If the function is called without an argument, the error message corresponding to the latest error is returned.
$status=  $dal->getStatus();
$msg= $dal->getErrorMessage($status);
print "Latest error: ", $msg;
This code snippet will achieve exactly the same…
$msg= $dal->getErrorMessage();
print "Latest error: ", $msg;
getConfigPath
getConfigPath
Returns a string with the value of the configuration path (root). This function is intended for debugging, and is included for reference only.
$msg= $dal->getConfigPath();
print "Configuration path: ", $msg;
getRfDeviceList
getRfDeviceList
Returns a string containing the names of all supported RF devices. The names are separated by spaces. If the call fails, an empty string is returned.
$rfdevices= $dal->getRfDeviceList();
print "RF devices: ", $rfdevices, "\n";
getDeviceType
getDeviceType DEVICENAME
Returns a string describing the device type of the RF device given as an argument. If an invalid RF device is given, an empty string is returned. Possible device types are:
- System-on-Chip
- Transceiver
- Transmitter
$device= "CC2530";
$devtype= $dal->getDeviceType($device);
print "$device is of type: ", $devtype;
getDeviceShortInfo
getDeviceShortInfo DEVICENAME
Returns a string describing the frequency band of the RF device given as an argument. If an invalid RF device is given, an empty string is returned.
$device= "CC430";
$info= $dal->getDeviceShortInfo($device);
print "Short info for $device: $info\n";
getEbDeviceList
getEbDeviceList
Returns a string containing a list of connected evaluation boards. The entries are separated by spaces. Each entry consists of a colon-separated list containing: EB Board name, RF Device name and the USB DID prepended by ‘CEB’ or ‘MEB’ (CEB: Chipcon Evaluation Board, MEB: MSP430 Evaluation Board).
Examples:
SmartRF04EB:CC1110:CEB29e4SmartRF05EB:CC2530:CEB2434CC Debugger:No chip:CEB8199XDS100v3:CC2538:XDS-06EB122011fAA
If the call fails, an empty string is returned. If no boards are connected the list also be empty. This function physically scans for connected devices, and it is strongly recommended to use getStatus() to determine if the operation was successful.
$ebdevices= $dal->getEbDeviceList();
print "Evaluation boards: ", $ebdevices, "\n";
Class DALExtDevice
This is the class for accessing individual RF devices The objects reference is used for accessing database information, and also to operate the RF device online. With this class it is possible to access all RF registers and command strobes and ultimately to send and receive packets over the air.
DALExtDevice
DALExt DEVICENAME
This is the constructor of DAL device object. It requires the RF device name as an argument. It is recommended to use DALExt:getStatus to check if the object was constructed successfully.
use dal_ext;

# Create DAL object
$dal= new dal_ext::DALExt();
$status=  $dal->getStatus();
die "DAL creation failed (status=$status)" unless $status eq 0;

# Create RF device object
$rfdev= new dal_ext::DALExtDevice("CC2530");
$status=  $dal->getStatus();
die "RF device failed (status=$status)" unless $status eq 0;
getDeviceBrief
getDeviceBrief DEVICENAME
Returns a string which gives a brief description of the RF device. If an invalid RF device is given, an empty string is returned.
$brief= $rfdev->getDeviceBrief();
print "$device brief description: ", $brief;
getDeviceDescription
getDeviceDescription
Returns a HTML string containing a full description of the device. Note that removal of HTML tags will be needed to create fully legible output in a PERL console application.
$htdescr= $rfdev->getDeviceDescription();

# Print HTML output
print $htdescr;
getStrobes
getStrobes
Returns a list of valid command strobes for the device. Each entry is separated by a space. The list will be empty for System-on-Chip devices.
$strobes= $rfdev->getStrobes();
print $strobes;
getEasyModeSettings
getEasyModeSettings
Returns a list of Easy Mode settings . The entries are separated by spaces. Each entry contains the name of the setting, a description, and a list of registers with the values that apply to this setting. This call returns a JSON object representing the setting. Note that a PERL scrips operating on JSON objects must include a ‘use JSON’ directive at the top of the file.
use dal_ext;
use JSON;

# Create RF device object (see DALExtDevice).
# .....
# .....

$settings= $rfdev->getEasyModeSettings();
$status=  $dal->getStatus();
die "Failed to get Easy Mode settings" unless $status eq 0;

my $ref = decode_json $settings;
my $nSettings= @{$ref->{'registersettings'}};

print "Number of settings: $nSettings\n";
$srefs= $ref->{'registersettings'};

# Traverse settings
foreach $sref (@$srefs) {
    print $sref->{'name'} . "\n";
    print $sref->{'description'} . "\n";
    print $sref->{'packet'} . "\n";

    # Traverse registers
    $rrefs= $sref->{'registers'};
    foreach $rref (@$rrefs) {
        my $name= $rref->{'name'};
        my $value= $rref->{'value'};
        print $rref->{'name'}, $rref->{'value'}, "\n";|
    }
}
getTypicalSettings
getTypicalSettings
Returns a list of Typical settings . The format is the same as for getEasyModeSettings .
$settings= $rfdev->getTypicalSettings();
$status=  $dal->getStatus();
die "Failed to get Typical settings" unless $status eq 0;

my $ref = decode_json $settings;

# See getEasyModeSettings() ...
getRegisters
getRegisters
Returns a space-separated list of the registers of an RF device.
$registers= $rfdev->getRegisters();
print $registers;
getRegInfo
getRegInfo REGNAME
Returns a HTML string containing a description of the register as found in the device User’s Manual or Data Sheet. Note that removal of HTML tags will be needed to create fully legible output in a PERL console application.
$htreginfo= $rfdev->getRegInfo("FREQCTRL");
print $htreginfo;
getUiClass
getUiClass
Returns the UIC (User Interface Class) of the RF device. This information may be relevant the application which uses the PERL interface has an advanced user interface. Devices with the same UIC may employ exactly the same user interface. Typically the user interfaces of IEEE 802.15.4 compliant SoC’s will be the identical.
The table below shows the supported User Interface Classes:
| Name | Description |
| IEEE-A | IEEE 802.15.4 compliant System-on-Chip |
| IEEE-B | IEEE 802.15.4 compliant transceiver |
| PROP-A | Proprietary transceiver |
| PROP-B | Proprietary transmitter |
| PROP-A-SOC | Proprietary System-on-Chip |
| CC430 | Proprietary MSP430 System-on-Chip |
| BLE | Bluetooth Low Energy |
$uiclass= $rfdev->getUiClass();
print $uiclass;
connectEbDevice
connectEbDevice USBDID
Attach the RF device object to a connected Evaluation Board. The USB Device ID (DID) of the board must be provided as argument. The function returns 0 on success and -1 on failure. Errors will occur if an invalid USB DID argument is provided or the RF device object does not match the RF device mounted on the EB.
$usbdid= 0x2486;
$status= $rfdev->connectEbDevice($usbdid);
die "Connect EB device ($usbdid) failed (status=$status)" unless $status eq 0;
readRegister
readRegister REGNAME
Read the value of a register.
$regname= "FREQCTRL";
$value= $rfdev->readRegister($regname);
printf "$regname= 0x%04x\n", $value;
writeRegister
writeRegister REGNAME,VALUE
Write a value to a register on the RF device.
$regname= "FREQCTRL";
$value= 0x5B;
$rfdev->writeRegister($regname,$value);
writePaTable
writePaTable PATABLE
Write PA Table to the RF device. This function is only applicable for the RF Devices with a PATABLE used to control PA power settings(CC11xx, CC25xx).
The variable $paTable will be part of the Register Export from SmartRF Studio if the “PA Table” option is selected. The table should be given as a string of hex values separated with a comma. The list should contain maximum 8 entries. More entries will be ignored.
The function returns 0 on success and -1 on failure.
$paTable= "0xfe, 0x00, 0x00, 0x00, 0x00, 0x00, 0x00, 0x00";
$rfdev->writePaTable($paTable);
setRegPacketTx
setRegPacketTx
Apply necessary registers settings for packet TX. The registers are typically IO control and Packet Control, but will vary between RF devices.
$rfdev->setRegPacketTx();
setRegContTx
- setRegContTx
Apply necessary registers settings for continuous TX. The registers are typically IO control and Packet Control, but will vary between RF devices.
$rfdev->setRegContTx();
commandStrobe
commandStrobe COMMAND
Send given command strobe to the RF Device. The supported commands can be seen from SmartRF Studio in the Device Control Panel and the “RF Device Commands” tab. The name of the buttons give a valid command. For example “STX” to set RF Device in TX mode.
$rfdev->commandStrobe("STX");
initTx
initTx
Prepare for packet reception by writing cached register values to the RF device and enter TX mode. Note that setRegPacketTx must be executed first. Returns 0 if the call succeeds, and -1 on failure.
$rfdev->setRegPacketTx();
$status= $dev->initTx():
die "Init TX failed" unless  $status eq 0;
setDefaultPktInterval
setDefaultPktInterval PKTLEN
Calculates and sets the interval between transmitted packets as a function of packet length.
$rfdev->setDefaultPktInterval(17);
setPktInterval
setPktInterval MSEC
Set the interval between sent packets. The value is given in milliseconds.
$rfdev->setPktInterval(150);
sendPacket
sendPacket PACKETsendPacket PACKET,IEEE
Send a packet over the air. The packet must be provided as a HEX-encoded string. The length will be calculated and prepended to the outgoing data. If the IEEE argument is 0 the packet will be output as is. If is set to 1, a IEEE 802.15.4 header will be prepended to the packet. The MAC header is 418800302570190920 , which makes it a DATA packet on PAN ID 0x2530 , destination address 0x1970 and source address 0x2009 . The sequence number is 0 . sendPacket return 0 on success and -1 on failure.
$status= $rfdev->sendPacket("11223344",1);
die "Send packet failed!" unless $status eq 0;
setRegPacketRx
setRegPacketRx
Apply necessary registers settings for packet RX. The registers are typically IO control and Packet Control, but will vary between RF devices..
$status= $rfdev->initRx():
die "Init RX failed" unless $status eq 0;
$rfdev->setRegPacketRx();
setRegContRx
setRegContRx
Apply necessary registers settings for continuous RX. The registers are typically IO control and Packet Control, but will vary between RF devices.
$rfdev->setRegContRx();
initRx
initRx
Prepare for packet reception by writing cached register values to the RF device and enter RX mode. Note that setRegPacketRx must be executed first. Returns 0 if the call succeeds, and -1 on failure.
$status= $rfdev->initRx():
die "Init RX failed" unless  $status eq 0;
$rfdev->setRegPacketRx();
isPacketReceived
isPacketReceived
Checks if a packet has been received. Returns 1 if a valid packet has arrived, 0 otherwise.
while (!$rfdev->isPacketReceived());
$packet= $rfdev->readPacket();
readPacket
readPacket
Returns a string containing a binary-encoded packet. The string will be empty if no packet is present.
while (!$rfdev->isPacketReceived());
$packet= $rfdev->readPacket();
print $packet . "\n";
getRssiPkt
getRssiPkt
Returns the RSSI value of the last packet read with readPacket().
while (!$rfdev->isPacketReceived());
$packet= $rfdev->readPacket();
$rssi= $rfdev->getRssiPkt();
print $packet . "\n";
print "RSSI: $rssi\n";
getRssiDbm
getRssiDbm
Returns the RSSI value read from the radio’s RSSI register (dBm).
$status= $rfdev->initRx():
die "Init RX failed" unless  $status eq 0;
$rssi= $rfdev->getRssiDbm();
print "RSSI: $rssi dBm\n";
getRssiRaw
getRssi
Returns the RSSI value read from the radio’s RSSI register (raw hexadecimal notation).
$status= $rfdev->initRx():
die "Init RX failed" unless  $status eq 0;
$rssi= $rfdev->getRssiRaw();
print "RSSI: $rssi\n";
getCrcStatus
getCrcStatus
Returns the CRC status of the last packet read with readPacket(). The value is ‘1’ if the CRC is correct, ‘0’ otherwise.
while (!$rfdev->isPacketReceived());
$packet= $rfdev->readPacket();
$crcstatus= $rfdev->getCrcStatus();
print $packet . "\n";
print "CRC status: $crcstatus\n";
RF Link Example
The example described in this section implements a link between two compatible RF devices. The RF devices can either be connected via USB to a single computer or be connected to separate computers. The sender and receiver are separate scripts, dal_sender.pl and dal_receiver.pl . The receiver script is in effect a sniffer and will capture all incoming traffic on the frequency it has been configured to operate at. To select which EB is to operate as sender and receiver respectively, modify the variable $ebDevIndex in the scripts.
NB! It is advisable to exceute the scripts through the Windows batch files with the same (base)name. This will ensure that that all the necessary DLLs are found. Alternatively you may copy the Qt DLL’s from the installation ‘bin/’ folder.
Register Settings
The scripts are designed to operate on all RF devices with register settings supported by SmartRF Studio 7, but please note: in order for non-IEEE 802.15.4 compatible devices to communicate the register settings must be present in the file dal_registers.pl . The same applies if you want to modify the link example to use alternative IEEE 802.15.4 settings (for instance change the channel). Uncomment the line #require "dal_registers.pl" to make the settings take effect.
Register settings are typically generated by the Register Export utility in SmartRF Studio. Open the Device Control Panel for the RF device you are using, launch Register Export and select the PERL template. The generated output can either be saved directly in dal_registers.pl file or copied via the clip-board. You may save to any file name, but remember to modify the ‘require’ directive in both PERL scripts accordingly. In case you use two different RF devices, you will have to generate a settings file for each of them. Note that the settings provided in dal_registers.pl with the Smart RF Studio installation are for CC1121.
Hardware Setup
Two EB (evaluation boards) with compatible RF evaluation modules are required. These must be connected to the PC via USB. Make sure that the antennas are mounted.
Sender
dal_send.pl sends packets from the RF device mounted on the second EB (second lowest USB DID), one packet every second.

Receiver
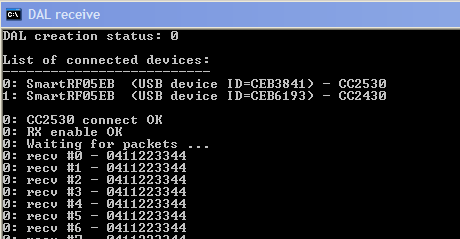
dal_receive.pl receives packets on the first EB (lowest USB DID), and displays the payload.
Common
dal_registers.pl is a file which contains the register settings for both the sender and the receiver. This file is required when running non IEEE 802.15.4 devices. Note that the default file are settings for the CC1121. If you are using another RF device you must use different settings. This setting can be generated with the SmartRF Studio Register export facility.
dal_eb.pm is a PERL module that encapsulates code that is used by both the sender and receiver script. It has two functions: enumerating EB devices and connecting.
Continuous TX/RX Example
The Continuous TX/RX example is much like the link example. It contains two scripts. One for the transceiver: dal_cont_tx.pl , and one for the receiver: dal_cont_rx.pl . The receiver script configure the RF Device in RX mode and start polling the RSSI signal. The transmitter is configured to start sending a continuous wave. For selection of the transmitter and receiver, the same rules apply as described for the link example.
Register Settings
To ensure correct operation in Continuous mode, the register settings should be exported from SmartRF Studio when the corresponding tab has been selected (Continuous TX or Continuous RX). For CC11xx and CC25xx devices with PATABLE register, you must enable PA table export in SmartRF Studio. In the example there is one register setting for the transmitter: dal_registers_cont_tx.pl , and one for the receiver: dal_registers_cont_rx.pl . Note that the settings provided with the Smart RF Studio installation are for CC2541 in proprietary mode.
Hardware Setup
The Hardware set-up will be the same as described for the link example.