6.19. CDD UART Module Migration
Migration Approach: Follow sequential migration for clear understanding of changes at each version. Each migration is organized by individual changes with description, old vs new comparison, and migration actions.
6.19.1. v03.00.00 (i.e release v01.04.00) from v02.00.00 (i.e release v01.03.00) Migration
6.19.1.1. Summary
Version v03.00.00 introduces Resource Allocator as a mandatory architectural foundation. This represents a fundamental shift from direct parameter configuration to centralized resource management:
Resource Allocator Introduction and UART Instance Configuration Updates: Resource Allocator becomes mandatory with CDD UART configurations updated to reference Resource Allocator instances
PREREQUISITE: Complete Resource Allocator Setup before proceeding.
6.19.1.2. Change 1: Resource Allocator Introduction and UART Instance Configuration Updates
6.19.1.2.1. Description
Resource Allocator becomes a mandatory architectural foundation for the CDD UART module, with CDD UART configurations updated to reference Resource Allocator instances. This represents a fundamental shift from direct parameter configuration to centralized resource management, where CDD UART instances are allocated through Resource Allocator and then referenced by UART unit configurations.
6.19.1.2.2. Old vs New Configuration
Old (v02.00.00): Direct parameter selection was used without Resource Allocator dependency.
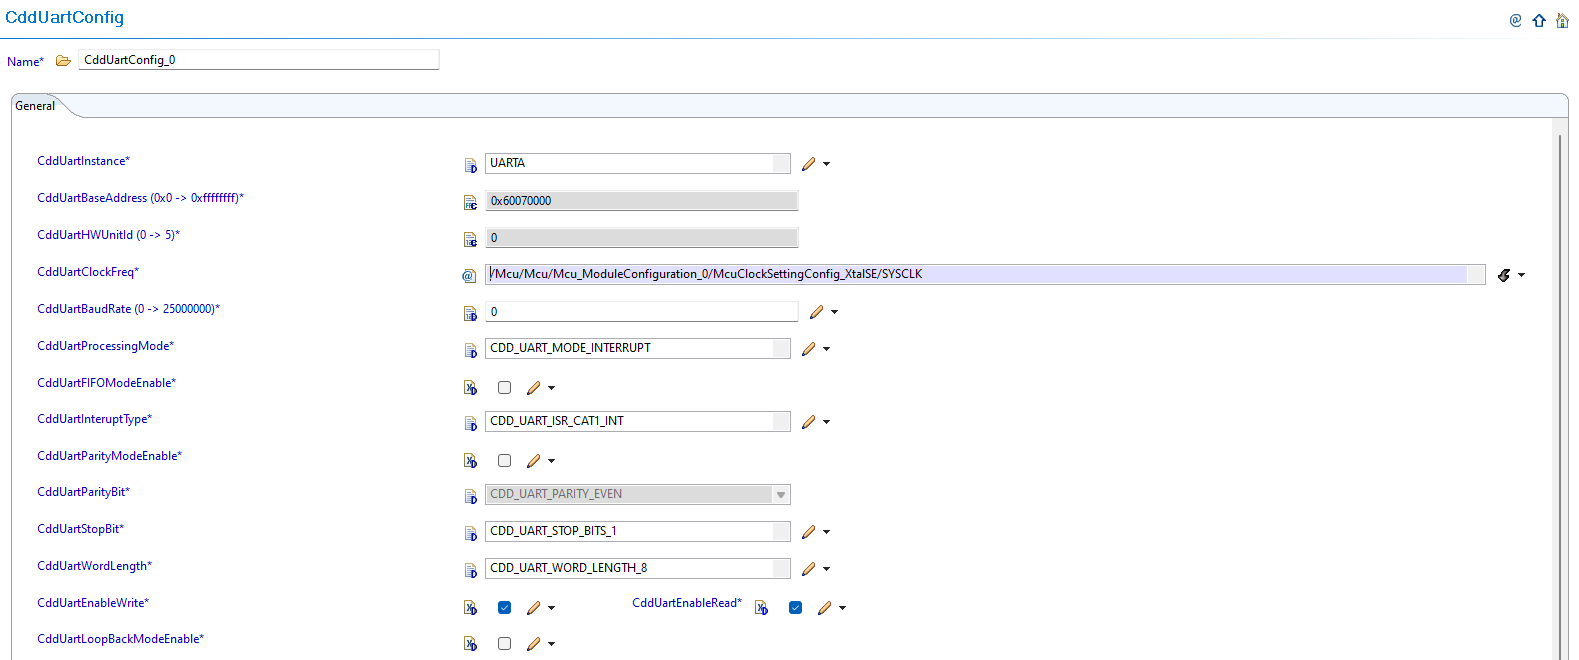
Fig. 6.80 v02.00.00: Direct UART instance parameter selection
New (v03.00.00): CDD UART configurations now reference instances allocated through Resource Allocator.
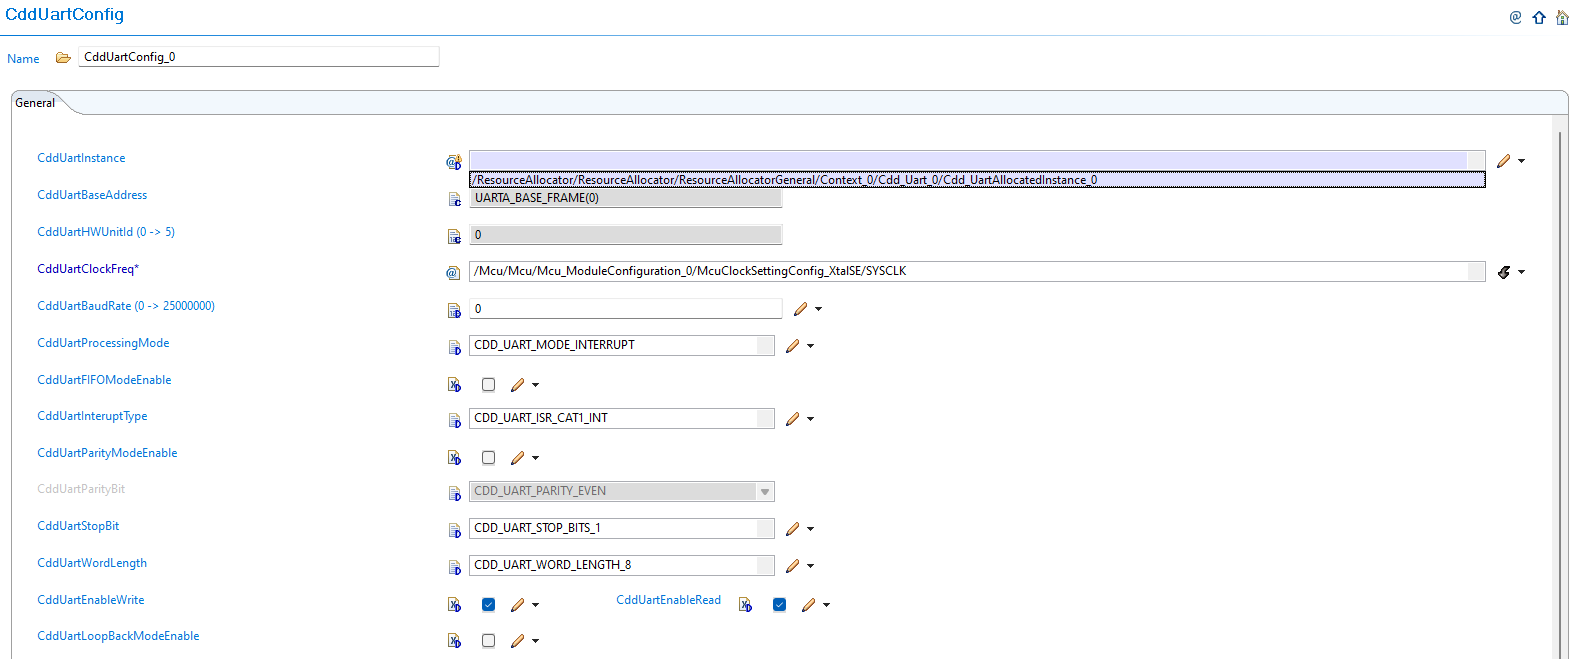
Fig. 6.81 v03.00.00: Set CddUartInstanceRef to point to the corresponding Cdd_UartAllocatedInstance in Resource Allocator
6.19.1.2.3. Migration Actions
Setup Resource Allocator: Follow Resource Allocator Setup
Navigate to Context: Navigate to ResourceAllocatorGeneral → Context → Cdd_Uart and add CDD UART allocator:

Fig. 6.82 Navigate to Context and add CDD UART allocator
Add CDD UART Instance: Add Cdd_UartAllocatedInstance entries for each UART instance your application requires:

Fig. 6.83 Add Cdd_UartAllocatedInstance entries for each UART instance your application requires
Configure UART Instance: Configure the InstanceName, Frame, and BaseAddr for each allocated instance:

Fig. 6.84 Configure the InstanceName, Frame, and BaseAddr for each allocated instance
Complete Configuration: Finalize CDD UART instance allocation
Navigate to CddUartUnit: Navigate to Cdd → CddUartUnit and update configurations to reference the CDD UART instances allocated in Resource Allocator
Open UART Unit Configuration: Access the CddUartUnit configuration that needs to be updated
Set Instance Reference: Set CddUartInstanceRef to point to the corresponding Cdd_UartAllocatedInstance in Resource Allocator
Verify Automatic Derivation: Confirm that the CddUartBaseAddress parameter is now automatically derived from the Resource Allocator reference
Note
The Resource Allocator module must be configured before the CDD UART module to ensure correct instance availability. For more details on Resource Allocator configuration, see the Resource Allocator Module User Guide.
6.19.2. v02.00.00 (i.e release v01.03.00) from v01.00.00 (i.e release v01.02.00) Migration
6.19.2.1. Summary
Version v02.00.00 introduces updated UART instance names and changes clock frequency selection from hardcoded values to MCU system clock references:
UART Instance Name Changes: UART instance naming convention updates for consistency and compatibility
Clock Frequency Selection Updates: Clock frequency configuration changed from hardcoded values to MCU system clock references
6.19.2.2. Change 1: UART Instance Name Changes
6.19.2.2.1. Description
Version v02.00.00 updates UART instance names for consistency and compatibility with the updated plugin architecture. The plugin will automatically identify and flag incompatible UART instance configurations that need to be updated.
6.19.2.2.2. Old vs New Instance Configuration
Configuration Compatibility:
v01.00.00 |
v02.00.00 |
|---|---|
Old UART instance naming convention |
Updated naming convention for plugin compatibility |
Direct instance name configuration |
Plugin-validated instance name selection |
Migration Requirements:
UART instance values must be chosen from the updated plugin options
Plugin automatically flags incompatible configurations
All UART instances require reconfiguration with new naming conventions
6.19.2.2.3. Migration Actions
Open Configuration: Open your existing configuration in the latest plugin version
Identify Incompatible Configurations: The plugin will automatically identify and flag incompatible UART instance configurations that need to be updated
Configure UART Instances: Configure the corresponding UART instances by choosing values from the updated plugin options
Verify All Instances: Ensure all UART instances used in your application are properly configured with the new naming conventions
Validate Configuration: Confirm that all UART instance configurations are compatible with the v02.00.00 plugin requirements
6.19.2.3. Change 2: Clock Frequency Selection Updates
6.19.2.3.1. Description
Version v02.00.00 changes clock frequency selection from hardcoded values to MCU system clock references. This change improves integration with the MCU module and ensures consistent clock configuration across the system.
6.19.2.3.2. Old vs New Clock Configuration
Clock Frequency Configuration:
v01.00.00 |
v02.00.00 |
|---|---|
Hardcoded clock frequency values |
MCU system clock references |
Static frequency configuration |
Dynamic clock frequency from MCU module |
Manual clock value entry |
Automatic derivation from MCU configuration |
6.19.2.3.3. Migration Actions
Run Auto-Calculate Wizard: Execute the auto-calculate wizard to update the UART base address with new clock references
Update Clock Configuration: Update UART clock frequency configuration to reference MCU system clock instead of hardcoded values
Verify MCU Integration: Ensure clock frequency settings align with your MCU configuration
Validate Clock Settings: Confirm that all UART clock configurations properly reference the MCU system clock
Test Clock Functionality: Verify that UART operations work correctly with the new clock frequency configuration