3. MCAL Configurator And EB Tresos User Guide
3.1. Introduction
3.1.1. Purpose and Scope
This comprehensive User Guide provides detailed instructions and best practices for utilizing the MCAL (Microcontroller Abstraction Layer) configurator and code generator package. Each MCAL driver has a driver implementation portion and a configurator/generator portion. The configurator portion is described in this user guide.
3.1.2. Overview of MCAL Configurator
Texas Instruments MCAL implementation leverages Elektrobit Tresos Studio as the primary configuration platform for all MCAL modules.
3.2. Software Dependencies
3.2.1. Requesting access to EB Tresos Tool and License
Customers can request access to the complete EB Tresos configurator installer package and licensing materials by visiting the following link MCAL-EB-TRESOS and follow the access request procedures.
Once your access request is approved, you will be able to download the complete configurator package, which includes all required installers and licensing components needed for MCAL configuration and code generation.
Document |
Description |
|---|---|
EB_Tresos_ACG8.5.0_Installer.zip |
EB Tresos Studio 24.x Installer. |
EB_Tresos_ACG8.8.10_Installer.zip |
EB Tresos Studio 29.x Installer. |
EB_Tresos_ACG8.8.12_Installer.zip |
EB Tresos Studio 29.x Installer. |
EB_Client_License_Administrator_1_5_1_Setup.exe |
EB Tresos License Administrator. |
EB_Tresos_Activation_Customer_License_TexasInstruments.pdf |
Activation Key for License Administrator Setup |
Note
Please consult the Release Notes or Getting Started documentation for specific EB Tresos version requirements for your target platform. It is critical to install only the EB Tresos version specified in the Release Notes to ensure compatibility with your MCAL package.
3.3. Tool Installation and Activation
EB Tresos Installation can be segregated into three major steps:
Installation of Client License Administrator as it requires an activation key for the machine where EB would be installed.
Installation of EB Tresos installer
Elektrobit Tresos License Troubleshooting ( Optional step in case of any license related issues )
3.3.1. Client License Administrator Installation
EB_Client_License_Administrator_X_Y_Z_Setup.exe
Install the executable as an administrator. On successful installation, you should see the icon “EB Client License Administrator X.Y.Z” on your desktop.
Launch EB Client License Administrator.
Enter the activation key provided. There can be one or more activation keys provided. However, the user needs only one successful activation of any key.
Click the “Activate” button.
Check the status of the license activation sequence. If successful, your license is ready to use.
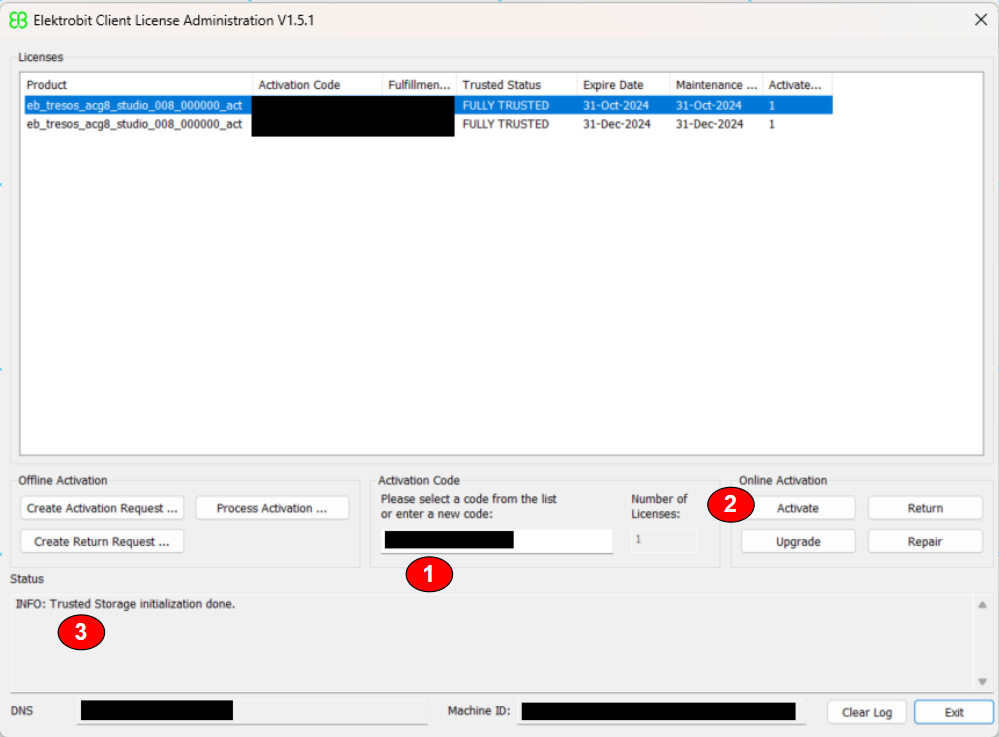
Fig. 3.1 EB Tresos License Activation
Note
For details, refer to LicensingUsersGuide.pdf Chapter 5 ({EB_INSTALLATION_PATH}/EB_Client_License_Administrator/Doc/LicensingUsersGuide.pdf)
3.3.2. EB Tresos Tool Installation
EB_Tresos_ACGX.X.X_Installer.zip
Contains a self-installing exe
Ensure to install as an administrator
On successful installation, an icon “Tresos Studio XX” will be created.
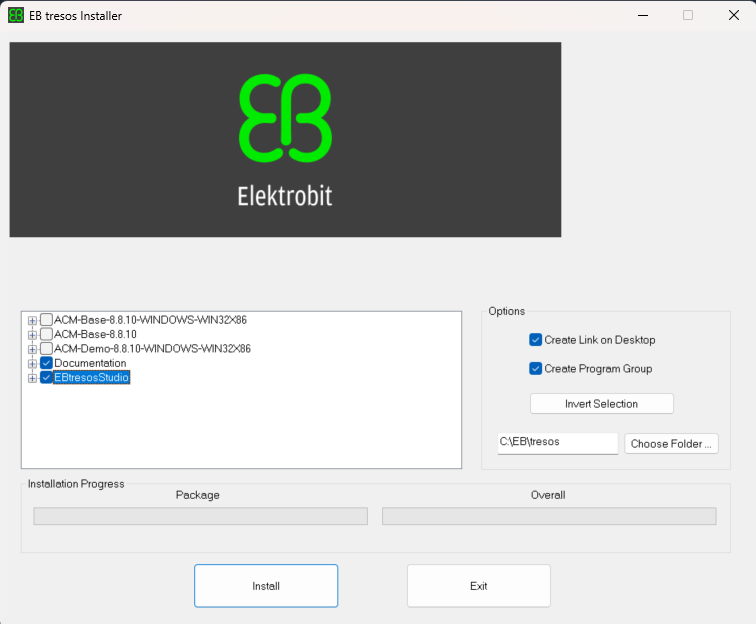
Fig. 3.2 EB Tresos Tool Installation
Note
Ensure that only the ‘Documentation’ and ‘EbtresosStudio’ components are installed in accordance with the license provided.
Post installation, launch “Tresos Studio XX.X” and confirm no license errors are seen.
3.3.3. Elektrobit Tresos License Troubleshooting
In cases where License Errors are seen (post successful installation of Client License Administrator), please try the following steps:
Check if “Flexnet Licensing Service” service is started in the Windows Service Manager Panel (Control Panel -> Administrative Tools -> Services). If it is not started, please start it manually.
Disable any “Antivirus” software on the machine
In cases where “Antivirus” software cannot be disabled, please add user-defined exceptions in “Antivirus” software to the following folders (With the assumption that EB is installed on C Drive):
C:\ProgramData\Flexnet\
C:\EB\
If license issues are still not resolved, contact EB support via Help->EB tresos support in the EB tresos tool.
3.4. Getting started with EB Tresos
Note
For New Users: If you are using EB Tresos Studio for the first time, it is highly recommended to familiarize yourself with the tool by referring to the documentation provided by EB Tresos in local tool installation directory: {EB_INSTALLATION_PATH}/tresos/doc/2.0_EB_tresos_Studio/2.1_Studio_documentation_users_guide.pdf** You can refer to following chapters for basic understanding:
Chapter 4: Using EB tresos Studio for the first time
Chapter 5: The graphical user interface (GUI)
This will help you understand the basic navigation, interface elements, and fundamental concepts before proceeding with MCAL configuration.
3.4.1. Importing plugins to EB Tresos
Copy the entire contents of the MCAL plugins directory, e.g. {MCAL_INSTALL_PATH}\plugins, to the {EB_INSTALLATION_PATH}/tresos/plugins folder.
3.4.2. Create an EB project
Follow the steps below to create an EB Tresos project:
Launch the EB Tresos tool. On the Welcome Screen, click on the Start Icon
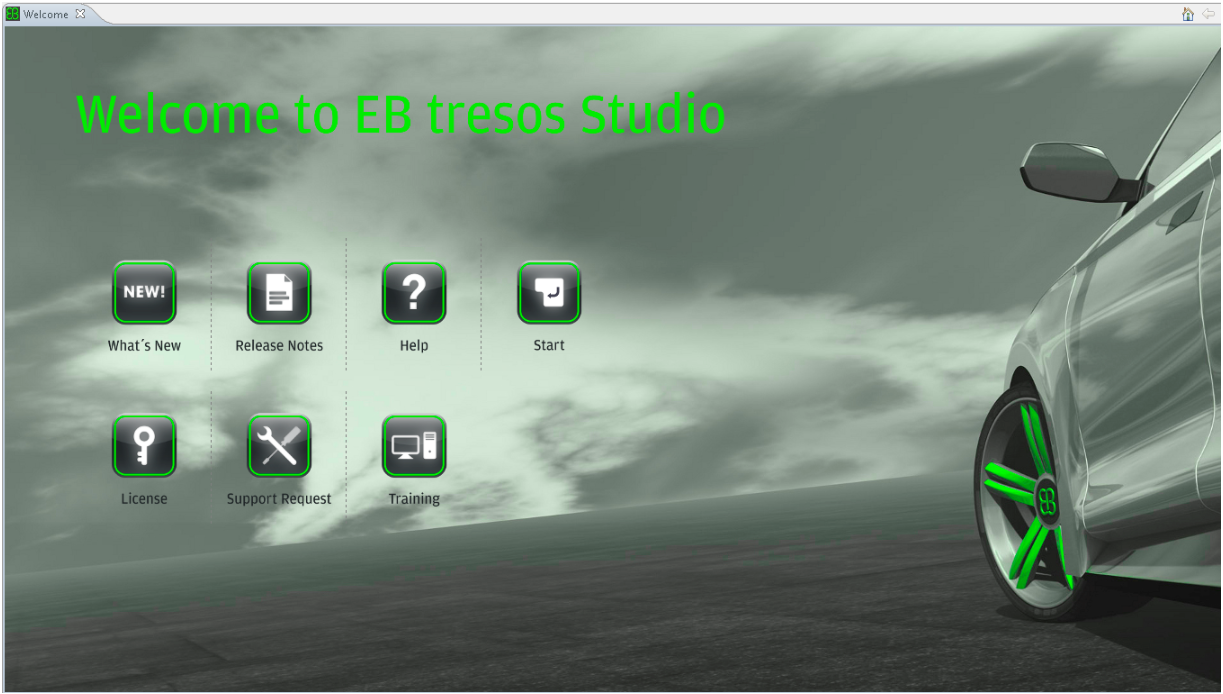
Fig. 3.3 EB Tresos Launch - Welcome Screen
Now click on File->New->Configuration Project to create a new project in the workspace
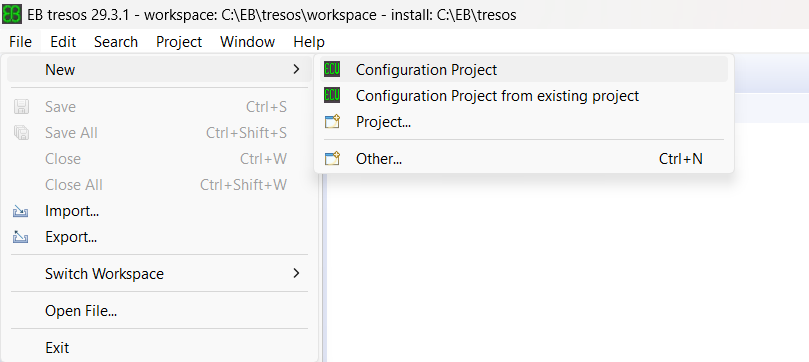
Fig. 3.4 New Configuration Project
Enter the Project name and select the location. Then click on the Next > button
The Use Default Location checkbox can be unchecked and a custom location for the project can be provided

Fig. 3.5 Project Wizard Window
In the Configuration Project Data Window, enter the appropriate name for the ECU instance for the configuration.
Select the Target from the list as F29H85x and then click on the Next > button
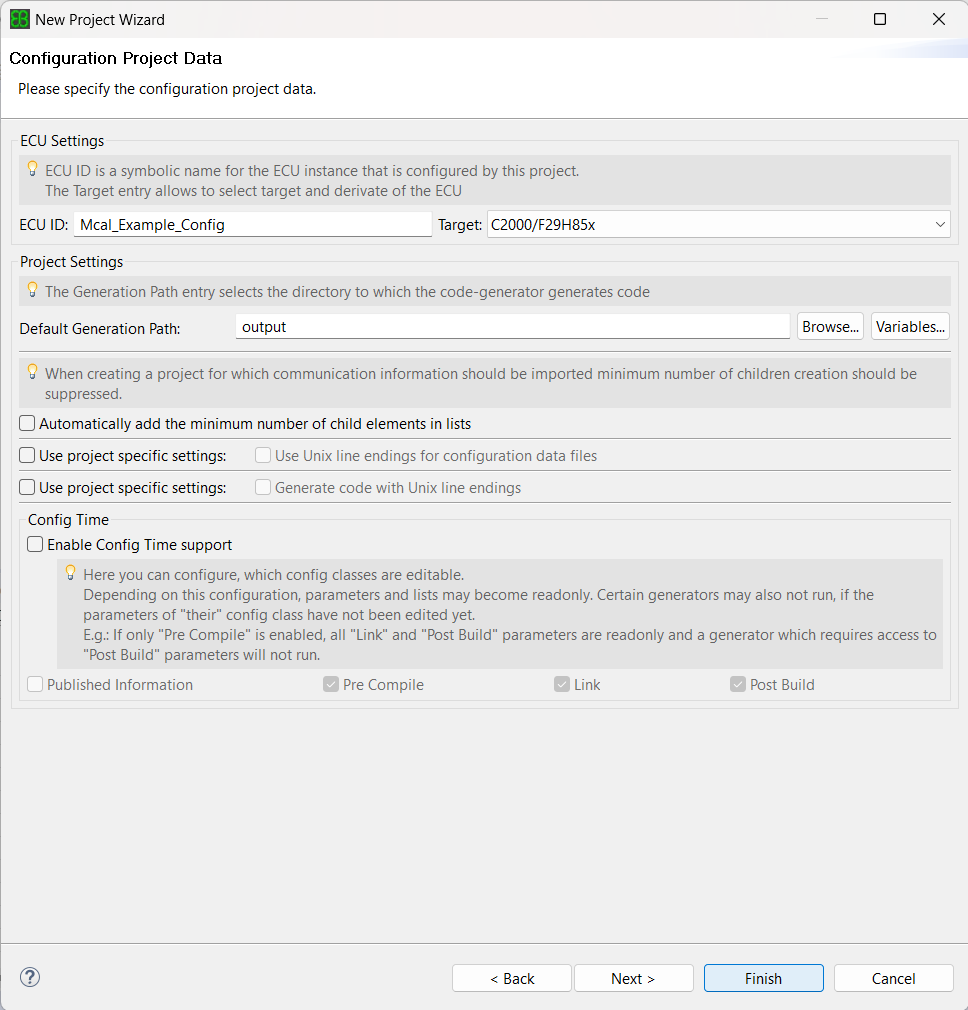
Fig. 3.6 EB Project Configuration Data
3.4.3. Load plugins
In the Module Configuration Window, select all the required plugins listed and add them to the module configuration.
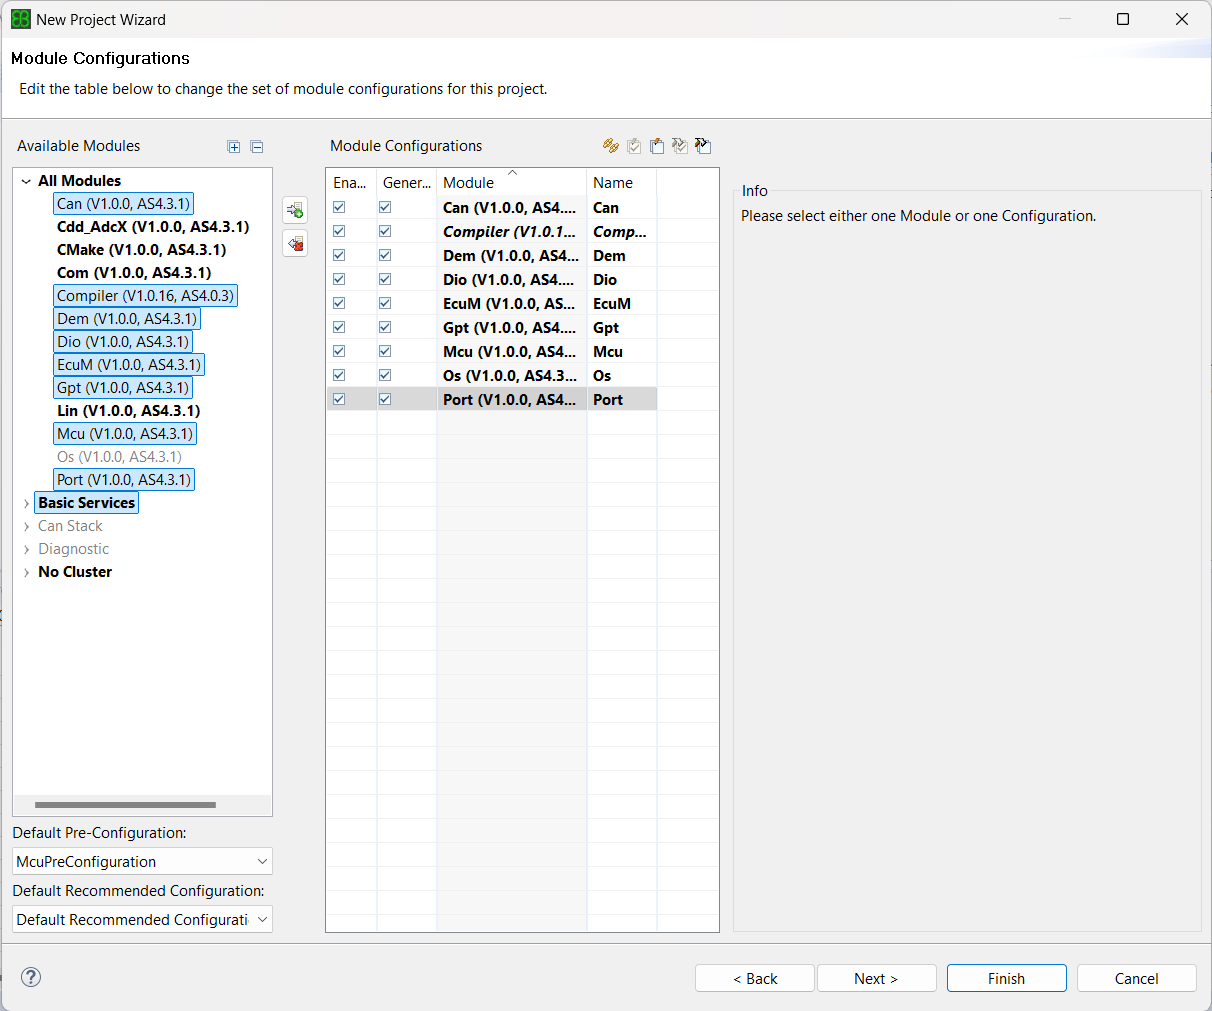
Fig. 3.7 EB Module Configuration
Note
If any default configuration is present for the selected module, ensure that Default Recommended Configuration is selected in the Recommended Configuration section
If the EB Tresos project already exists and you need to add or remove modules, right-click on the EB Tresos project and select ‘Module Configurations’ to manage the project’s modules.
Once all the required modules are added, click on next and then click on the Finish button to create the project.
The created project and modules can be seen in the Project Explorer tab once the project creation is completed
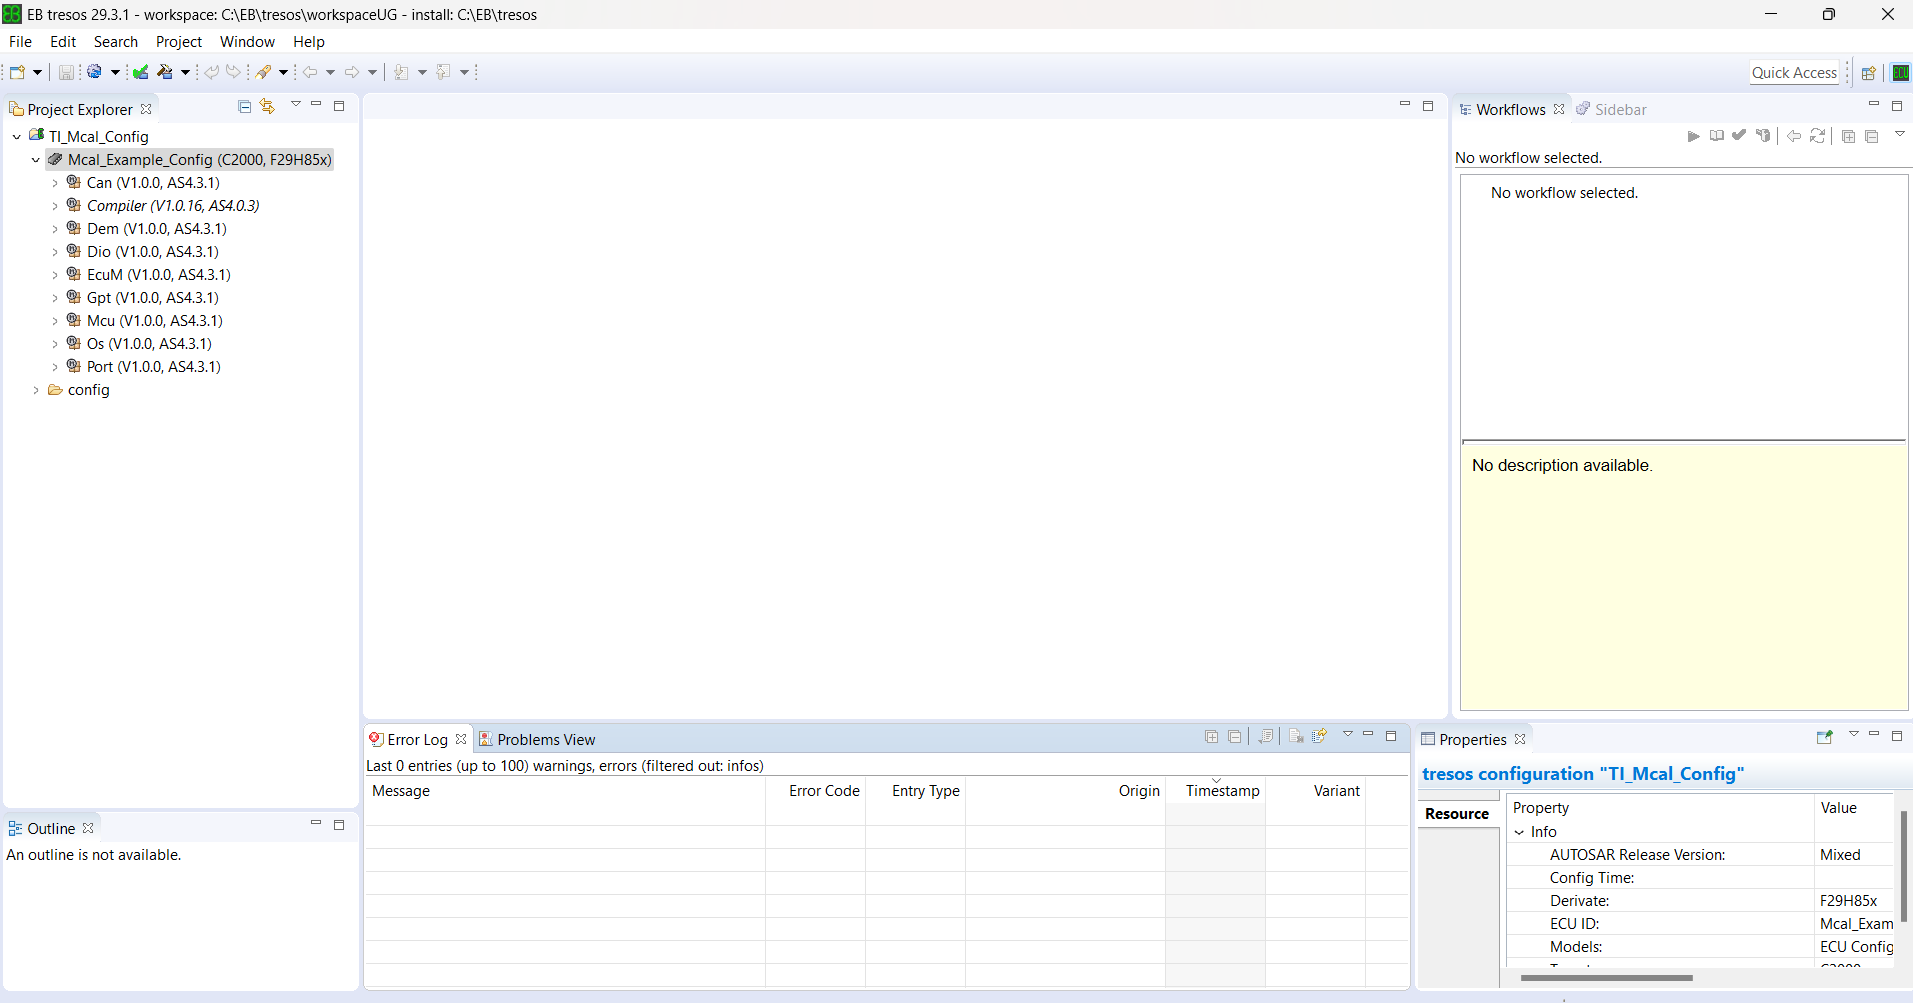
Fig. 3.8 EB Project Created
3.4.4. Generate plugins
Load the modules and configure according to the requirements and save the project.
Click on the Settings button down arrow -> Unattended wizard configurations.
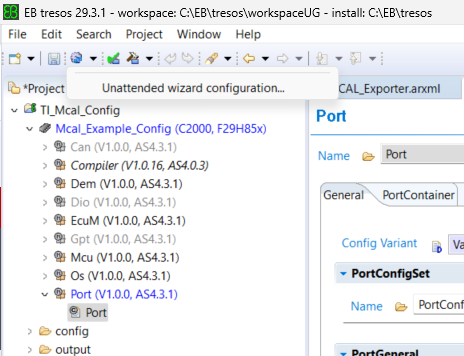
Fig. 3.9 EB Unattended Wizard Configuration
Check the AutoCalc (Calculate Derivable Values) checkbox and select the default values and calculated values checkbox, then click on Run to auto-calculate derivable values.
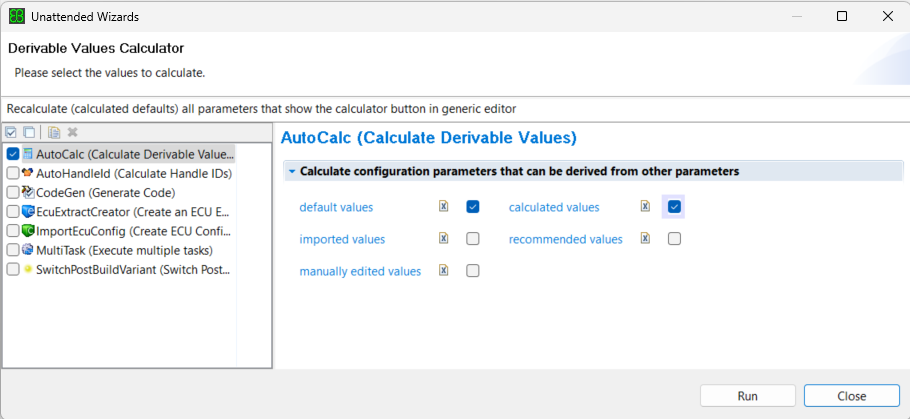
Fig. 3.10 EB Unattended Wizard Config Dialog
Note
Unattended wizard configuration settings need to be configured once during project configuration where the AutoCalc (Calculate Derivable Values) checkbox needs to be set. Once the settings are done, just clicking on the settings icon->AutoCalc will auto-calculate all the values and any other configuration updates in the project.
3.4.4.1. Calculator Icon Behavior

Fig. 3.11 EB Tresos Calculate Button Values
The Calculate button next to configuration parameters initiates specified parameter calculations. The appearance of the icon depends on the current state of the parameter:
Icon |
State |
Behavior |
|---|---|---|
Pencil icon |
The current value is not edited manually but comes from another source (e.g., default value or imported). |
Clicking this button marks the element as manually edited. With this operation you accept the value. Operations such as running unattended wizards or importers that would normally overwrite the default, calculated or imported values do not change the element any more. |
Pencil with calculator icon |
The value was manually edited but can be recalculated. |
Clicking this button recalculates the element value and marks it as a calculated default value. |
Calculator icon |
The value depends on other elements and can be calculated by EB Tresos Studio. |
Clicking this button triggers the calculation based on dependencies. |
Note
For more details on parameter icons and their behavior, refer to Section 5.4.1.1 Sections and parameters in {EB_INSTALLATION_PATH}/tresos/doc/2.0_EB_tresos_Studio/2.1_Studio_documentation_users_guide.pdf
Right-click on the project in the Project explorer and choose Verify Project to see any errors or warnings in the configuration.
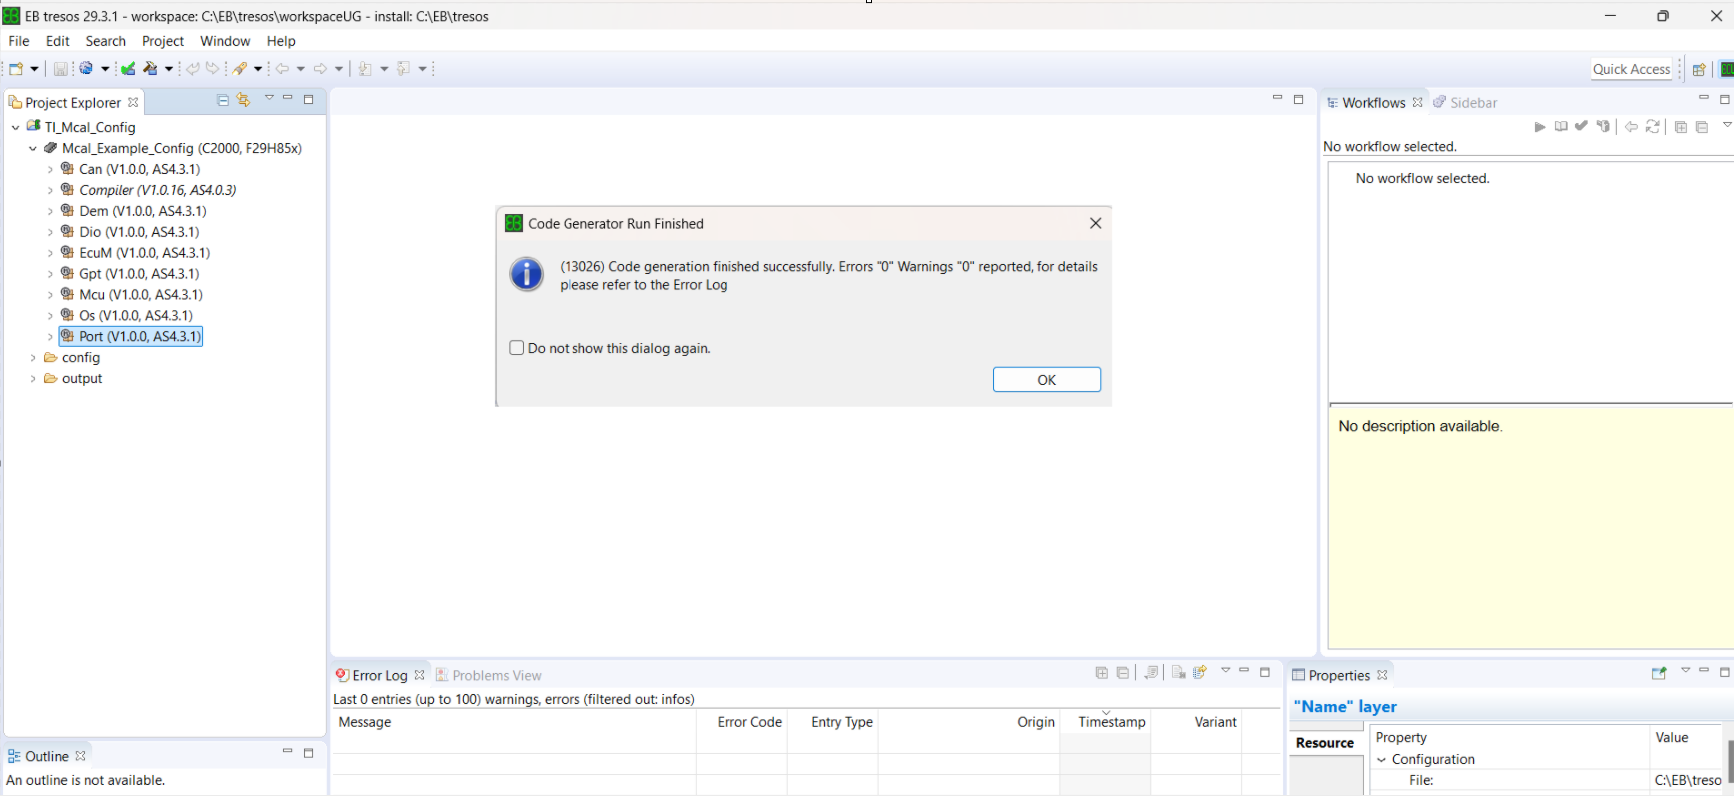
Fig. 3.12 EB Generate Configuration
Next, right-click on the project in the Project explorer and choose Generate Project to generate the output files.
Generated files will be present in the output folder.
For more details on how to configure AUTOSAR modules using EB tresos studio, refer to 2.1_Studio_documentation_users_guide.
3.4.5. Generate BSWMD
To generate a BSWMD file, right-click on the project created or the module for which you want to generate the file, and click on Build Project->Generate_SWC-T
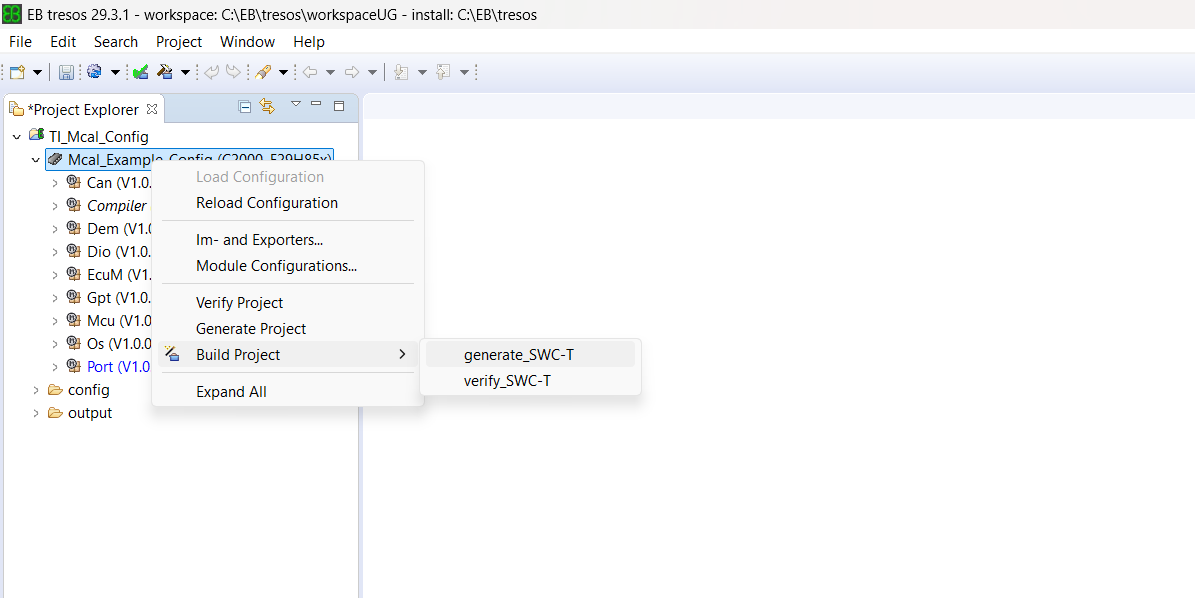
Fig. 3.13 Generate BSWMD File
Make sure the pop-up appears indicating 0 errors and 0 warnings.
The generated BSWMD.arxml file will be present in the output folder in swcd folder.
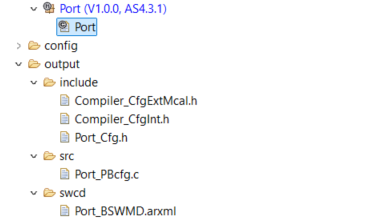
Fig. 3.14 Output Files
3.4.6. Setting up Multi-Task Wizard
The MultiTask wizard allows executing multiple tasks such as importer, exporter, another unattended wizard like AutoCalc, Generate, and Validate in a single click.
To set up the MultiTask wizard for a project:
Click on the project in the Project Explorer and select Unattended Wizards then click on Unattended wizard configuration.
In the MultiTask wizard dialog, configure the tasks to be executed. e.g.
AutoCalc (Calculate Derivable Values): Automatically calculates all derivable parameter values.
Generate: Generates the configuration source files.
Generate BSWMD: Generates the Base Software Module Description (BSWMD) ARXML file.
Click Run to execute all configured tasks with a single click.
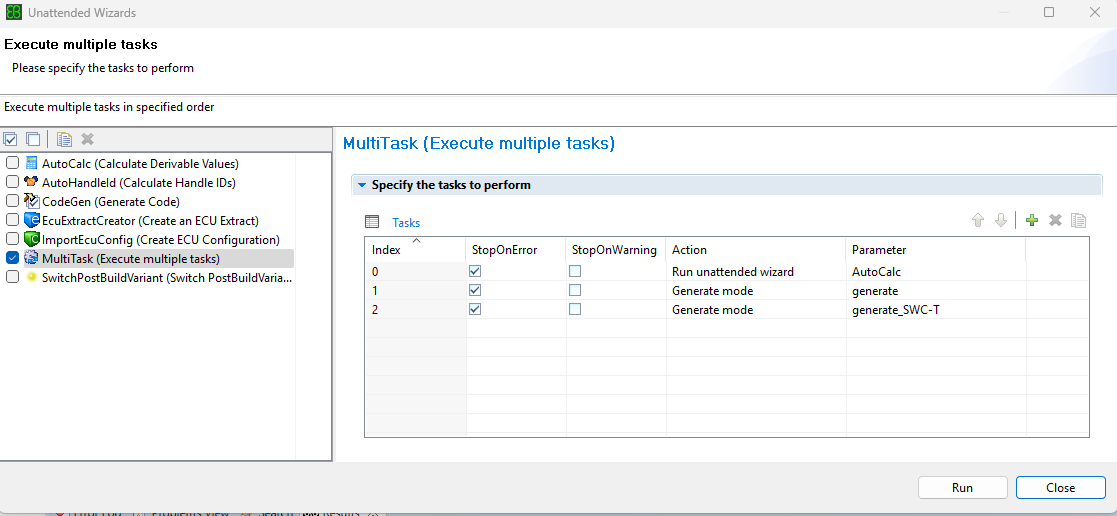
Fig. 3.15 EB Tresos - MultiTask Wizard
3.4.7. Module Plugin Directory Structure
A typical module plugin would contain the following files:
📦ModuleName_TI_DeviceName
┣ 📂config
┃ ┣ 📜ModuleName.arxml : Vendor Specific Module Description : ECU Configuration and ECU Parameter definitions for the MCAL module
┃ ┗ 📜ModuleName.xdm : ECU Parameter definition for the MCAL module.
┣ 📂config_ext
┃ ┣ 📜ModuleName_PreConfiguration.xdm : Pre-Configured values of ECU Configuration Description for the MCAL module.
┃ ┗ 📜ModuleName_Rec.xdm : Recommended values of ECU Configuration Description for the MCAL module.
┣ 📂generate
┃ ┣ 📂include
┃ ┃ ┗ 📜ModuleName_Cfg.h : Provides template to generate header file
┃ ┗ 📂src
┃ ┃ ┣ 📜ModuleName_Cfg.c : Provides template to generate Compile Time module configurations
┃ ┃ ┣ 📜Module_Lcfg.c : Provides template to generate Link Time module configurations
┃ ┃ ┗ 📜ModuleName_PBcfg.c : Provides template to generate Post Build module configurations
┣ 📂generate_swcd
┃ ┗ 📂swcd
┃ ┃ ┗ 📜ModuleName_BSWMD.arxml : Base Software Module Description : Contains details such as exclusive area, Module Entries, Interrupts, MemMap etc…
┣ 📂META-INF
┃ ┣ 📜MANIFEST.MF : Licensing and module include information
┃ ┣ 📜CRYPTOMANIFEST.MF : Contains Signature for the files in Plugin
┃ ┗ 📜CRYPTOMANIFESTSIG.MF : Contains Signature for complete Plugin
┗ 📜plugin.xml : XML file used to register resources with EB Tresos Studio
3.5. Reference EB Documentation
Document |
Description |
Link |
|---|---|---|
2.1_Studio_documentation_users_guide.pdf |
EB Tresos user guide. This document can be used to understand how to use EB tresos for configuration and code generation. |
{EB_INSTALLATION_PATH}/tresos/doc/2.0_EB_tresos_Studio/2.1_Studio_documentation_users_guide.pdf |
LicensingUsersGuide.pdf |
Details the activation of EB license and use of EB Client License Administrator tool |
{EB_INSTALLATION_PATH}/EB_Client_License_Administrator/Doc/LicensingUsersGuide.pdf |
fnp_LicAdmin.pdf |
Document from Flexnet explaining the usage of Flexnet licensing tools |
{EB_INSTALLATION_PATH}/EB_Client_License_Administrator/Doc/fnp_LicAdmin.pdf |
3.6. Run Export
The configurations generated in EB Tresos can be exported to other configuration tools like DaVinci Configurator, ETAS ISOLAR-AB, etc.
To export the configuration from EB to AUTOSAR XML (ARXML) format, the following steps can be followed:
Right-click the EB Project from the workspace which needs to be exported
Click on Im- and Exporters…
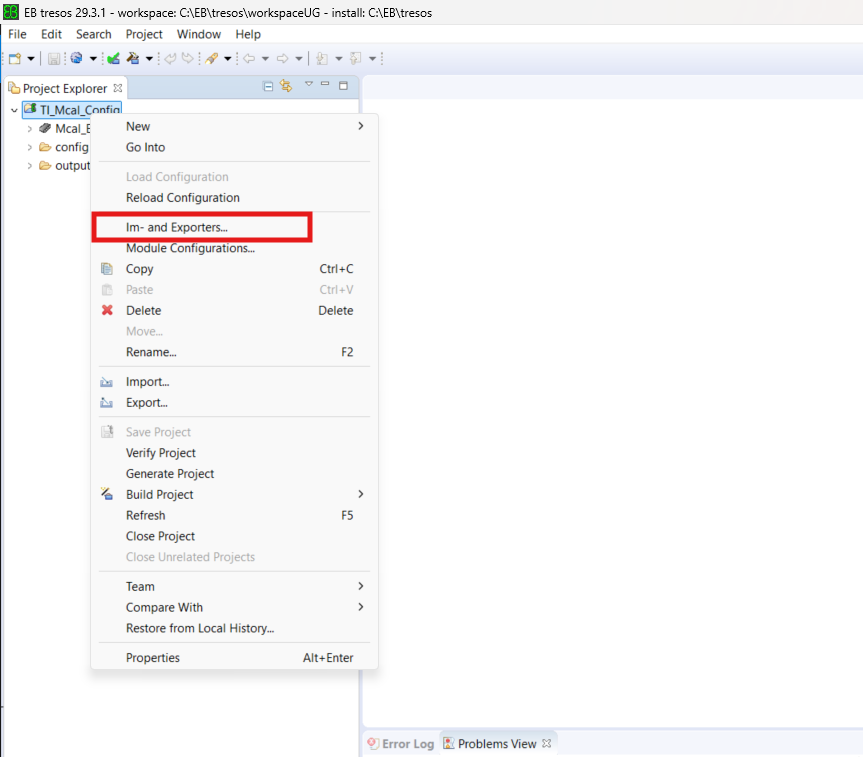
Fig. 3.16 Export configurations
Click on the Create new Im- or Exporter button (+ Symbol)
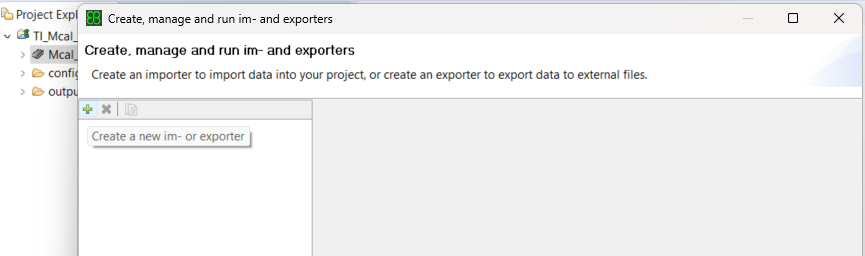
Fig. 3.17 Create New Exporter
Fill in the Name and select Mode as Export Only, then click on the Next button.
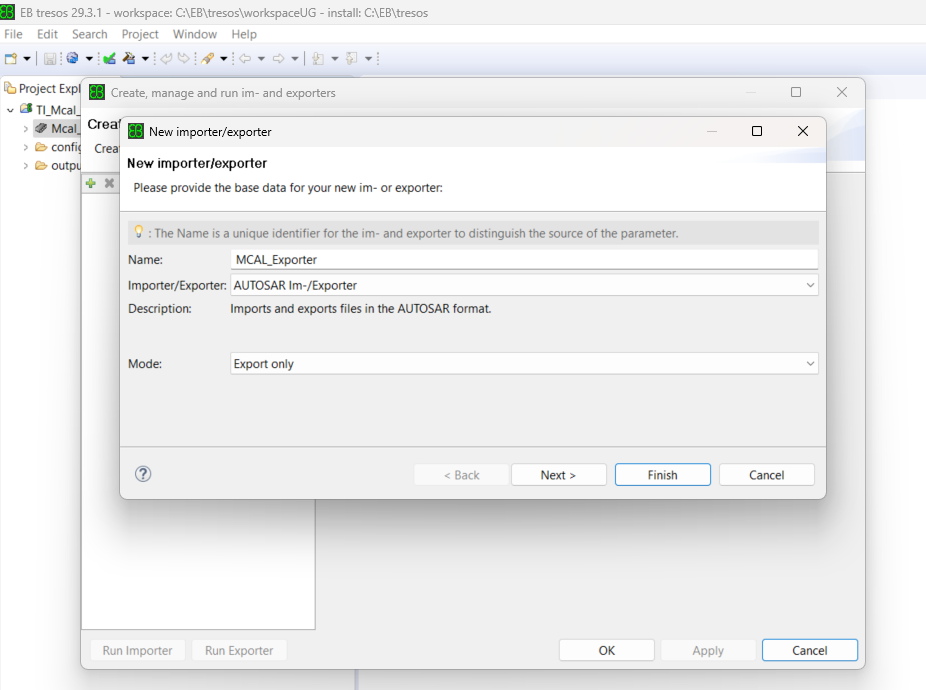
Fig. 3.18 Exporter Name
In the next window, click on Browse and select the file
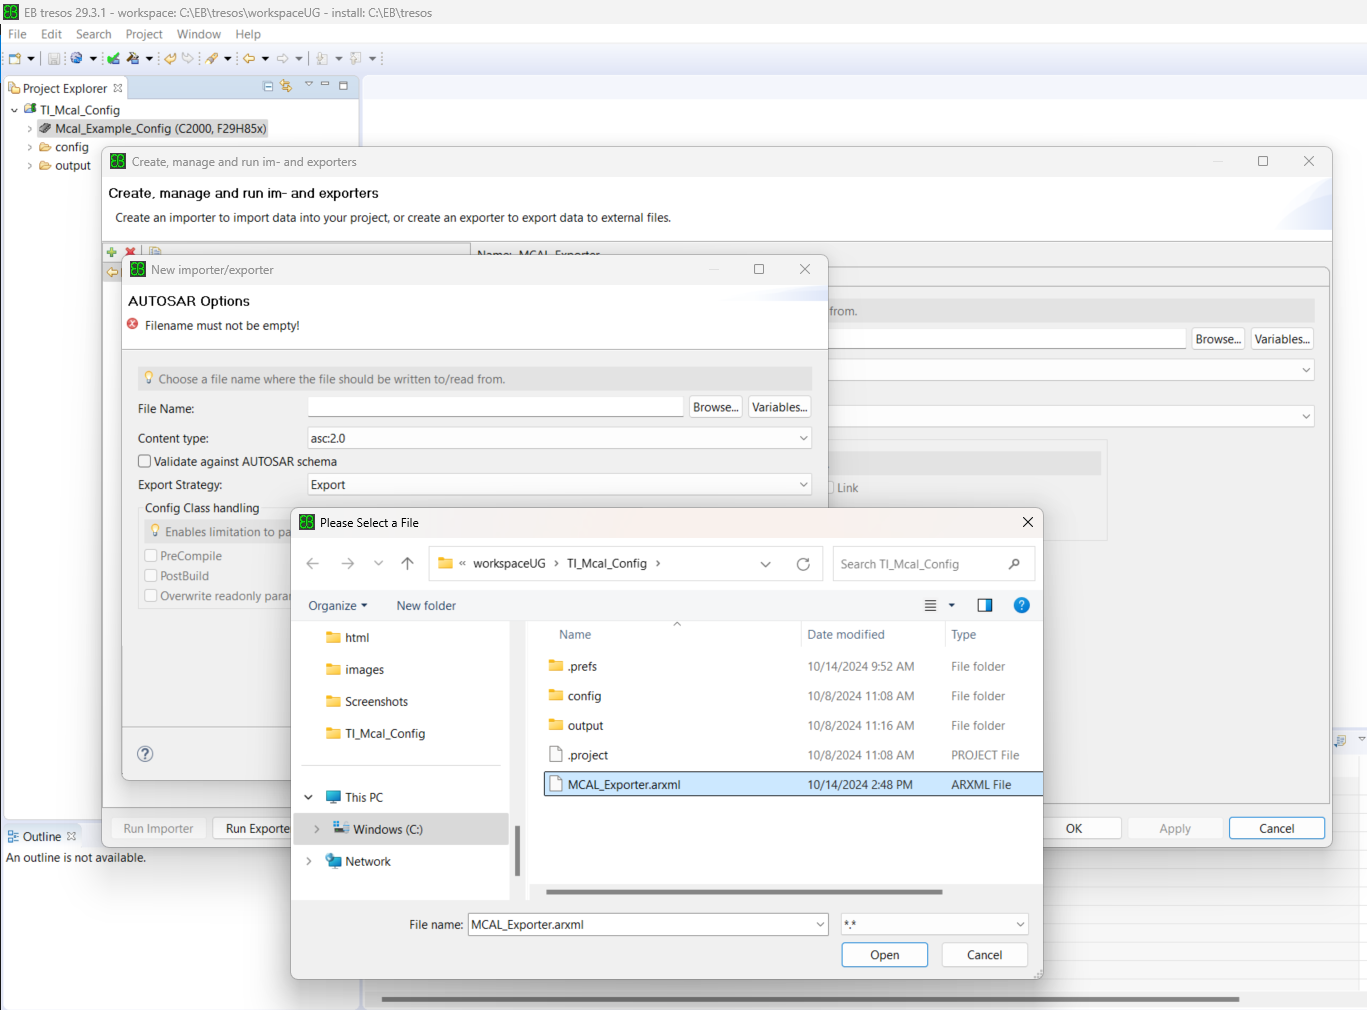
Fig. 3.19 Exporter Select File
Select AUTOSAR version as 4.3.1, and click Finish.
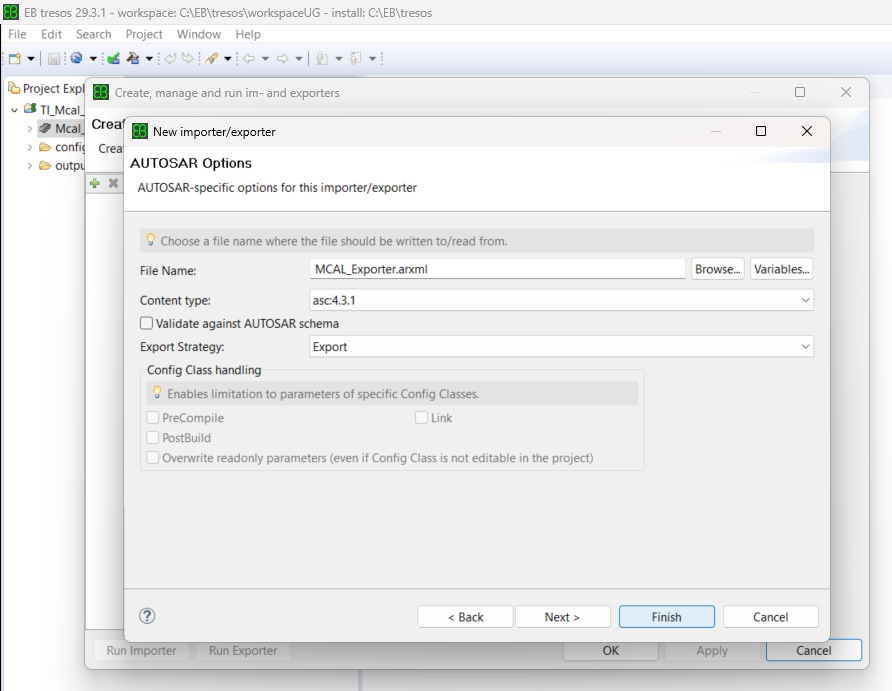
Fig. 3.20 AS Version Select
Select the exporter and click on the Run Exporter button.
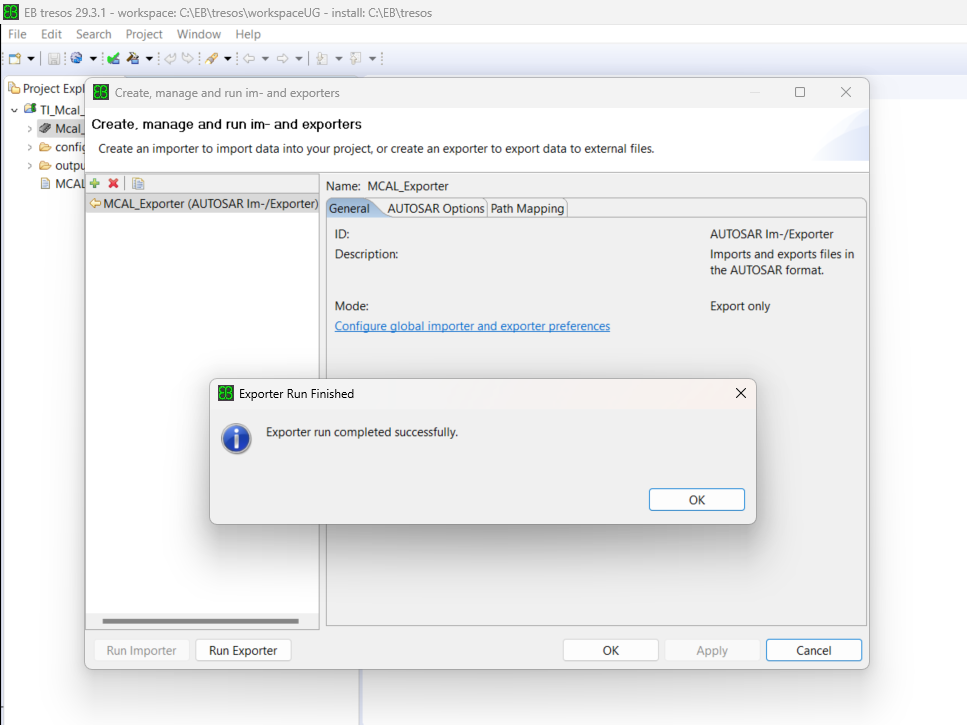
Fig. 3.21 EB Run Exporter
Note
Once the exporter run is successful, the generated ARXML file can be used as the input file for other configurator tools.