6.1. Creating and Managing Projects
In software development projects for embedded systems, there is quite commonly the need to create a single project that builds related versions of the application for different target hardware/memory configurations, with different build options, etc. In large-scale projects, there is also the need to organize files in a structure that is easily navigated and maintained by multiple team members.
The CCS Theia IDE is a flexible development environment that allows you to (among other features):
- Organize files in a structure that is easily navigated and maintained.
- Customize project properties.
- Create multiple build configurations for a single project, each with its own set of build options.
- Specify different version of build tools for each build configuration.
- Create a system level project that simplifies maintaining multiple projects required for a multicore device.
This section discusses the project model used by CCS Theia. It covers how to create, organize and configure projects to help you handle different versions of your applications.
6.1.1. Projects Overview
This section provides an overview of workspaces and projects, and the types of projects supported by CCS Theia.
All work in CCS Theia is based on projects, which are typically a collection of files and folders. Projects are stored and organized in folders that are often referred to as workspaces.
6.1.1.1. Workspaces
A "workspace" is the collection of one or more folders that are opened in the Explorer. In most cases, a single folder is opened in the workspace. However, it is possible to have multiple folders open simultaneously, known as a multi-root workspace environment.
- Configure settings that only apply to a specific folder or folders but not others
- Persist task and debugger launch configurations that are only valid in the context of that workspace
- Store and restore UI state associated with that workspace (for example, the files that are opened)
- Selectively enable or disable extensions only for that workspace
The terms "folder" and "workspace" are sometimes used interchangeably. However, a workspace is a parent folder of a project (or projects) that has additional CCS Theia configuration and settings information.
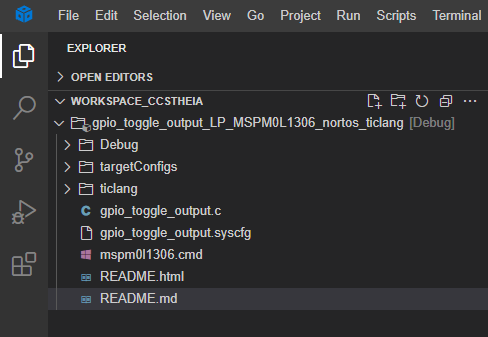
When CCS Theia is launched for the first time, it will create a new folder called workspace_ccstheia in the users home directory and use that as the default workspace folder. Any projects imported to CCS Theia will be copied into this folder.
6.1.1.1.1. Single-Folder Workspaces
You don't have to do anything for a folder to become a workspace in CCS Theia other than open the folder. A different folder can be specified for the workspace. You can open a folder the following way: File → Open Folder... and specify the folder to switch to.
Once a folder has been opened, CCS Theia will automatically keep track of its contents, and create a .theia folder to keep track of metadata such as custom workspace settings.
6.1.1.1.2. Multi-Root Workspace
Multi-root workspaces are workspaces with multiple distinct folders associated with it. All the folders appear in the Explorer for that workspace.
Instead of opening a folder as workspace, they use a *.theia-workspace JSON file that lists the folders of the workspace.
Warning
If there are two projects of the same name in the distinct folders of a multi-root workspace, only one will be recognized as a buildable/debuggable project.
6.1.1.1.2.1. Adding Folders
- New folders can be added to a workspace by selecting the More Actions... → Add Folder to Workspace... option in the Explorer toolbar.

- You can also add a new folder to a workspace by going to File → Add Folder to Workspace....
After a folder is specified, a prompt will appear asking if you wish to save the workspace to a file. It is not required to save the workspace to a file. However, it may be useful if you are working with multiple sets of multi-root workspaces.
Note: You will still be able to save the untitled workspace later if you want to. Otherwise, it will only remain accessible till you end the current session of CCS Theia.
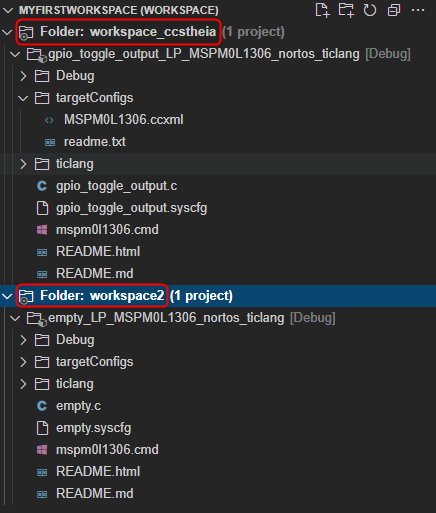
Once the steps are completed, both folders will now be available in the Explorer for the current workspace:
6.1.1.1.3. Saving Workspaces
The current workspace information can be saved to a file and re-imported:
- To save workspace settings: File → Save Workspace As....
- To import workspace settings: File → Open Workspace....
The file is a json file with a *.theia-workspace file extension. It will contain paths to any open folders in the Explorer and any custom workspace settings.
6.1.1.1.4. Workspace File
A *.theia-workspace json file is used to represent a multi-root workspace, and store custom settings for workspaces. The schema is as following:
{
   "folders": [
      {
         "path": "<path-to-folder-1>/<folder-name-1>"
      },
      {
         "path": "<path-to-folder-2>/<folder-name-2>"
      }
   ],
   "settings": {
      "<setting-key-1>": "<setting-value-1>",
      "<setting-key-2>": "<setting-value-2>"
   }
}
When you save any workspace to a file, it is saved as a *.theia-workspace file. The folder paths are automatically generated so they are the correct location. *.theia-workspace file supports both absolute and relative file paths.
Note
The visual difference of having a folder opened versus opening a .theia-workspace file can be subtle. To give you a hint that a .theia-workspace file has been opened, some areas of the user interface (for example, the root of the file explorer) show an extra (Workspace) suffix next to it.

6.1.1.1.5. Workspace Settings
Workspace settings enable you to configure settings in the context of the workspace you have opened and always override global user settings.
See: General Settings
6.1.1.2. Projects
A project stores all the information needed to build an individual program or library, including:
- Filenames and paths of source code and object libraries.
- Build-tool options.
- Include file dependencies.
- Build-tool version used to build the project.
Projects typically contain files and folders. Similar to the workspace, a project maps to a physical folder in the file system. When a new project is created, its default location is in a subfolder (of the project name) within the workspace folder. However you can also choose a folder outside the workspace.
Once the project is created, a reference to it will be made in the workspace and the project will be visible and available for use from the Explorer. Each project in the workspace must have a unique name.

6.1.1.3. Explorer
The Explorer can be opened in the Side Bar by selecting the Explorer icon in the side Activity Bar.
The primary function of the Explorer is to display the workspace folder and all associated projects. The project displayed is mostly a representation of the file system of the project folder. When you create a subfolder and move files to that subfolder from within the Explorer, the actual filesystem is being altered. Similarly, changes made to the filesystem will be reflected in the Explorer.
Note that not all files that appear in the view will exist in the filesystem and vice versa. Linked files will appear in the view but because they are references and not actual copies, they will not appear in the actual filesystem. Any project metadata files/folder with the project folder (typically preceded with a ".") will also be hidden.
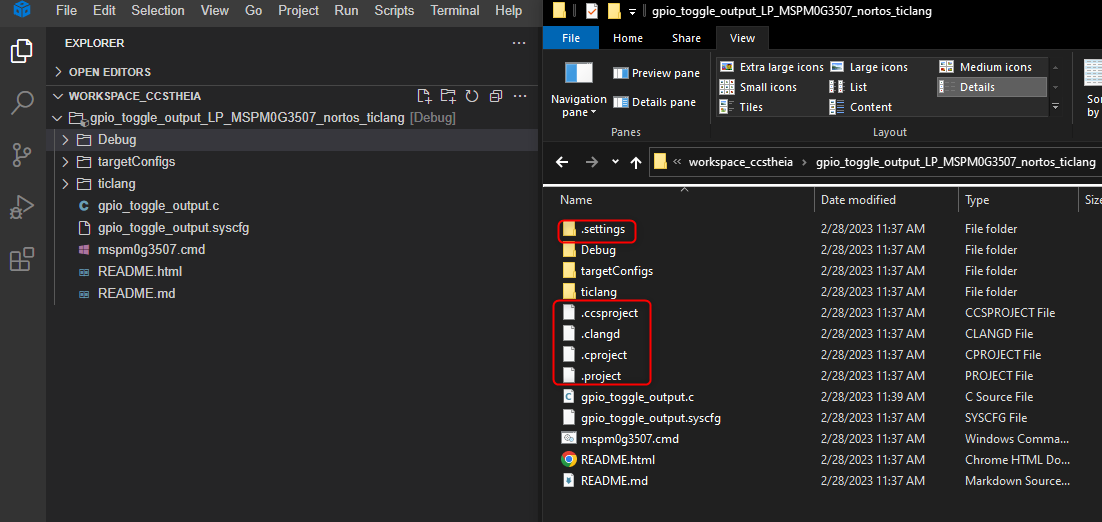
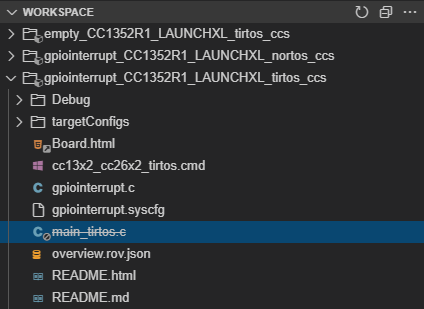
The screenshot below shows the contents of the 'gpio_toggle_output_LP_MSPM0G3507_nortos_ticlang' project in the Explorer and how it maps to the physical project folder in the workspace in Windows Explorer. Note how the CCS generated project files (.ccsproject, .cproject, .project), .clangd and .settings folder shown in Windows Explorer are hidden in the Explorer. Otherwise the rest of the folders and files are structured the same in the Explorer and Windows Explorer.
At the top of the Explorer is a view labeled OPEN EDITORS. This is a list of active files or previews. These are files that are open in the editor that you were working on.
From this view, files in the list can be saved, closed, even compared with other fies in the list.
6.1.2. Working with Projects
This section covers the steps for creating, importing and working with CCS Theia projects.
6.1.2.1. Creating New Projects
To create a new CCS project, follow the procedure in the relevant section in the Getting Started chapter.
6.1.2.2. Adding or Linking Source Files to Project
File are either added or linked to a project.
When you add a file/folder to a project, it is physically copied to the root location of the project folder directory.
When you link a file/folder to a project, the project will create a reference to the file/folder in the file system instead of copying it into the project directory. Linked files appear in the Explorer with a special icon as shown below.
![]()
All files contained in a project (either copied or linked) will be included in the project build unless specifically excluded. To exclude a file from build, refer to Exclude Files from Build.
To add files to a project, simply drag and drop the file from the system file explorer (Windows Explorer, Finder, etc) to the project in the Explorer.
To copy or link files and folders to a project, select the desired project in the Explorer view and select the Add Files/Folders options in the associated context menu to open the Add files/folder into dialog. In the dialog, select the Add (+) button to bring up the Select files/folders to add dialog. The Select files to link drop-down list in the dialog gives you the below options:

- Select files to copy: Select files to add (copy) to the project.
- Select files to link: Select files to link to the project.
- Select folders to copy: Select folders to add (copy) to the project.
- Select folders to link: Select folders to link to the project.
- Create a virtual folder: Create a virtual folder in the project.
If the file or folder is being linked, then the Available path-variables... drop-down list will be active and allow the use of a variable for the link to avoid an absolute path. The list of available variables can vary depending on the project. Selecting a variable will display the path it represents in the Location field below it. For more details on the path variables for the project and also to create your own custom variables, please see the General Properties of the project.
The Location field will display the full path to the file/folder to be added to the project. If a path variable was specified above, it will also display the value of the path variable. This field can not be manually modified.
The Path field is a modifiable field that is used to specify the file/folder to add/link. The Browse... button at the end can be used to browse to the desired file/folder. It will use an absolute path to the file/folder. If a path variable has been specified, the Extend... button can be used to create a relative path from the path defined by the path variable.
Note
It is good practice to use path variables for linked resources as this aids in project portability.
The Name field has the name of the file/folder to be added/linked.

Seleting OK will close the Select files/folders to add dialog and and the file(s)/folder(s) specifed will now appear in the Add files/folder into list. Pressing OK here will add/link the file(s)/folder(s) to the project.

There are also options to Remove and Edit existing entries in the Add files/folder into dialog.
Warning
Since linked files actually reside in a location outside the project folder, be aware that editing these files will modify the file not only for the current project but also for any other project that links to the same file. This is especially important when working with TI software packages and SDKs that may share source files among multiple projects.
6.1.2.3. Importing Projects
A more common scenario than creating a new project is to work with an existing project. This could be either your own development project or an example project provided by TI. In this case, you must first import the project into CCS Theia.
There are two main options:
- Import directly from Resource Explorer
- Manually import an existing project on the file system
More information on Resource Explorer is available here.
More information on manual import is available here.
Warning
Importing a project of the same name as one that already exists in the workspace is not allowed.
Note
CCS Theia can import projects that are created with CCS Theia or CCS versions 4.x and greater. However, bear in mind that the greater the variance in CCS version used to create the project vs. version used to import the project, the more error-prone the import process could be.
6.1.2.4. Renaming Projects
To rename a project in the Explorer:
- Right click on the Project and select Rename.
- Give it a new name and click OK.
6.1.2.5. Copying Projects
To make a copy of a project that is in the Explorer view:
- Right click on the Project and select Copy.
- Right click in the Explorer and select Paste.
The copied project will be renamed automatically to avoid conflict with the original project.
Warning
While the copy of the project is renamed from the original, many other settings (like name of output file, map file) and build definitions could keep the same name as the original project. Please inspect the project properties of the new copy to check for an discrepancies.
6.1.2.6. Deleting Projects
To delete a project that is in the Explorer:
- Right click on the Project and select Delete.
6.1.2.7. Sharing Projects
CCS Theia projects are typically self-contained within the project folder. These project folders can simply be shared to another user for import into their environment.
6.1.2.7.1. Portability Across Operating Systems
In addition to creating projects without any absolute paths, other things to consider if the project needs to be portable across OS:
- Use forward slashes in all settings and options.
- Avoid upper/lowercase characters in file names, as Windows does not differentiate between them but Linux does.
6.1.3. Configuring Projects
CCS provides a lot of flexibility when it comes to project configuration and management.
6.1.3.1. Project Properties
There are many settings that define the properties of a project, such as the toolset used for the build, compiler and linker build options, project dependencies and environment variables, to name a few. These settings can be viewed and customized through the Project Properties. This section describes the more commonly used settings for a project.
6.1.3.1.1. General Properties
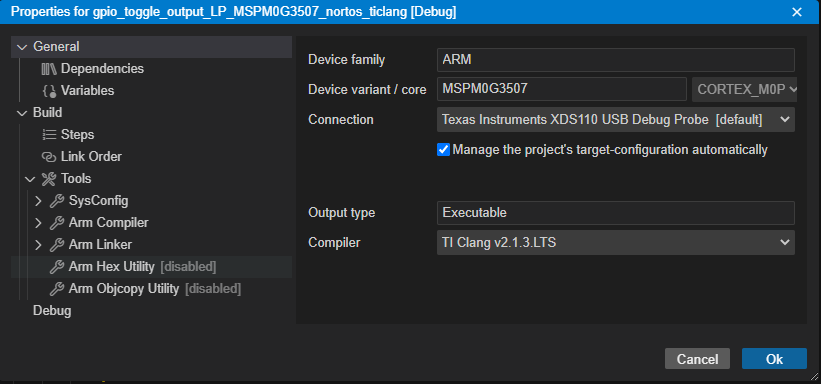
To view and customize General Properties, right-click on a project and go to Properties, then click on General in the left pane.
The Project tab in the right pane contains the following:
- Device family: Displays the device family configured for this project. This setting cannot be modified.
- Device variant / core: Displays the device variant and core configured for this project. This setting cannot be modified.
- Connection: Displays the debug probe to be used when debugging this project. This setting can be modified.
- Output type: Displays the output type for the project (Executable, Static Library, etc). This setting cannot be modified.
- Compiler: Displays the compiler to be used when building the project. This setting can be modified.
Under the General properties, there are two additional properties types:
Dependencies: Displays any Product dependencies and Project dependencies:
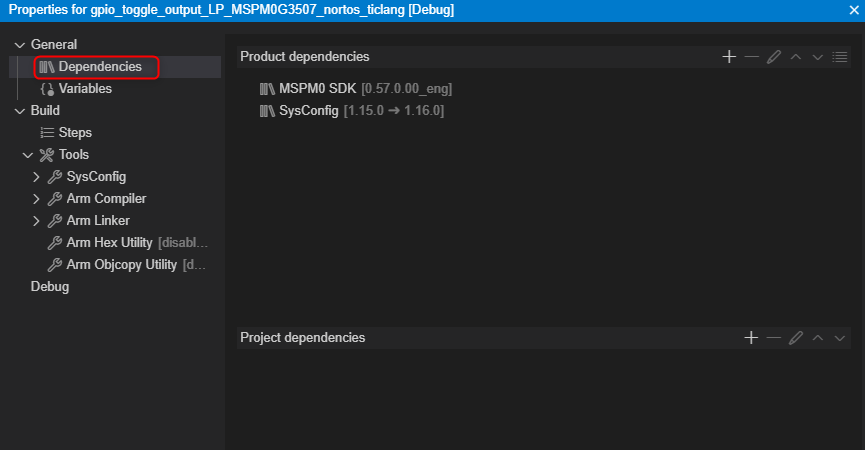
- Product dependencies: Lists any dependencies on specific products (SDKs, tools, etc).
- Project dependencies: Lists any dependencies on other projects. These project would need to exist in Explorer. Any dependent projects would automatically be built first when building the current project. See Project Dependencies for more information.
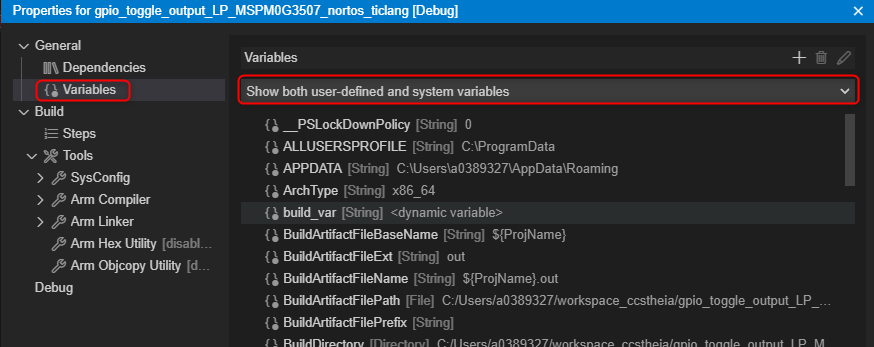
Variables: Displaly both user and system defined build variables available to the project.
6.1.3.1.2. Build Properties
To view and customize Build Properties, right-click on a project and go to Properties, then expand on Build in the left pane. Several additional properties will appear underneath.
Steps: Pre-build and Post-build steps.
Pre-build steps are steps that run before the main project build takes
place.
Post-build steps are steps that run after the main project build
takes place.
See Pre and Post Build
Steps for more information.
Link Order: Defines the order in which files are passed to the linker.
Tools: The bulk of the properties lie underneath:
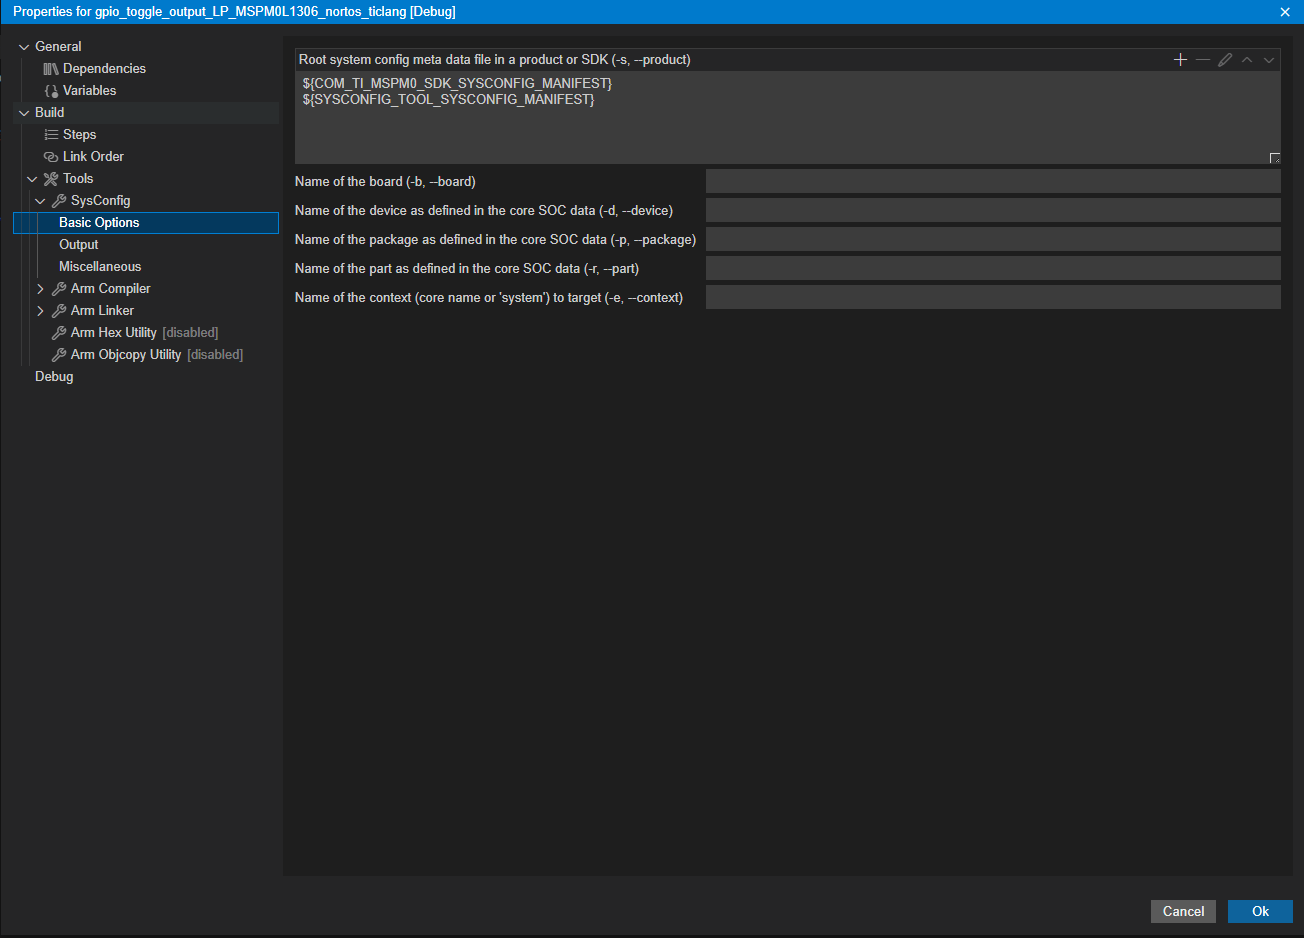
SysConfig: SysConfig options
Edit SysConfig flags, edit basic options or control the ouput directory for generated content.
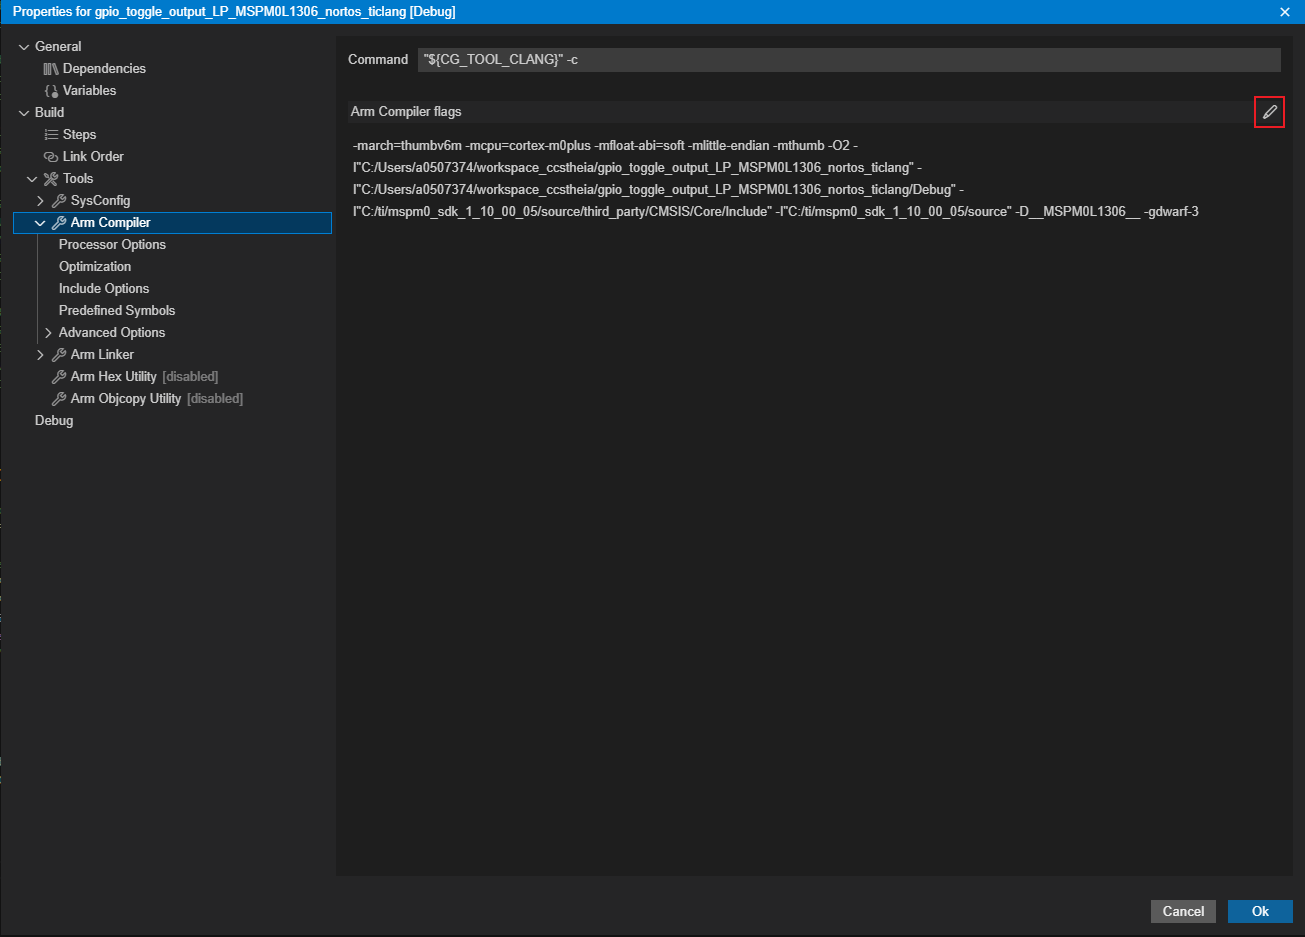
Compiler/Linker: Compiler and Linker options
There are several compiler and linker options available to control your build. The list of options is too vast to go into detail here. Refer to the Compiler and Assembly Language Tools Users Guides for details on the options supported by the compiler and linker respectively. In the Build properties dialog, these options are categorized into groups for easy identification. You can drill down into the Compiler and Linker sections in the CCS Theia GUI to access all of the available options.
Compiler and linker flags can also be added or removed directly via the Edit Flags button.
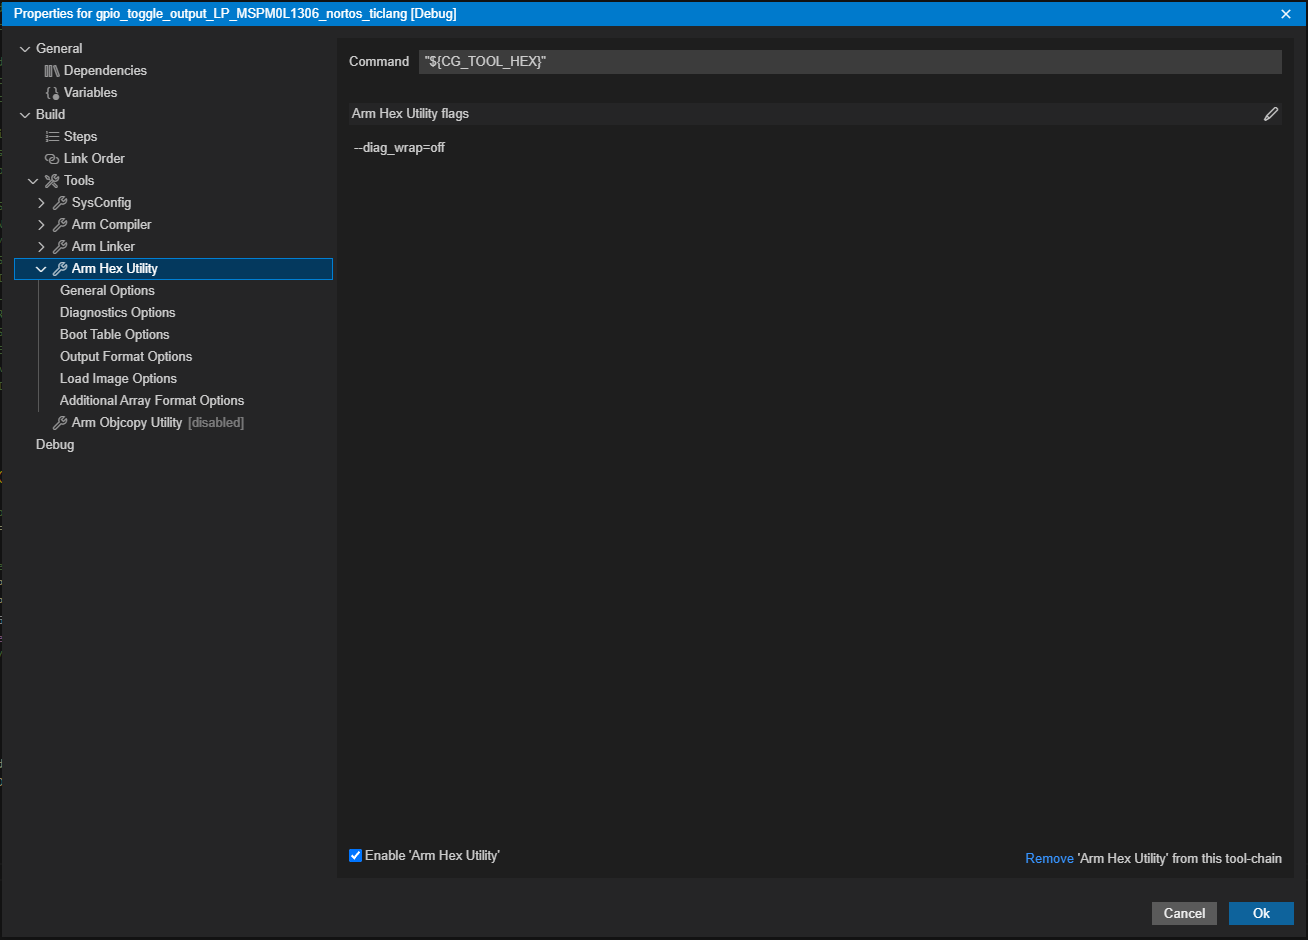
Hex Utility: Hex utility options
The Hex Utility can be enabled and invoked as part of the build in CCS Theia. By default, the Hex Utility is disabled for a new CCS project. Once enabled, there are several options available. Refer to the Assembly Language Tools Users Guides for details on the options supported by the Hex Conversion Utility.
Hex utility flags can also be added or removed directly via the Edit Flags button.
For additional information on the Hex Utility integration into CCS, refer to the Hex Utility in CCS page.
6.1.3.1.3. Debug
See: Debug Properties
6.1.3.2. Parallel Builds
Enabling the parallel build option speeds up compilation time by taking advantage of the multi core PCs that are very common these days. This can be especially beneficial when working with large projects.
This option is enabled by default in new CCS projects and most TI example projects.
Note
When parallel builds are enabled, the messages/banners in the CCS build console will be interleaved due to the multiple jobs running at the same time.
6.1.3.3. Pre and Post Build Steps
As part of the CCS build, you can define pre-build and post-build steps.
Pre-build steps are steps that run before the main project build
takes place.
The pre-build step is always executed even if the state of
the main build is up to date. An attempt to execute the main build will
occur regardless of the success or failure of executing the pre-build
step.
Post-build steps are steps that run after the main project build
takes place.
The post-build step is not executed if the state of the
main build is determined to be up to date. It will be executed only if
the main-build has executed successfully.
One common use-case for post-build step is to convert the executable
(.out) created by the project into a hex or binary format using the
hex converter or other utilities such as tiobj2bin. The hex
converter is part of the compiler toolset (can be found in
\ccs\tools\compiler\<compiler_version>\bin within CCS installation) and
tiobj2bin is included with CCS (can be found in
\ccs\utils\tiobj2bin within CCS installation).
To set pre and post build steps in CCS, right-click on the project in the Explorer, go to Properties → Build → Steps and enter the desired commands in the Pre-build steps or Post-build steps fields.
For example, to convert the executable (.out) to binary format (.bin), the following command can be used as post-build step:
"${CCS_INSTALL_ROOT}/utils/tiobj2bin/tiobj2bin" "${BuildArtifactFileName}" "${BuildArtifactFileBaseName}.bin" "${CG_TOOL_ROOT}/bin/ofd2000" "${CG_TOOL_ROOT}/bin/hex2000" "${CCS_INSTALL_ROOT}/utils/tiobj2bin/mkhex4bin"
Be sure to replace ofd2000 and hex2000 with the respective binaries for your device, for example, ofd6x and hex6x (for c6000) or armofd and armhex (for ARM).
Note that some example projects in software packages like TivaWare and Simplelink SDKs already have a similar post-build, which you can use as reference as well.
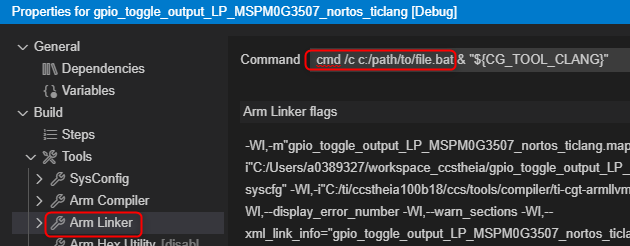
6.1.3.3.1. Adding Custom Steps
To add some custom steps or call a batch file after the compile step but before the link step, you can add a pre-link step to the command field in the Linker options, as shown below. The custom step is basically prepended before the existing command and separated with an ampersand. The below example adds a pre-link step to call a batch file.
6.1.3.4. Project Dependencies
Projects may be constructed such that the main project is dependent on other projects. A common use case is when a main project links in a library and the project for the library is set up as a referenced project. In this set up, when you build the main project, the referenced project will be built first and then the main project.
Project dependencies can be set up from the project properties of an existing project. In order to create a dependency, all referenced projects must be in the same workspace as the main project.
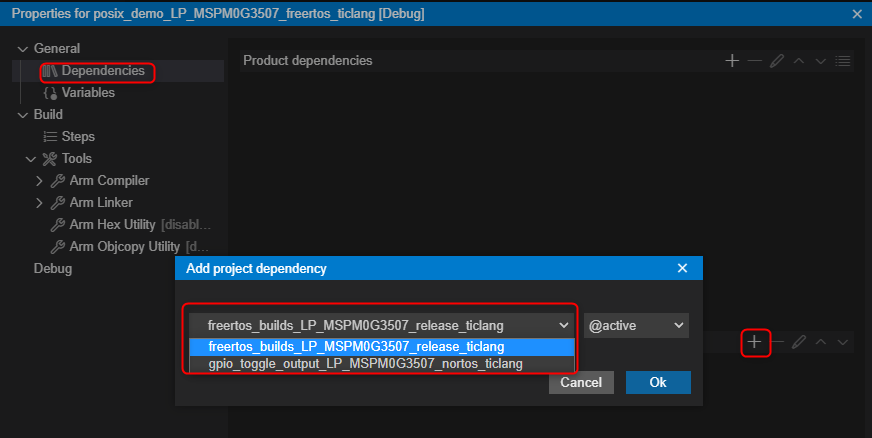
To create a project dependency:
- In Explorer view, right-click on the project and select Properties.
- Select General → Dependencies in the left pane and note the Project dependencies section in the right pane.
- Click on + button, choose the project to add to the list of dependencies and click OK.
The drop-down list after the project name allows you to choose which build configuration to use when building the referenced project. Note that this setting will apply for the active build configuration of the main project. This setting lets you control which build configuration of the referenced project will be built prior to building a specific build configuration of the main project.

Creating a dependency does not mean that the library generated by the dependent project is automatically linked into the main project. It simply means that the dependent project will be built prior to the main project so any changes made to the dependent project since last build will be picked up. The library file will still need to be manually linked to the main project. This can be done either by linking the library file to the main project or by adding the library name and path to the main project’s linker options.
6.1.3.5. Exclude Files from Build
By default all files and folders within the CCS Theia project folder are assumed to be part of the project build.
To exclude file(s) or folders from the CCS project build, right-click on the file or folder in the Explorer view select Exclude from Build.
With the default settings, files (or folders) excluded from build will appear crossed out in Explorer.
Another option to exclude a folder (and all content within) is to create a
blank file with the filename .exclude. CCS Theia will automatically
exclude all files within the folder from the project build.
6.1.3.6. Changing Compiler Versions
All CCS Theia releases come bundled with specific version(s) of compiler tools. During project development phase you may want to build your project with a different version of compiler tools than what is included with CCS Theia. One reason may be to avail of bug fixes and enhancements in newer versions of compilers, another reason may be to stay locked down on an older version of the compiler. CCS Theia is very flexible in allowing you to do this.
To view the version of compiler used for the project build, right-click on the project in the Explorer view and go to Properties → General, and view the Compiler field. If the project imported into CCS was originally created with a version of compiler tools different than what is installed in your machine or what CCS is set to use, that information will be shown in the Compiler version field.
The drop-down menu in the Compiler field will show the different versions available to use if there is more than one version discovered/installed into CCS Theia.
If you wish to build with a different version of compiler tools than what is already available, you can install the specific version and have CCS Theia discover it. Please see the Compiler Installation and Selection article for details.
6.1.3.7. Build Configurations
During development, it is quite common to have the need to create a single project that builds executables (.out files) with different project options, source files or even for different memory configurations. In CCS this is done with Project Build Configurations.
A Project Build Configuration defines a set of build options and resources at the project level that can be labeled and easily accessible with a very minimal number of steps. Therefore, by creating multiple build configurations within a single project it is possible to organize and quickly switch between different sets of options and resources.
Many CCS Theia projects have two build configurations: Debug and Release. The Debug build configuration usually has no optimization and full symbolic debug enabled, to enable easy debugging. The Release build configuration will often have optimization enabled and symbolic debug disabled, to get your code as small or fast as possible without the need for source level debug. These are just the options usually set for the default build configurations, it could be different for different device families, so it is best to check the default options set for each build configuration and tweak it as necessary.
When a project is imported into CCS Theia, the first configuration (in alphabetical order) is set to active in the workspace. Usually this is the Debug configuration but may be different depending on the configuration names.
Note that some example projects provided by TI may have custom configuration names other than Debug and Release. For example, projects in C2000Ware may have RAM and Flash configurations, where one is set up to run from RAM and the other to run from Flash. Based on the configuration, the project may use a different linker command fle and may or may not include certain source files.
When a project is built, the output files generated by the build are placed in a configuration-specific subdirectory. For example, if the project is in the directory MyProjects, the output files for the Debug configuration will be placed in MyProjects\Debug. Similarly, the output files for the Release configuration will be placed in MyProjects\Release.
To change the active configuration:
- Right-click on the project in the Explorer.
- Go to Build Configurations and select the desired configuration.
To create and manage your own custom configurations:
- Right-click on the project in the Explorer.
- Go to Project → Build Configurations → Manage....
OR - In the main menu, go to Build Configurations → Manage...
From the opened dialog, you can delete, rename and create new configurations. When creating a new configuration there are several options available to copy a base set of options/settings.
6.2. Building Projects
There are several options available for building projects:
- Full Builds - re-build and re-link all the source files.
To re-build the currently active project: Select Rebuild Project(s) from project’s context menu.
To re-build all the open projects in the workspace: Select menu Project → Clean. Then Project → Build. - Incremental Builds - build and re-link only the source files that
were modified since last build.
To build the currently active project: Select menu Project → Build Project(s) or select Build Project(s) from project’s context menu.
To build all the open projects in the workspace: Select menu Project → Build All. This will build the active build configuration of all the projects in the workspace.
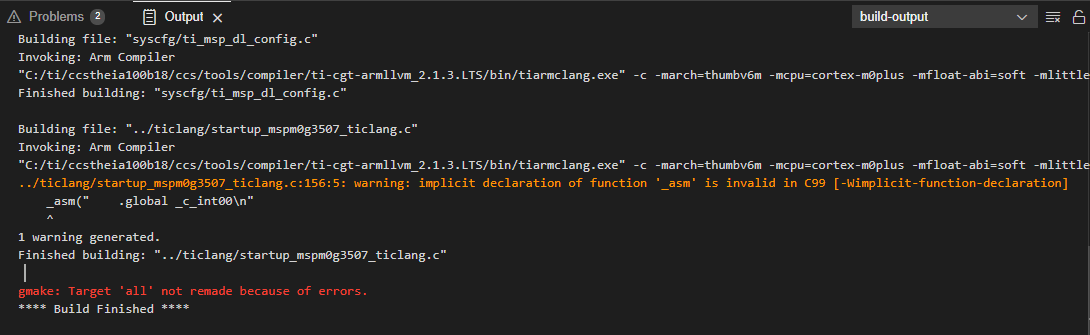
During the build, the Output view displays the standard and error outputs of the build tools.
When the build is finished, the Problems
view displays any errors or warnings.
If there are errors encountered during build, refer to the Build errors in CCS page. It discusses some of the more common build errors and warnings and how to resolve them.
6.2.1. Project Files and Build System Overview
CCS Theia projects use the Eclipse managed make system where the makefile is generated automatically and takes care of managing the toolchain and build details.
This section provides an overview of the project metadata files and describes what happens under the hood during the project create and build steps.
6.2.1.1. Create Project
When a new CCS project is created, the following project metadata files and folders are created in the project folder:
- .ccsproject: Stores project settings contributed by TI.
- Ex: Stores initial device/toolchain settings entered by user at project creation.
- .cproject: Stores project settings contributed by CDT (C/C++ Development Tooling).
- Ex: Stores most of the build properties under the ‘Build’ section (most of the compiler/linker options).
- .project: Stores project settings contributed by Eclipse.
- Ex: Stores information for linked resources, linked resource variables, resource filters.
- .settings (folder): Stores project specific settings that differ from the default CCS settings.
- Ex: Workspace preferences
The .ccsproject file holds a snapshot of selections made at the time of project creation, and rarely changes after that. So if you change properties such as the device-variant or compiler tools version, the change is not stored in the .ccsproject file, but instead stored in the .cproject file.
The .ccsproject file is mainly a historical left-over from the days when some settings were stored on a project-level (as opposed to build-configuration-level). But the file is still currently used to:
- Allow the user to roll back certain settings to their original values.
- Store some project-wide settings, such as the connection for debugging ( and maybe other settings in the future).
Although it seems like this file stores some unnecessary information, it could be helpful when trying to debug issues.
The .ccsproject, .cproject, .project files are XML files. It is generally NOT recommended to manually edit these files unless you are an expert user and have a good understanding of what you are modifying.
6.2.1.2. Build/Rebuild Project
When a CCS Theia project is built for the first time or rebuilt, it goes through the following steps:
- Auto-generate makefiles:
Generates main makefile and several *.mk include files in the active project configuration folder (such as Debug folder, by default).- makefile: Main makefile that includes the generated *.mk files
- All of the sources participating in the build are defined in the
below *.mk files
- objects.mk
- subdir.mk
- subdir_vars.mk
- Optionally clean using ‘gmake’ (when selecting Rebuild
Project or Clean Project).
Deletes .obj, .pp and .out files in the active configuration folder (such as Debug folder, by default). It does not delete makefiles and .map files. - Build the main makefile using ‘gmake’.
The main make build in turn invokes the below steps:- Execute any specified Pre-build step.
- Execute main build. This is the bulk of the build where the build commands are passed to the build tools to build/compile the source files and generate the main executable file.
- Execute any specified Post-build step.
6.2.1.2.1. Pre-build
Pre-build steps are steps that run before the main project build takes place.
For details on setting up and using the pre-build step in CCS Theia, see the section Pre and Post Build Steps.
6.2.1.2.2. Main Build
When a project is built in CCS, the main build is the step where the build commands and input files are passed to the Compiler tools, and optionally to other tools like the SysConfig tool that can be used to configure components like TI Drivers and device-specific components (such as the networking stack, EasyLink, and WiFi) on SimpleLink devices. Each build tool takes in a set of input files and generates a set of output files.
The figure below shows a typical software development flow and gives an idea of the build tools and files involved when a project is built in CCS. All of this is handled in the background by the makefile, however it is helpful to have an understanding of the build flow to better understand the build output that appears in the CCS build console.
The build tools components are highlighted in blue and the input/output files are highlighted in white . The RTSC Tools and SysConfig Tools are dotted to show that they come into play only when working with RTSC and/or SysConfig.
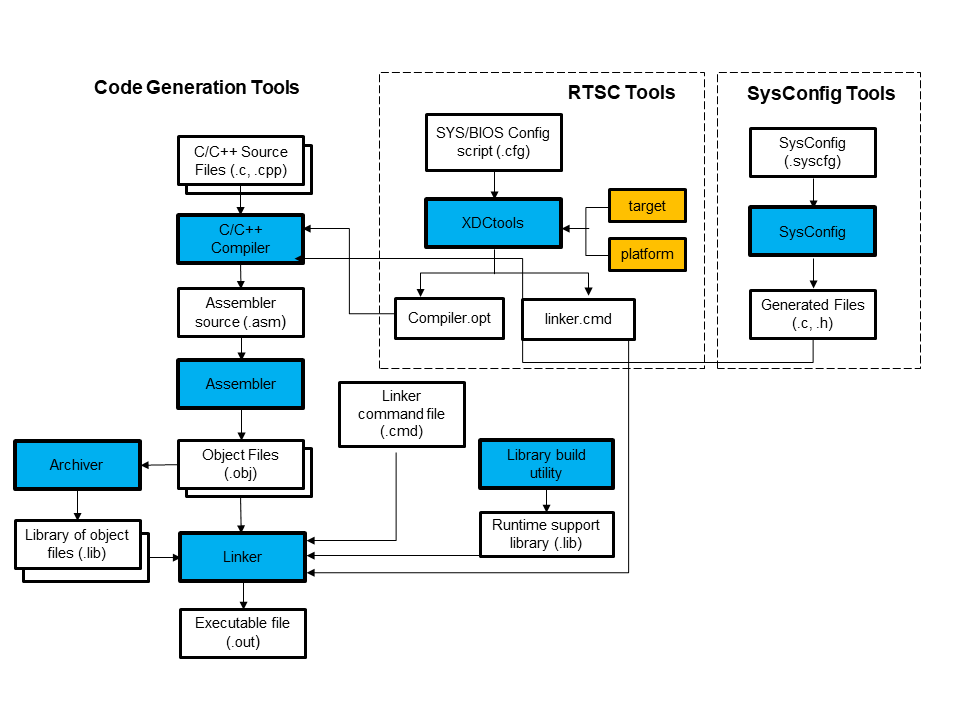
The most common path of software development flow, in the absence of RTSC or SysConfig, is the straight path going from C/C++ Source Files down to the Executable file through the Compiler, Assembler and Linker. The Assembler step usually runs in the background and is hidden from the user. The Archiver and Library build utility are peripheral functions that enhance the process and may or may not be run depending on the requirements.
If the project is a RTSC project, the XDCtools run first and generate output files that are then passed to the compiler and linker.
If the SysConfig tool is used to configure components, the SysConfig command runs prior to the compiler and generates output files (.c, .h) that are then passed to the compiler. The files generated by SysConfig will depend on which SDK components are integrated into the application. As more SDK components start to be integrated with SysConfig, more files will be generated.
For more information on each of the tools shown in figure, please see the references below:
Compiler: accepts C/C++ source files and produces assembly language source code.
See the Compiler Users Guide for your specific processor family.Assembler: translates assembly language source files into machine language relocatable object files.
See the Assembly Language Tools Users Guide for your specific processor family.Linker: combines relocatable object files into a single absolute executable object file. It accepts relocatable object files and object libraries as input.
See the “Linker Description” chapter in the Assembly Language Tools Users Guide for your specific processor family.Archiver: collects a group of files into a single archive file, called a library. It also allows you to modify a library by deleting, replacing, extracting, or adding members.
See the “Archiver Description” chapter in the Assembly Language Tools Users Guide for your specific processor family.Library build utility: builds customized run-time-support libraries.
See the Assembly Language Tools Users Guide for your specific processor family.XDCtools: provides configuration tools used to create and build a static configuration as part of your application.
See the XDCtools User's Guide for more information.SysConfig Tool: tools used to create and build system configuration as part of your application.
See the section SysConfig for more information. Also refer to this article and the below documentation:- MSPM0: SysConfig Guide for MSPM0
- SimpleLink: SimpleLink MCU SDK User's Guide
- C2000: C2000 Academy
- Sitara MCU: Sitara MCU+ Academy
For more information on some of the input and output files in a typical CCS project build flow refer to the article Files in CCS Projects.
6.2.1.2.3. Post-build
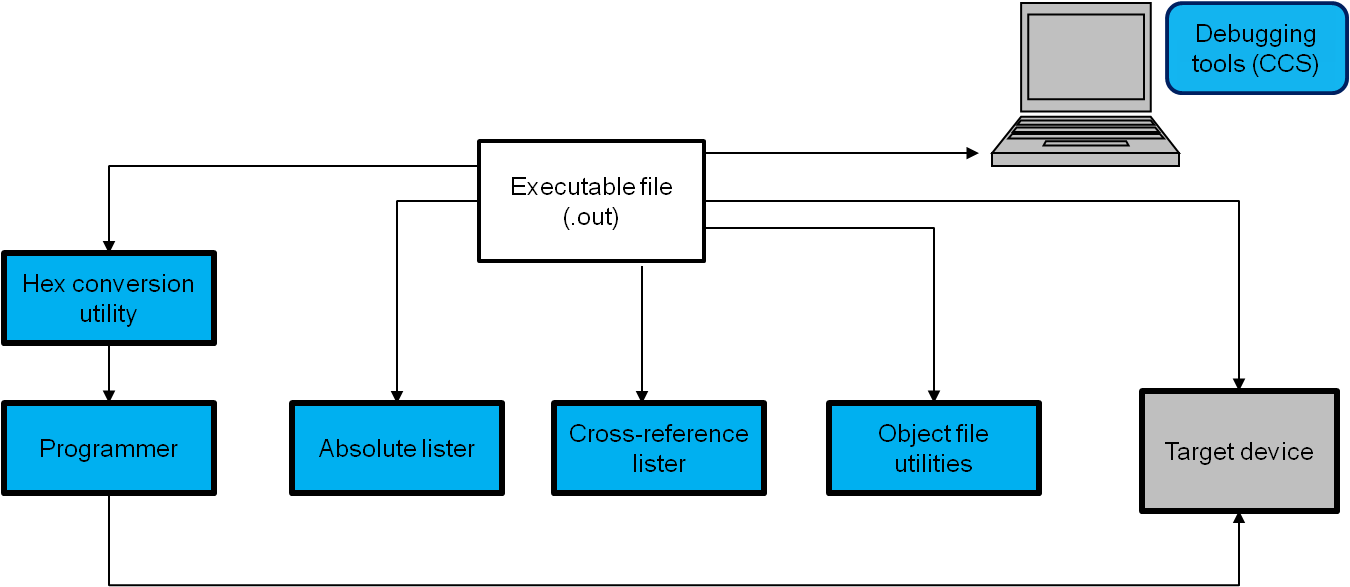
The main build step discussed above results in a executable file (.out). This file can be directly loaded to a target device and debugged using Code Composer Studio, or can be converted to a hex format and programmed to a target device by a hex programmer. Other types of post processing can also be performed on the .out file using utilities included with the compiler tools.
The figure below shows some of the typical post build operations.
For more information on each of the tools shown in figure, please see the references below:
- Hex conversion utility: converts an object file into other hex formats.
- Absolute Lister: accepts linked object files as input and creates .abs files as output. The .abs files can be assembled to produce a listing that contains absolute, rather than relative, addresses.
- Cross-reference Lister: uses object files to produce a cross-reference listing showing symbols, their definitions, and their references in the linked source files.
- Object file utilities: comprises of utilities such as Object File Display utility, Disassembler, Name utility and Strip utility.
Details on all the above tools are in the Assembly Language Tools Users Guide.
For details on setting up and using the post-build step in CCS Theia, see the section Pre and Post Build Steps.
6.2.1.3. Output View
At build time, the Output view displays the standard and error outputs of the build tools. When building multiple projects, the Output view will show the output for the active project selected in the Explorer view.
The view displays the options passed to the various build tools and any diagnostic messages reported by the build tools. Build warnings and errors are highlighted in different colors for easy identification.
The information reported in this view are often more detailed and useful than the summary reported in the Problems view.
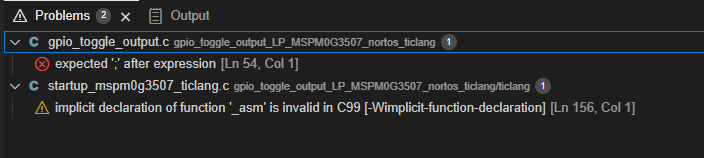
6.2.1.4. Problems View
The Problems view provides a summary of errors and warnings encountered during project build. When building multiple projects, the Problems view will display information for all project in the Explorer view.
Entries that appear will display the applicable source file name, the associated project, and the description of each error/warning with the location of the error (Line and Column number).