Firmware update process
The OAD process consist of 2 main participants:
The OAD Client is usually the peripheral device that is being updated. The OAD Client uses a Boot Image Manager (BIM) to facilitate the application of a new firmware update image. In addition, a host computer may transfer a new firmware image to the server.
Warning
If the device is connected to an external debugger when performing an OAD, the device could potentially not reset properly after a successfull OAD. This is a known issue, however, simply unplugging/replugging or hard reset the device will make the device boot properly. Read more about this in detail in Section Halt In Boot (HIB).
The BIM on the client device runs on every device reset and determines if a firmware update is to be applied. If no update is stored, then the BIM will transfer program execution to the application image. The behavior of the BIM is dependent upon the selected OAD type and further described in the respective off-chip and on- chip sections below.
The OAD Server is usually the central device that is supplying the firmware update image. Figure 62. shows their relationship.
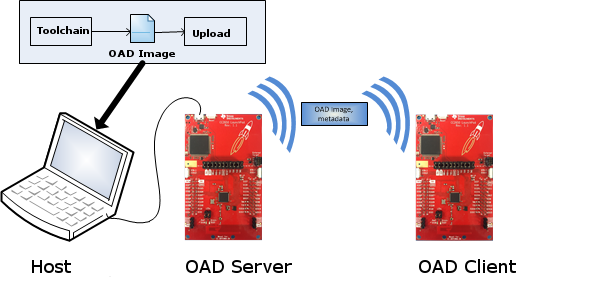
Figure 62. OAD Server and OAD Client
A complete OAD process consists of the following steps:
- The host creates a new firmware image.
- The host uploads the firmware image to the OAD Server.
- The OAD Server distributes the image to one or more OAD Client devices.
- The OAD Client validates the image and stores it at an intermediate location.
- The BIM on the client device replaces the existing firmware image with the new image.
These steps are explained more in detail throughout the following sections. They are generic though. For detailed step-by-step instructions, have a look at the example README files of the corresponding example projects in the SimpleLink CC13x0 SDK.
Firmware image creation
- An updatable firmware is designed like a usual application, but with the
following differences:
- The OAD module needs to be included to process and store incoming firmware images.
- A modified linker script is required to reserve room for the image header at the front of the application.
- Once the image has been linked, metadata has to be computed and merged into the firmware
binary. This is done by a python script called
oad_image_tool.py. It can be found in the folder<SDK_INSTALL_FOLDER>/tools/<STACK>/oad/.
This results in unified binary file containing a header with metadata and followed by the firmware image.
Upload to the OAD Server device
The firmware image created in the previous step needs to be uploaded to the OAD server device for further distribution. This step is application-specific. New images might be delivered via a point-to-point connection or broadcasted to all nodes.
The rfWsnConcentratorOadServer example provides a UART terminal interface
that allows a firmware image to be uploaded on-the-fly to a
rfWsnNodeOadClient. This is done by a script oad_write_bin.py which
can be found in the folder <SDK_INSTALL_FOLDER>/tools/<STACK>/oad/.
Distribution of the firmware image
The OAD Server distributes the image to one or more OAD Client devices. This step is application-specific.
Image validation and storage on the OAD Client
The OAD client application will implement an ‘OAD State Machine’ for performing the OAD and then store the image either to internal or external flash. After succeeding, it performs a reboot of the device.