3.9. Multimedia
Introduction
TI’s embedded processors such as AM57xx have following hardware accelerators.
- IVA (Image and Video Accelerator) for accelerating multimedia encode and decode.
- VPE (Video Processing Engine) for Scaling, Color Space Conversion and Deinterlacing.
- C66x DSP cores for offloading certain image/video and/or voice/audio processing.
In order to make it easy for customers to write applications, and to leverage open source elements that provide functionality such as AVI stream demuxing, audio encode/decode, etc, TI’s PROCESSOR-SDK supplies ARM based GStreamer plugins that abstracts the hardware accelerator offload.
This multimedia training page will cover the following topics.
- Capabilities of IVA-HD, VPE, DSP, and ARM
- Out of Box Multimedia Demos in PROCESSOR-SDK
- Software Stack of Accerelated Codec Encoding/Decoding
- Gstreamer Pipelines for Multimedia Applications
- Gstreamer Plugins Limitations
- List of Features not Supported with Gstreamer
- DSP C66x Gstreamer Plugin Internals
- Rebuild IPUMM Firmware
- Load and Unload Firmware
Capabilities of IVA-HD, VPE, DSP, and ARM
In PROCESSOR-SDK, IVA-HD, and hence the multimedia encoding and decoding applications, supports the following codecs.
- Video Decode: H264, MPEG4, MPEG2, and VC1
- Video Encode: H264, and MPEG4
- Image Decode: MJPEG
Codec datasheet can be downloaded from git repository here - https://git.ti.com/ivimm/ipumm/trees/master/extrel/ti/ivahd_codecs/packages/ti/sdo/codecs
VPE supports video operations such as scaling, color space conversion, and de-interlacing.
- Supported Input formats: NV12, YUYV, UYVY
- Supported Output formats: NV12, YUYV, UYVY, RGB24, BGR24, ARGB24, ABGR24
DSP is a general purpose programmable core available for offloading signal processing kernels.
- Sample Image Processing Kernels integrated in the DSP gstreamer plugin: Median2x2, Median3x3, Sobel3x3, Conv5x5, Canny
Demo applications also demonstrate the following ARM based coding capabilities.
- Video decoding on ARM: H.265
- Audio encoding and decoding on ARM: AAC, MPEG2 (leveraging open source codecs)
Multimedia Demos Available via Matrix
The following Multimedia demos are available via Matrix on AM57xx EVM (X15 board with LCD). The table below provides a list of these demos, with a brief description.
| Demo Name | Details |
| IVAHD H264 Decode | This demo runs a gstreamer playbin pipeline to decode H264 using IVAHD. The demo plays back audio as well and you can listen if speakers are connected. |
| IVAHD H264 Encode | This demo runs a gstreamer pipeline to do H264 encoding on IVAHD. The input clip is in NV12 format. The output is saved to /home/root directory |
| AAC Decode | This demo runs a gstreamer playbin pipeline for ARM audio decoding and playout. |
| H.265 (HEVC) Decode | This demonstrates HEVC decoding on ARM. The gstreamer pipeline decodes and display an H265 stream. |
| VIP VPE IVAHD MPEG4 Encode and Decode | This demonstrates video capture via Video Input Port (VIP), color space conversion and scaling with Video Processing Engine (VPE), IVAHD MPEG4 encoding, IVAHD MPEG4 decoding and display |
| DSP C66 Image Processing | This demonstrates the use of DSP C66x plugin (dsp66videokernel) for offloading image processing tasks to DSP. |
Software Stack of Accelerated Codec Encoding/Decoding
As shown in the figure below, the software stack of the accelerated codec encoding/decoding runs on two subsystems: MPU subsystem on ARM-A15, and IPU subsystem on ARM-M4. The two subsystems communicate with each other through RPMSG. At the highest level in MPU subsystem on ARM-A15, there is Linux user space application which is based on Gstreamer. GStreamer is an open source framework that simplifies the development of multimedia applications. The GStreamer library loads and interfaces with the TI GStreamer plugin (GST-Ducati plugin), which handles all the details specific to use of the hardware accelerator. Specifically, TI GStreamer plugin interfaces libdce in user space. On one hand, libdec interacts with libdrm in user space for displaying video in Wayland window system. On the other hand, libdce interfaces with RPMSG in Linux kernel to communicate with the IPU subsystem on ARM-M4. The IPU subsystem builds on SYS/BIOS RTOS and runs IVAHD video/image codecs, utilizing framework components and codec engine.
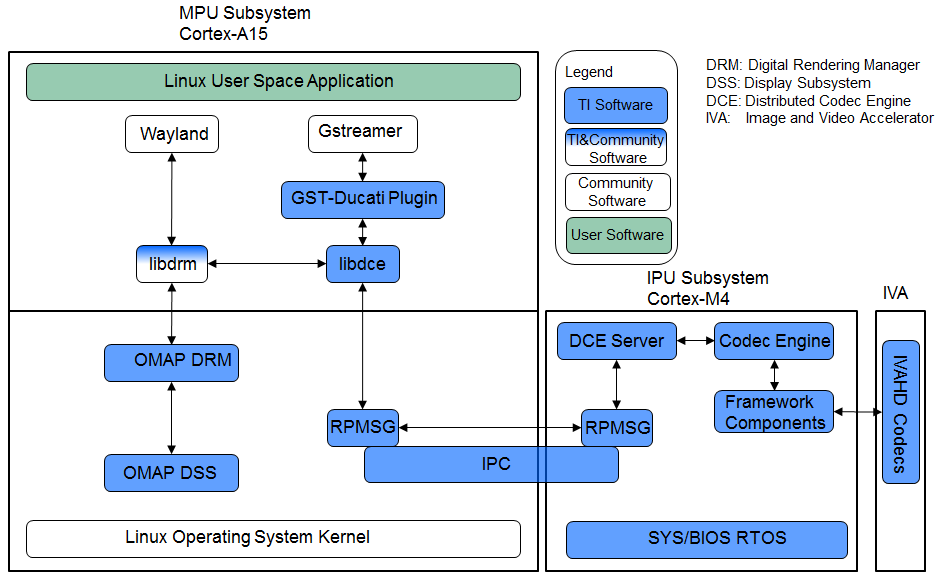
Overview of the Multimedia Software Stack
The Multimedia software contains many software components. Some are developed by Texas Instruments and some are developed in and by the open source community(White). TI contributes, and sometimes even maintains, some of these open source community projects, but the support model is different from a project developed solely by TI.
Gstreamer Pipelines for Multimedia
Open Source GStreamer Overview
GStreamer is an open source framework that simplifies the development of multimedia applications, such as media players and capture encoders. It encapsulates existing multimedia software components, such as codecs, filters, and platform-specific I/O operations, by using a standard interface and providing a uniform framework across applications.
The modular nature of GStreamer facilitates the addition of new functionality, transparent inclusion of component advancements and allows for flexibility in application development and testing. Processing nodes are implemented via Gstreamer plugins with several sink and/or source pads. Many plugins are running as ARM software implementation, but for more complex SoCs certain functions are better executed on hardware accelerated IPs like IVAHD (video codecs) or VPE.
Gstreamer is multimedia framework based on data flow paradigm. It allows easy plugin registration just by deploying new shared objects to /usr/lib/gstreamer-1.0 folder. The shared libraries in this folder are scanned for reserved data structures identifying capabilities of individual plugins. Individual processing nodes can be interconnected as a pipeline in run-time creating complex topologies. Node interfacing compatibility is verified at that time - before pipeline is started.
GStreamer brings a lot of value-added features to Processor SDK, including audio encoding and decoding, audio and video synchronization, interaction with a wide variety of open source plugins (muxers, demuxers, codecs, and filters). New GStreamer features are continuously being added, and the core libraries are actively supported by participants in the GStreamer community. Additional information about the GStreamer framework is available on the GStreamer project site: https://gstreamer.freedesktop.org/.
TI Provided Gstreamer Plugins
One benefit of using GStreamer as a multimedia framework is that the core libraries already build and run on ARM Linux. Only a GStreamer plugin is required to enable additional hardware features on TI’s embedded processors with both ARM and hardware accelerators for multimedia. The TI GStreamer plugins provide elements for GStreamer pipelines that enable the use of plug-and-play IVAHD codecs, certain hardware-accelerated operations such as video frame resizing, de-interlacing, and color space conversion, image processing offloaded to DSP, and ARM based HEVC decoding. The TI GStreamer plugins provide baseline support for eXpressDSPTM Digital Media (xDM1) plug-and-play codecs. Multiple xDM versions are supported, making it easy to migrate between codecs that conform to different versions of the xDM specification.
Below is a list of TI GStreamer plugins provided in Processor SDK.
- Ducati Decoding and Encoding
- ducatih264dec
- ducatimpeg4dec
- ducatimpeg2dec
- ducativc1dec
- ducatijpegdec
- ducatih264enc
- ducatimpeg4enc
- Ducati VPE
- vpe
- ducatih264decvpe
- ducatimpeg2decvpe
- ducatimpeg4decvpe
- ducatijpegdecvpe
- ducativc1decvpe
- DSP Image Processing
- dsp66videokernel
- ARM HEVC Decoding
- h265dec
Visual Representation of Typical GStreamer Pipelines
A typical GStreamer pipeline starts with one or more source elements, uses zero or more filter elements, and ends in a sink or multiple sinks. This section provides visual representation of two typical gstreamer pipelines: 1) multimedia decoding and playout, and 2) video capture, encoding, and network transmission.
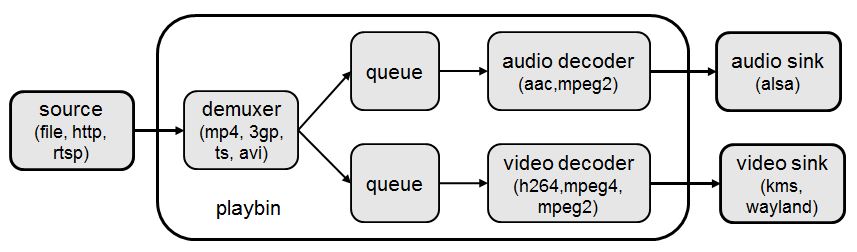
Decode Pipeline
The example pipeline shown in the figure below demonstrates the demuxing and playback of a transport stream. The input is first read using the source element, and then processed by gstreamer playbin2. Inside playbin2, demuxer first demuxes the stream into its audio and video stream components. The video stream is then queued and sent to TI ducati gstreamer plugin for decoding. Finally, it is sent to a video sink to display the decoded video on the screen. The audio stream is queued and then decoded by ARM audio gstreamer plugin, and then reaches its destination at the alsasink element to play the decoded audio.
Encode Pipeline
The example pipeline shown in the figure below demonstrates video capture, encode, muxing, and network transmission. The camera capture is processed by VPE, and then queued for video encoding. After that, it is queued for video parsing, muxing. Finally, it is sent to network through RTP payloader and udp sink.

Gstreamer test pipeline:
–need someone to add this code to make it work. only showing a figure.
Running a gstreamer pipeline
Gstreamer pipelines can also run from command line. In order to do so, exit Weston by pressing Ctrl-Alt-Backspace from the keyboard which connects to the EVM. Then, if the LCD screen stays in “Please wait...”, press Ctrl-Alt-F1 to go to the command line on LCD console. After that, the command line can be used from serial console, SSH console, or LCD console.
One can run an audio video file using the gstreamer playbin from the console. Currently, the supported Audio/video sink is kmssink, waylandsink and alsassink.
kmssink:
  target #  gst-launch-1.0 playbin uri=file:///<path_to_file> video-sink=kmssink audio-sink=alsasink
waylandsink:
  1. refer Wayland/Weston to start the weston
  2. target #  gst-launch-1.0 playbin uri=file:///<path_to_file> video-sink=waylandsink audio-sink=alsasink
The following pipelines show how to use vpe for scaling and color space conversion.
 1. Decode-> Scale->Display
    target # gst-launch-1.0 -v filesrc location=example_h264.mp4 ! qtdemux ! h264parse ! \
ducatih264dec ! vpe ! 'video/x-raw, format=(string)NV12, width=(int)720, height=(int)480' ! kmssink
 2. Color space conversion:
    target # gst-launch-1.0 -v videotestsrc ! 'video/x-raw, format=(string)YUY2, width= \
(int)1280, height=(int)720' ! vpe ! 'video/x-raw, format=(string)NV12, width=(int)720, height=(int)480' \
! kmssink
Note
- While using playbin for playing the stream, vpe plugin is automatically picked up. However vpe cannot be used with playbin for scaling. For utilizing scaling capabilities of vpe, using manual pipeline given above is recommended.
- Waylandsink and Kmssink uses the cropping metadata set on buffers and does not require vpe plugin for cropping
The following pipelines show how to use v4l2src and ducatimpeg4enc elements to capture video from VIP and encode captured video respectively.
Capture and Display Fullscreen
  target #  gst-launch-1.0 v4l2src device=/dev/video1 num-buffers=1000 io-mode=4 ! 'video/x-raw, \
format=(string)YUY2, width=(int)1280, height=(int)720' ! vpe num-input-buffers=8 ! queue ! kmssink
Note:
 The following pipelines can also be used for NV12 capture-display usecase.
 Dmabuf is allocated by v4l2src if io-mode=4 and by kmssink and imported by v4l2src if io-mode=5
 target # gst-launch-1.0 v4l2src device=/dev/video1 num-buffers=1000 io-mode=4 ! 'video/x-raw, \
format=(string)NV12, width=(int)1280, height=(int)720' ! kmssink
 target # gst-launch-1.0 v4l2src device=/dev/video1 num-buffers=1000 io-mode=5 ! 'video/x-raw, \
format=(string)NV12, width=(int)1280, height=(int)720' ! kmssink
Capture and Display to a window in wayland
  1. refer Wayland/Weston to start the weston
  2. target #  gst-launch-1.0 v4l2src device=/dev/video1 num-buffers=1000 io-mode=4 ! 'video/x-raw, \
format=(string)YUY2, width=(int)1280, height=(int)720' ! vpe num-input-buffers=8 ! queue ! waylandsink
Note:
 The following pipelines can also be used for NV12 capture-display usecase. Dmabuf is allocated by v4l2src
 if io-mode=4 and by waylandsink and imported by v4l2src if io-mode=5.
 Waylandsink supports both shm and drm. A new property use-drm is added to specify drm allocator based bufferpool to be used.
 When using ducati or vpe plugins, use-drm is set in caps as true.
 target # gst-launch-1.0 v4l2src device=/dev/video1 num-buffers=1000 io-mode=4 ! 'video/x-raw, \
format=(string)NV12, width=(int)1280, height=(int)720' ! waylandsink use-drm=true
 target # gst-launch-1.0 v4l2src device=/dev/video1 num-buffers=1000 io-mode=5 ! 'video/x-raw, \
format=(string)NV12, width=(int)1280, height=(int)720' ! waylandsink use-drm=true
Capture and Encode into a MP4 file.
  target #  gst-launch-1.0 -e v4l2src device=/dev/video1 num-buffers=1000 io-mode=4 ! 'video/x-raw, \
format=(string)YUY2, width=(int)1280, height=(int)720, framerate=(fraction)30/1' ! vpe num-input-buffers=8 ! \
queue ! ducatimpeg4enc bitrate=4000 ! queue ! mpeg4videoparse ! qtmux ! filesink location=x.mp4
Note:
  The following pipeline can be used in usecases where vpe processing is not required.
  target # gst-launch-1.0 -e v4l2src device=/dev/video1 num-buffers=1000 io-mode=5 ! 'video/x-raw, \
format=(string)NV12, width=(int)1280, height=(int)720, framerate=(fraction)30/1' ! ducatimpeg4enc bitrate=4000 ! \
queue ! mpeg4videoparse ! qtmux ! filesink location=x.mp4
Capture and Encode and Display in parallel.
  target #  gst-launch-1.0 -e v4l2src device=/dev/video1 num-buffers=1000 io-mode=4 ! 'video/x-raw, \
format=(string)YUY2, width=(int)1280, height=(int)720, framerate=(fraction)30/1' ! vpe num-input-buffers=8 ! tee name=t  ! \
 queue ! ducatimpeg4enc bitrate=4000 ! queue ! mpeg4videoparse ! qtmux ! filesink location=x.mp4 t. ! queue ! kmssink
Below provides more gstreamer pipeline examples.
File to file video encoding pipeline:
target # gst-launch-1.0 filesrc location=waterfall-352-288-nv12-inp.yuv ! videoparse width=352 height=288 format=nv12 ! video/x-raw, width=352, height=288 ! ducatih264enc ! filesink location=waterfall-352-288-nv12-inp_gst.h264
The cap filter of “video/x-raw, width=352, height=288” is needed in this pipeline to specify the width and height. Otherwise, variable width and height are configured for the encoder and the encoded output can be corrupted.
File to file 4K H264 encoding pipeline
target # gst-launch-1.0 filesrc location= 4k.nv12 ! videoparse width=3840 height=2160 format=nv12 framerate=12/1 ! video/x-raw, width=3840, height=2160 ! ducatih264enc level=51 profile=100 bitrate=16000 ! filesink location=4k.h264
Full HD at 60fps Encoding
target # gst-launch-1.0 videotestsrc num-buffers=1000 ! 'video/x-raw,format=(string)NV12,width=1920,height=1080,framerate=(fraction)60/1' ! ducatih264enc level=level-51 profile=high ! queue ! h264parse ! mp4mux ! filesink location=test.mp4
Multi-channel Encoding
target # gst-launch-1.0 -e v4l2src device=/dev/video1 num-buffers=1000 io-mode=4 ! 'video/x-raw, format=(string)YUY2, width=(int)1280, height=(int)720, framerate=(fraction)30/1' ! tee name=t ! vpe num-input-buffers=8 ! queue ! ducatih264enc ! queue ! h264parse ! qtmux ! filesink location=test.mov t. ! vpe num-input-buffers=8 ! 'video/x-raw, format=(string)NV12, width=(int)640, height=(int)480' ! queue ! ducatih264enc ! queue ! h264parse ! qtmux ! filesink location=test1.mov
Network Loopback
Sender:

target # gst-launch-1.0 -e v4l2src device=/dev/video1 io-mode=4 ! 'video/x-raw,format=(string)YUY2,width=1280,height=720,framerate=(fraction)30/1' ! vpe num-input-buffers=8 ! queue ! ducatih264enc intra-interval=1 ! h264parse ! rtph264pay mtu=200 ! udpsink host=127.0.0.1 port=5000 &
Receiver:

target # gst-launch-1.0 -v udpsrc port=5000 ! 'application/x-rtp,media=(string)video, clock-rate=(int)90000, payload=(int)96' ! rtph264depay ! h264parse ! ducatih264dec ! vpe ! 'video/x-raw,format=(string)NV12, width=320,height=240' ! waylandsink sync=false
Note:

Both pipelines must be executed on target board.
.. rubric:: ARM H265 (HEVC) decoding pipeline
target # gst-launch-1.0 filesrc location=<file>.265 ! 'video/x-raw, format=(string)NV12, framerate=(fraction)24/1, width=(int)1280, height=(int)720' ! h265dec threads=2 ! vpe ! kmssink
DSP offloaded image processing pipeline
target # gst-launch-1.0 filesrc location=<file>.265 ! 'video/x-raw, format=(string)NV12, framerate=(fraction)24/1, width=(int)1280, height=(int)720' ! h265dec threads=1 ! videoconvert ! dsp66videokernel kerneltype=1 filtersize=9 lum-only=1 ! videoconvert ! vpe ! 'video/x-raw, format=(string)NV12, width=(int)640, height=(int)480' ! kmssink
This pipeline decodes an H265 clip on ARM A15, offloads the image processing task (Sobel 3x3 kernel) to DSP, and the processed clip is then re-sized and displayed.
Processor SDK provides reference implementation of multiple image processing kernels, for which the pipeline can be configured as shown in the table below.
| Kernel Type | Definition in GST Pipeline |
| Median2x2 | dsp66videokernel kerneltype=0 filtersize=5 lum-only=0 |
| Median3x3 with luminance only | dsp66videokernel kerneltype=0 filtersize=9 lum-only=1 |
| Sobel3x3 with luminance only | dsp66videokernel kerneltype=1 filtersize=9 lum-only=1 |
| Conv5x5 | dsp66videokernel kerneltype=2 filtersize=25 lum-only=0 |
| User defined kernel with Sobel3x3 and luminance only | dsp66videokernel kerneltype=4 arbkernel=Sobel3x3 filtersize=9 lum-only=1 |
- Audio/Video decoding with http input source
target # gst-launch-1.0 playbin uri=http://<link_to_file> video-sink=kmssink audio-sink=alsasink
- Audio/Video decoding with rtsp input source First, set up and run RTSP server on host. Then, run the following command:
target # gst-launch-1.0 playbin uri=rtsp://<link_to_file> video-sink=kmssink audio-sink=alsasink
- Record real-time FPS of video decoding
target # gst-launch-1.0 -v playbin uri=file:///<path_to_file> video-sink=fpsdisplaysink audio-sink=alsasink > fps_log.txt
Note: please view fps_log.txt to find out the FPS information after the pipeline completes.
Gstreamer Plugins Limitations
- Gstreamer VPE plugin supports only YUY2, NV12, YUYV input/output formats.
- Not all encoder’s parameters are exposed as gstreamer encoder’s properties.
List of Features not Supported with Gstreamer
- DSS WB is not supported with gstreamer.
- Ivi-shell is not supported with gstreamer.
DSP C66x Gstreamer Plugin Internals
TI’s Processor SDK Linux supplies ARM based GStreamer plugin that abstracts C66x DSP offload. The primary goal of this DSP GStreamer plugin is to demonstrate how C66x can be used in GStreamer framework, in combination with other GStreamer plugins. The plugin, under the hood, uses OpenCL to dispatch to the C66x cores. This plugin provides sample DSP kernels and can be used as a reference to develop user’s own DSP kernels.
Overview of Existing Source Code
Source code of the DSP plugin can be found from https://git.ti.com/processor-sdk/gst-plugin-dsp66.
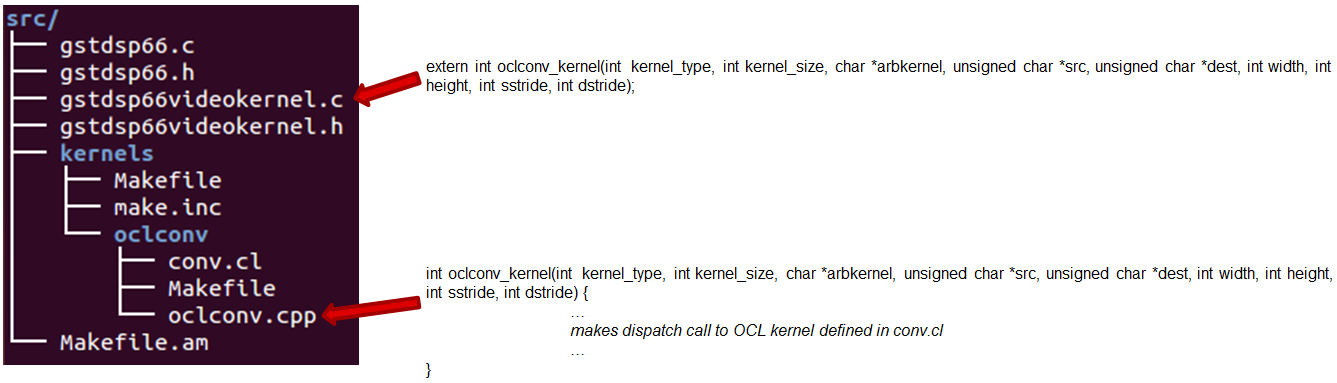
As shown in the figure below, the GST plugin code (gstdsp66*.c and gstdsp66*.h files) is directly under the ./src folder. It is implemented in C following GST framework requirements, and therefore it is compatible with the gstreamer version used in Processor-SDK-Linux.
Dispatch of work load to DSP is done via call to functions in independent shared objects, which are implemented in OpenCL code organized under the kernels folder. The kernels folder currently has a sub-folder of oclconv, which provides sample DSP kernels for image processing. As long as the APIs between the GST plugin code (in ./src folder) and OpenCL code (in ./src/kernels/oclconv folder) are the same, this shared object can be compiled and installed separately. This approach allows easier modification, implementation and maintenance once the APIs are fixed.
The image processing functions in oclconv are implemented via calls to DSP optimized imglib and vlib library functions, or implemented in OpenCL C.
- Kernels implemented with OpenCL C: Median2x2
- Kernels implemented with imglib function calls from OpenCL C: Median3x3, Sobel3x3, Conv5x5
- Kernels implemented with vlib function calls from OpenCL C: Canny
Adding Custom DSP Kernels
Using the existing oclconv as the template, more folders can be added under ./src/kernels folder to create shared libraries with additional wrappers (for functions invoked from GST plugin context) and OCL (host side and DSP) kernels. Makefile in ./src/kernels folder will attempt make in all sub-folders. Each sub-folder will provide independent shared library object that can be invoked from gstdsp66 context (e.g., function calls in ./src/gstdsp66videokernel.c file). Individual shared object libraries can be independently recompiled and updated in the target file system.
Modifying the Existing Plugin
The DSP plugin also allows easy modifications and additions, and below are some examples.
Currently the DSP plugin provides five sample image process operations: 1) Median2x2; 2) Median3x3; 3) Sobel3x3; 4) Conv5x5; and 5) Canny. Users can modify the source code to add more image processing operations as needed.
Currently the DSP plugin provides properties as below. More properties can be added so that they can be passed from gst-launcher.
- kerneltype: select the kernel type
- filtersize: the size of the filter, choose from (5,9,25)
- lum-only: true for applying the filter on luminance only, false for applying on all three planes.
- arbkernel: provide a way to specify the name of the kernel invoked via OpenCL.
Details of a specific image processing kernel can also be modified, e.g., the coefficients for Conv5x5 kernel, which are defined in kernels/oclconv/conv.cl::kernel void Conv5x5() function.
Rebuilding and Installing the Plugin
After modifications/additions are made for the DSP plugin source code, the plugin needs to be rebuilt, and this can be done from the Yocto build.
First, please refer to Processor SDK Building The SDK to set up the build environment and bitbake the original recipe for gstreamer1.0-plugins-dsp66, i.e.,
MACHINE=am57xx-evm bitbake gstreamer1.0-plugins-dsp66
After the bitbake command above is successfully done, ./build/arago-tmp-external-linaro-toolchain/work/cortexa15hf-vfp-neon-linux-gnueabi/gstreamer1.0-plugins-dsp66/git-r<*> will be created with the original source code under the git sub-folder. Copy the modified and/or the newly added files to the git sub-folder, and rebuild the plugin referring to Rebuild Recipe.
Last, install the rebuilt plugin on target filesystem referring to Install Package. After the installation, the following files will be updated and/or added. Gstreamer framework includes seamless detection and registration of the new plugin.
- /usr/lib/gstreamer-1.0/libgstdsp66.so
- /usr/lib/liboclconv.so
- [optional] any additional shared library (as described in previous section), should be placed in /usr/lib
Rebuild IPUMM Firmware
Pre-built IPUMM firmware images can be located on target file system at /lib/firmware/dra7-ipu2-fw.xem4. In case there is a need to rebuild the IPUMM firmware, the instructions below are provided for rebuilding IPUMM firmware. It assumes that everything is done on a Ubuntu machine.
IPUMM GIT Repo
IPUMM is publically available at https://git.ti.com/ivimm/ipumm. To clone the git repository, execute the following command.
git clone git://git.ti.com/ivimm/ipumm.git
To checkout a particular tag, e.g., 3.00.09.01, run the following command:
cd ipumm
git checkout [tag, e.g., 3.00.09.01]
IPUMM Build Tools
Making IPUMM depends on the following tools.
- Codec Engine: Codec Engine Product Releases
- Framework Components: Framework Components Product Releases
- IPC: IPC Product Releases
- XDAIS: XDAIS Product Releases
- BIOS: SYS/BIOS Product Releases
- XDC Tools: XDCTools Product Releases
- TMS470 CGT ARM: The compiler tools are provided as part of CCS.CCSv6 Download
Each release of IPUMM is verified with particular versions of the tools above. Check top level Makefile of ipumm to identify the versions to be downloaded and installed. For example, the tool versions used in IPUMM 3.00.09.01 are listed as below:
XDCVERSION      ?= xdctools_3_31_02_38_core
BIOSVERSION     ?= bios_6_42_02_29
IPCVERSION      ?= ipc_3_40_01_08
CEVERSION       ?= codec_engine_3_24_00_08
FCVERSION       ?= framework_components_3_40_01_04
XDAISVERSION    ?= xdais_7_24_00_04
# TI Compiler Settings
export TMS470CGTOOLPATH ?= $(BIOSTOOLSROOT)/ccsv6/tools/compiler/ti-cgt-arm_5.2.5
Below are direct download links and install instructions for IPUMM 3.00.09.01 build tools. When installing the tools, it is preferable to install all the tools to the same directory, e.g., /opt/ti.
- Download and untar codec_engine_3_24_00_08,lite.tar.gz
- Download and untar framework_components_3_40_01_04,lite.tar.gz
- Download and unzip ipc_3_40_01_08.zip
- Download and untar xdais_7_24_00_04.tar.gz
- Download and install bios_setuplinux_6_42_02_29.bin
- Download and untar xdctools_3_31_02_38_core_linux.zip
- Download and install CCSv6 Build#6.1.1.00022. Ensure that “TI ARM Compiler” is selected during the installation. After the installation, the compiler tools (version 5.2.5) are located at [ccs_install_dir]/ccsv6/tools/compiler/ti-cgt-arm_5.2.5.
Build IPUMM
Setup Environment
Export the following environment variables:
export BIOSTOOLSROOT=<path where all tools are hosted>
export IPCSRC=<path where IPC is installed>
export TMS470CGTOOLPATH=<path to CGTOOL ARM Compiler is installed>
Example for IPUMM 3.00.09.01 assuming all the tools are installed to /opt/ti directory:
export BIOSTOOLSROOT=/opt/ti
export IPCSRC=/opt/ti/ipc_3_40_01_08
export TMS470CGTOOLPATH=/opt/ti/ccsv6/tools/compiler/ti-cgt-arm_5.2.5
Build IPUMM
Follow the steps below to build IPUMM firmware.
export HWVERSION=ES10
cd ipumm
make unconfig
make vayu_smp_config
make clean
make ducatibin
After the build is completed, two different images will get created. Select the correct one for your devices.
 * dra7-ipu2-fw.xem4: This firmware will be used for Linux or Android.
The firmware is built with the resource table defined in platform/ti/dce/baseimage/custom_rsc_table_vayu_ipu.h
The corresponding map file is: platform/ti/dce/baseimage/package/cfg/out/ipu/release/ipu.xem4.map
 * dra7xx-m4-ipu2.xem4: This firmware will be used for QNX.
The firmware is built with the resource table defined in platform/ti/dce/baseimage/qnx_custom_rsc_table_vayu_ipu.h
The corresponding map file is: platform/ti/dce/baseimage/package/cfg/out/ipu/release/qnx_ipu.xem4.map
Firmware Loading and Unloading
The table below shows the remote cores and their corresponding
definitions in the kernel dtsi files
([ti-processor-sdk-linux-am57xx-evm-[ver]]/board-support/linux-[ver]/arch/arm/boot/dts/dra7.dtsi, and dra74x.dtsi),
as well as the argument to be used in the loading/unloading commands.
| Remote Core | Definition in dtsi file | Argument in loading/unloading |
| IPU1 | ipu@58820000 | 58820000.ipu |
| IPU2 | ipu@55020000 | 55020000.ipu |
| DSP1 | dsp@40800000 | 40800000.dsp |
| DSP2 | dsp@41000000 | 41000000.dsp |
For example, the argument of 55020000.ipu corresponds to IPU2 as can
be seen from dra7.dtsi.
ipu2: ipu@55020000 {
     compatible = "ti,dra7-rproc-ipu";
In the sections below, 55020000.ipu will be used as the example. For
a specific use case, please select the corresponding argument which is
applicable.
Unloading and loading remotecores at runtime
It is possible to unload and reload a remotecore at runtime from Linux
using the sysfs interface.
target $ cd /sys/bus/platform/drivers/omap-rproc/
target $ echo 55020000.ipu > unbind
target $ echo 55020000.ipu > bind
The echo 55020000.ipu > unbind command tears down the communication
channels between the A15 and the remotecore and unloads the remotecore.
Any application level shutdown that needs to be performed needs to be
handled by the system integrator.
The echo 55020000.ipu > bind loads the appropriate firmware binary
onto the remotecore.
Changing the remotecore binary at runtime
To change the remotecore binary at runtime
- Unload the remotecore using
unbind. - Change the remotecore binary in the firmware folder. Default location
is
/lib/firmwareon the target filesystem. - Load the remotecore using
bind.
target $ cd /sys/bus/platform/drivers/omap-rproc/
target $ echo 55020000.ipu > unbind
target $ cp /home/root/new-binary.xem4 /lib/firmware/dra7-ipu2-fw.xem4
target $ echo 55020000.ipu > bind
If it is desirable to avoid overwriting the existing remote binaries, the method of symbolic links can be used instead of direct copy. For example, Processor SDK provides two types of DSP remotecore binaries: one for DSPDCE (dra7-dsp1-fw.xe66.dspdce-fw) and another one for OpenCL (dra7-dsp1-fw.xe66.opencl-monitor). dra7-dsp1-fw.xe66 is created as a symbolic link by default pointing to the OpenCL binary. When it is needed to switch to DSPDCE, the symbolic link of dra7-dsp1-fw.xe66 can be updated pointing to dra7-dsp1-fw.xe66.dspdce-fw.
target $ cd /sys/bus/platform/drivers/omap-rproc/
target $ echo 40800000.dsp > unbind
target $ rm /lib/firmware/dra7-dsp1-fw.xe66
target $ ln -s /lib/firmware/dra7-dsp1-fw.xe66.dspdce-fw /lib/firmware/dra7-dsp1-fw.xe66
target $ echo 40800000.dsp > bind
After the switch, copycodectest application can be run to verify that DSPDCE firmware is loaded. This application fills the input buffer with a number entered as the argument and after process the output buffer is tested for the same pattern.
usage: copycodectest pattern.
Example:
target # copycodectest 123
Sample console output:
root@am57xx-evm:~# copycodectest 123
0x22070: Opening Engine..
Created dsp_universalCopy
Fill input buffer with pattern 123
Verifing the UniversalCopy algorithm
copycodectest executed successfully
Loading firmware during initial boot without using udev
During the default boot, firmware is supplied to the kernel by udev.
Starting the udev service on boot causes a few seconds increase in
boot time. In cases where a quick boot is required, the user may not
start the udev service in boot. In such cases, firmware can be
supplied to the kernel using the sysfs interface. An example script is
shown below.
FW_NAMES="dra7-dsp1-fw.xe66 dra7-dsp2-fw.xe66 dra7-ipu1-fw.xem4 dra7-ipu2-fw.xem4"
for FW in $FW_NAMES ; do
    echo 1 > /sys/class/firmware/$FW/loading
    cat /lib/firmware/$FW > /sys/class/firmware/$FW/data
    echo 0 > /sys/class/firmware/$FW/loading
done