Performing a BLE OAD
This section will detail the steps required to perform an OAD over BLE using BTool. It assumes that the OAD Target and Distributor have been setup according to Setting up the BLE OAD Environment.
Modifying the Image Version
Modifying the image version is a quick and easy way to verify that the OAD has completed. Some sample apps will display their image version in the terminal window.
Navigate to the
oad_image_header*.cfile in the SDK.Modify the
SOFTWARE_VERfield to increase the version numberRebuild the application project, and generate a new binary
*_oad.bin.- The oad_image_tool automatically runs as a post-build step
- The binary from the tool will be placed in the build folder alongside the
default
.outfile.
OAD using BTool
Connect to the target device using its BLE address
- See steps in OAD Target Setup for steps to get target address
- Screen shot below shows how to connect to a specific BLE address in BTool

Wait for the application’s connection parameter update (if enabled)
BTool will send a connection parameter update at the beginning of an OAD to attempt a faster download. The embedded application will also attempt a parameter update. It is recommended to wait until the application’s connection parameter update has taken place before starting an OAD. If you are experiencing a slow OAD, this may be the cause. The parameter update is complete once the following message is shown in the BTool log:
--------------------------------------------------------------------
[7] : <Rx> - 04:16:04.518
-Type           : 0x04 (Event)
-EventCode      : 0x00FF (HCI_LE_ExtEvent)
-Data Length    : 0x0B (11) bytes(s)
 Event          : 0x0607 (1543) (GAP_LinkParamUpdate)
 Status         : 0x00 (0) (SUCCESS)
 ConnHandle     : 0x0000 (0)
 ConnInterval   : 0x0024 (36)
 ConnLatency    : 0x0000 (0)
 ConnTimeout    : 0x00C8 (200)
Dump(Rx):
0000:04 FF 0B 07 06 00 00 00 24 00 00 00 C8 00       ........$.....
--------------------------------------------------------------------
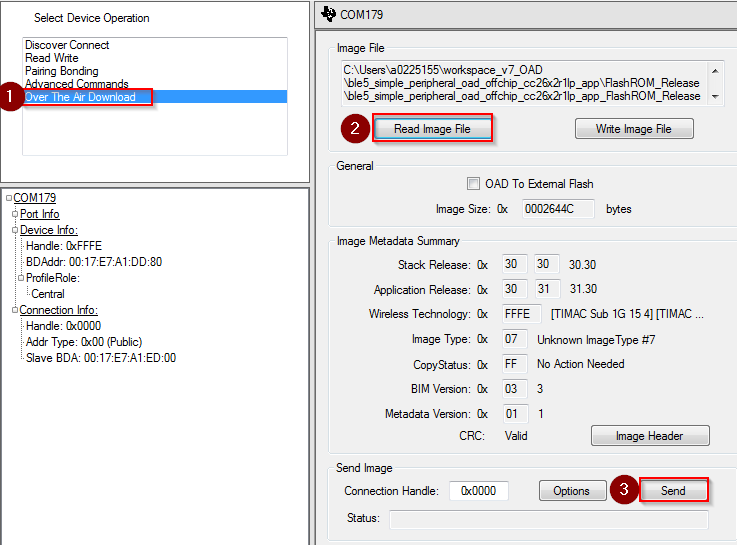
Once connected, switch to the OAD tab and load an oad image into BTool
- The OAD process has begin once the image identify is accepted.
- While intermittent blocks are being sent BTool will display:
Write Block Number = x of y- The OAD process will continue until BTool displays
OAD Download Successful.- After an OAD has completed, you may need to manually hit the reset button on the CC26x2 LaunchPad in order to trigger a full reset and jump to BIM. This step is only required after first programming the device. This will disconnect the debugger and terminate the debugging section.
- After some delay (copying in the BIM), the new image should bootup and will be active.
Note
The OAD Image Tool will run as a post build step to build an OAD
enabled image. The output of the tool is a bin file with _oad.bin
appended to the name of the input hex file. This is the file to pass into
BTool.