OAD Application
The application layer is responsible for plugging the OAD module. The OAD profile and communication with the BLE-Stack is encapsulated inside the OAD module. An application developer wishing to implement use the TI OAD solution will not need to worry about implementing the OAD state machine, but instead can just include the module and make the proper calls as detailed in Adding BLE OAD to an Existing Project. However, the details of the OAD application layer are documented here for completeness and to aide in debugging.
OAD Software Architecture
The building blocks of the OAD software architecture are detailed below. In the figure below the following terms have been abbreviated for compactness in the image.
- CB : Callback
- SVC: BLE Service
- Func: Function

Internally the OAD module is responsible for the following:
- Implementing the OAD profile
- Plugging the GATT read and write callback from the BLE5-Stack
- Serializing and de-serializing structures from over the messages
- Sending OAD related requests and responses to the BLE5-Stack to be sent over the air
- Queuing up messages from stack callbacks to be processed later by the application
- Implementing the OAD state machine, and ensuring proper state transitions
- Implementing the OAD inactivity timers
- Implementing getter/setter functions for the application to use and configure the OAD module
External to the OAD module the application task is responsible for the following. See Adding BLE OAD to an Existing Project more more information.
- Plugging an OAD event handler
- Calling the OAD event processing function in a task context when events are posted.
- Resetting the device when the
OAD_DL_COMPLETEevent is received.
A message sequence chart is included below to show a sample of an application’s interaction with the OAD module.

Figure 86. OAD Module/ Application interaction
OAD State Machine
The OAD module implements an ‘OAD State Machine’ for performing the OAD. The following state machine depicts the OAD module state transitions and its interactions with the OAD communication profile messages for both on-chip and off-chip OAD.
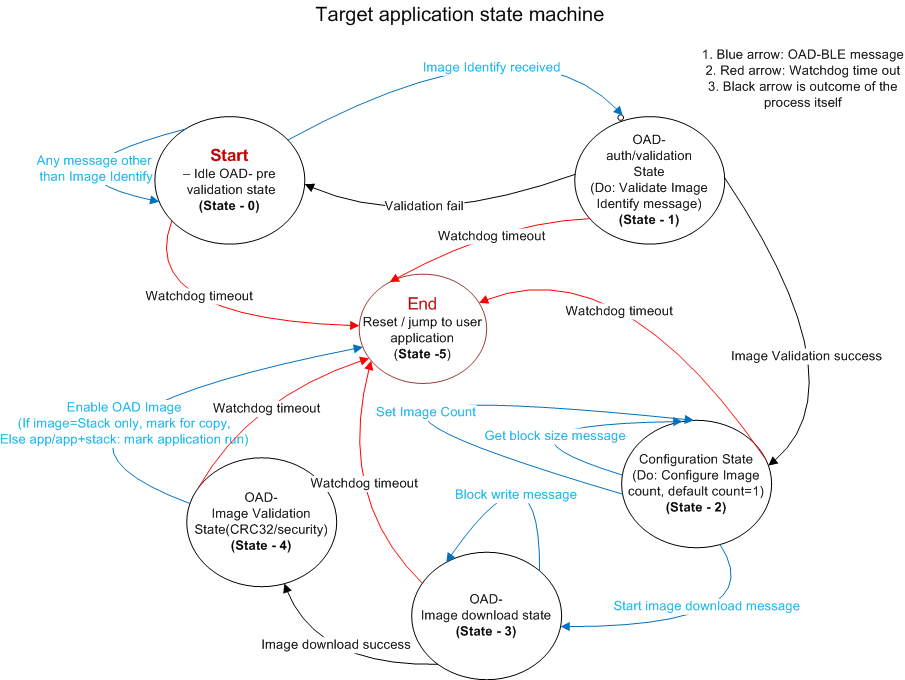
Figure 87. OAD Types Overview
The states and state transitions are encapsulated inside the OAD module, but some of the critical states are described below to aide in understanding.
Note these sections refer to internal state handling and transitions local to the target device. For a summary of the over the air sequence see Sequence diagram for OAD process and for a breakdown of the different types of profile messages and how to interpret them over the air please see BLE-Stack OAD Profile.
Image Validation
After establishing a new connection, updating the connection interval for a faster OAD and enabling notifications of OAD Image Identify and OAD Image Block characteristics on the OAD target, the OAD distributor shall write to the Image Identify characteristic of the OAD target. The message data will be the header retrieved from the OAD Image available for OAD.
On receiving the Image Identify message, the OAD target will verify that the contents of the image can be supported. This is done by checking the Image Header fields, BIM & header versions, and length of the image.
The OAD target will then perform boundary checks in the case of an Application Only or Stack Only OAD. This is done to ensure no boundary violations will occur between the upgraded image and the images that remain on the device.
Image Block Transfers
After the Image Validation has completed, the OAD target will switch to the configuration state. There it will get the block size and set image count. When the OAD distributor sends the Start OAD Command to the Control Characteristic (for more details see OAD Control Characteristic Supported Commands.), the OAD target will respond with a Control characteristic notification requesting the first block. The OAD distributor will then send the first block to the OAD target.
This process continues with the OAD target notifying the OAD distributor of the next block it needs and the OAD distributor sending the requested image block until all blocks have been transferred.
Completion of the OAD Process
After receiving the complete image, the CRC32 of the entire image will be calculated and the’CRC32 status’ bytes will be set accordingly. If the computed CRC matches with the ‘CRC’ field of received image, it switches to ‘End’ state.
For off-chip OAD, after OAD process is finished, the OAD target checks that the previous state was OAD Validation. If not, the state machine is reset and any used buffers are freed.
Next, the Application checks to see if there are any more images waiting to be downloaded. If there are, the Application will return to the Image Download state. If there are no more images to download, the OAD target will check to see if the image that was downloaded should be copied to internal flash.
If the Enable OAD Image Command has been received, the new image will be copied to internal flash and the device will be reset. If not, the currently resident image will continue regular execution.