Linux Border Router Quick Start
Warning
Please note this is an alpha release, as such some items are not fully functional. These include commissioning and a full Border Router, and matching Android Thread Commissioning Application.
The focus of this tutorial is to help developers get a border router solution that will allow a other devices to communicate with an OpenThread device using CoAP.
This document is written for, and with the intent of using a BeagleBone Black as the Linux host that runs the overall border router application.
This example will also run on a Linux host such as Ubuntu 16.04.
Note
This release, and this guide does not fully support the OpenThread
Border Router, instead this tutorial makes use of the OpenThread Border
Router Repository only for the purposes of the libcoap library and
tools. The Border Router repository contains a copy of libcoap and the
required patches to libcoap to make libcoap function with OpenThread.
Platform Notes
Embedded Devices
This tutorial focuses on using two TI-OpenThread Stack examples with some optional extra examples.
- An NCP (network co-processor) device
- A CLI (command line interface) device
- (optional) doorlock, temperature sensor, thermostat, or shade.
The NCP example will connect to a Linux machine using a serial port. This getting started guide assumes that you are using a CC26X2R1 LaunchPad, using the XDS110 built-in USB-to-serial converter.
The application on the host processor (wpantund) will send commands to the
NCP over UART using the Spinel protocol. These commands will configure the
OpenThread stack on the NCP, and will be used to send and receive network
traffic.
Setting Up the BeagleBone Black
This section will cover connecting to the BeagleBone Black, creating a microSD card image, and expanding the image with the BeagleBone Black.
Required Hardware Components:
- BeagleBone Black (BBB)
- 8Gig (or larger) SD Card, (it is helpful to have several SD Cards in case you want to clone)
- 5V Power Supply for the BBB
- Ethernet Cables to connect the BBB to your network
Software Tools:
- The BBB SD Card Image of your choosing
- See below for details
- Internet access for the BBB
- 7Zip - to decompress the Image (the BBB images are .xy compressed) Link: http://www.7-zip.org/
- A means to write the image to an SD CARD, such as Win32Diskimage
- Windows: https://sourceforge.net/projects/win32diskimager/
- Linux: The program “dd” can also be used to write the image.
- Terminal Program such as Putty, TeraTerm or CoolTerm
- Serial settings: 115.2K Baud, 8bits, No Parity, 1 Stop, No handshake
- Link: Putty: https://www.chiark.greenend.org.uk/~sgtatham/putty/latest.html
- Link: TeraTerm: https://ttssh2.osdn.jp/index.html.en
- Link: CoolTerm: http://freeware.the-meiers.org/
Note
The BBB can be powered either via a USB cable, or via a power supply. If power is supplied through the USB cable, the device may not supply enough power for the CC26X2R1 LaunchPad. It is recommended that you use the 5V power supply for this purpose.
Booting the BBB from the SD Card
The BBB can boot from ether the on board memory, or from an SD Card. This guide will show how to boot from the SD card instead of the internal EEPROM.
The BBB has 3 push button switches, they are:
| S1: | Reset |
|---|---|
| S2: | User Boot |
| S3: | Power |
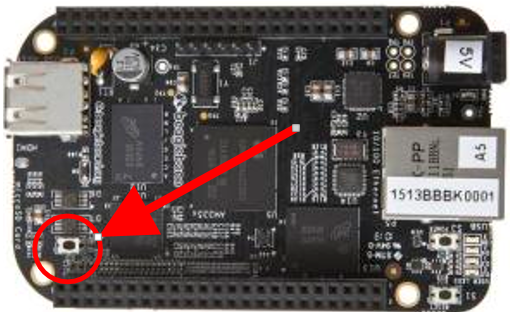
Both S1 & S3 are located next to the 4 LEDs and the Ethernet connector. The user boot switch is located opposite the microSD card reader, and can be seen in Figure 16.
On initial power up (and only initial power up), the BeagleBone Black reads the user boot switch. If the switch is pressed, the BeagleBone Black will boot from the microSD card otherwise the BeagleBone Black will boot from the on-board flash memory.
Debug Serial cable
Option 1: FTDI-TTL-232-3V3 cable
The 6-pin UART connector on the BeagleBone Black has the same pinout as the FTDI USB-to-serial adaptor. The connection can be seen in Figure 17. These adaptors can be found here:
| FTDI: | http://www.ftdichip.com/Products/Cables/USBTTLSerial.htm |
|---|---|
| Adafruit: | https://www.adafruit.com/product/70 |
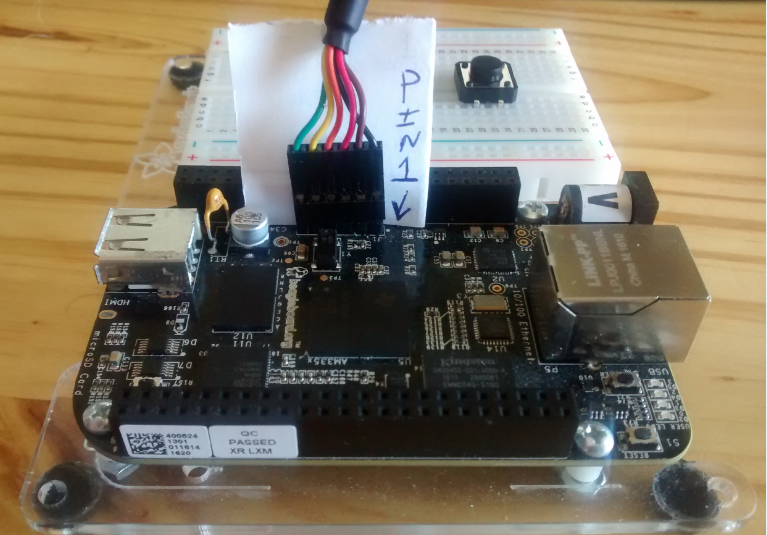
Figure 17. FTDI-TTL-232-3V3 Cable
Note
In the image a white paper is placed behind the serial connector to provide contrast and to identify Pin 1. The FTDI pin 1 - is the black wire. Pin 6 is the green wire. The Black wire goes towards the Ethernet connector. The green wire should be closest to the USB-Type-A connector.
Option 2: Flying Leads type USB Serial Cable
A flying-leads version of the USB-to-Serial connection is available, the connections can be seen in Figure 18.
Adafruit: https://www.adafruit.com/product/954
Note
In the image, a white paper is used to provide contrast and to help identify Pin 1
| Pin 1: | Adafruit Black (closest to the Ethernet Connector) |
|---|---|
| Pin 2: | N/C |
| Pin 3: | N/C |
| Pin 4: | Adafruit Green |
| Pin 5: | Adafruit White |
| Pin 6: | N/C |
| N/C: | Adafruit-Red |

Figure 18. Adafruit USB Cable
Background - SD Card Size vs SD Card Images
BeagleBone Black microSD card images are created small to facilitate smaller cards and cards with bad sectors. The image may be expanded to fit the size of the card.
The steps below show how to use the BBB to expand the SD Image to fit the size of your SD Card. It is possible to do these commands directly on the Linux host, however care must be taken to only affect the microSD card.
It is suggested not to fill the entire card to the very last sector. This will allow the image to be cloned to other microSD cards that may have a smaller size or more bad sectors.
How does this work
It is important to understand how this works, because the requirements of the microSD card image may need to be changed. It is helpful to think of the card image as a picture frame around your data.
The data on the SD Card is effectively a continuous array of data sectors. The sectors are numbered starting with 0 - ending somewhere around 8Gigabytes (depending on your SD Card).
In sector 0 is what is called an MS-DOS Partition table. This type of partition table can hold between 1 and 4 partitions. You can think of a partition as a “picture frame” around the file system (your data).
Some entire disk images have 1 partition, others have more partitions. Find
the largest partition because this is where your data is located. This is often
not located at sector 1, but some later sector. The exact value varies, it is
important to know that your card or SD image might use values different then
these instructions. The partition in question end at some sector we will refer
to as N.
In the first step we will write a new 2G or 4G image onto the SD Card starting at sector 0 (the partition table). The image will end somewhere near 2Gb or 4Gb. The remaining space is not allocated.
We cannot stretch the partition, this is not possible. Instead, we must delete
the existing partition and then create a new partition. This new partition will
start at the same location as old partition, but will end at your desired
length. We will call this sector X.
Program the SD Card Image and Connect the Hardware
Download the latest Debian JESSIE image for your board
BBB Link: https://beagleboard.org/latest-images
This document is based on the BeagleBone Black image:
bone-debian-8.7-lxqt-4gb-armhf-2017-03-19-4gb.img.xz
$ md5sum bone-debian-8.7-lxqt-4gb-armhf-2017-03-19-4gb.img
817fb72e7afe2d4ab69b1999da32def4 *bone-debian-8.7-lxqt-4gb-armhf-2017-03-19-4gb.img
Please perform the following steps:
- Decompress the image using 7zip or similar tool
- Use a tool such as Win32DiskImager to write the image to an SD card
- Insert the SDCard into the BBB
- Connect the Ethernet cable to the BBB
- Connect your DEBUG-Serial cable to the BBB
- Launch your terminal program (115.2K, 8-N-1, no handshake)
- Remember to press and hold the boot-switch (see above)
- Apply power to the BBB (via a wall power supply)
- Wait a few seconds, LEDs should start to blink.
- Then release the boot-switch.
- Watch the linux board boot up on your Terminal program.
Boot the BBB, and login as ROOT
Once Linux has booted, the debug serial connection will prompt you for login. Login as the default user with the information below:
user: debain
password: temppwd
Determine the current data partition, and start location
The goal is to determine the device name that is the root partition,
type the command: df -Th / The result will look like this:
$ df -hT /
Filesystem     Type  Size  Used Avail Use% Mounted on
/dev/mmcblk0p1 ext4  3.3G  2.8G  295M  91% /
You will note the available data partition size is 295Mbytes This is not enough to build, run and execute examples.
Important Findings:
- We find the data partition is:
/dev/mmcblk0p1 - The device as a whole is:
/dev/mmcblk0 - The p1 suffix is the naming convention for Partition 1.
Note
Other images may have additional partitions.
Become Root
Become root if not already
debian@beaglebone:~$ sudo bash
[default password is: temppwd]
root@beaglebone:/home/debian#
Start fdisk
Type the command fdisk /dev/mmcblk0
Print the current partition table
The fdisk p command prints the current partition table.
Note
In this example, there is a single partition. Your image may be configured differently.
root@beaglebone:/home/debian# fdisk /dev/mmcblk0

Welcome to fdisk (util-linux 2.25.2).
Changes will remain in memory only, until you decide to write them.
Be careful before using the write command.

Command (m for help): p
Disk /dev/mmcblk0: 7.2 GiB, 7744782336 bytes, 15126528 sectors
Units: sectors of 1 * 512 = 512 bytes
Sector size (logical/physical): 512 bytes / 512 bytes
I/O size (minimum/optimal): 512 bytes / 512 bytes
Disklabel type: dos
Disk identifier: 0xca52207f

Device         Boot Start     End Sectors  Size Id Type
/dev/mmcblk0p1 *     8192 6963199 6955008  3.3G 83 Linux
Important findings:
- The Start Sector number is
8192(we will use this number below). - The one and only data partition for this image starts at 8192 * Your image may have multiple partitions or start at a different location. * You are looking for the “Linux” partition.
Delete the partition
Command (m for help): d
Selected partition 1
Partition 1 has been deleted.
Create the new (replacement) partitions
Type the command: n to create the replacement partition.
Warning
When creating the new partition is it critical to use the SAME FIRST SECTOR (see above) as the old partition.
This example uses an 8Gig card, so we will use +7G for the partition size
to create a 7Gb partition (slightly smaller then the physical card size).
Command (m for help): n
Partition type
   p   primary (0 primary, 0 extended, 4 free)
   e   extended (container for logical partitions)
Select (default p): p
Partition number (1-4, default 1): 1
First sector (2048-15126527, default 2048): 8192
Last sector, +sectors or +size{K,M,G,T,P} (8192-15126527, default 15126527): +7G

Created a new partition 1 of type 'Linux' and of size 7 GiB.
Determine the last sector (Optional)
This step is optional and can be done at some point in the future when the information is needed.
Note
The reason the +7G was used above, and not the default last sector is so
that we can later clone the SD Card we are creating and then share that
cloned image other members of your development team.
To clone the card you will need to:
- Read the SD Card into an IMG file (using a tool such as Win32DiskImager)
- Truncate the SD Card to the actual size of the image.
This step explains how to calculate the size-value used truncate the image. If the image is not truncated the image may, or may not fit on other SD Cards. By truncating the image, the resulting image can easily be written to any SD Card of similar size.
Run the command: sudo fdisk /dev/mmcblk0, then use the p command to
print the Partition Table, see below:
Command (m for help): p
Disk /dev/mmcblk0: 7.2 GiB, 7744782336 bytes, 15126528 sectors
Units: sectors of 1 * 512 = 512 bytes
Sector size (logical/physical): 512 bytes / 512 bytes
I/O size (minimum/optimal): 512 bytes / 512 bytes
Disklabel type: dos
Disk identifier: 0xca52207f

Device         Boot Start      End  Sectors Size Id Type
/dev/mmcblk0p1       8192 14688255 14680064   7G 83 Linux
When using a tool such as Win32DiskImager the entire SD card is read including
the free area after the end of the partition. The problem occurs when trying to
write the image to the next card, it may or may not be too large. The standard
Linux tool truncate can be used to solve the problem.
Note
The truncate command is a standard Linux tool, and it is also present in the Git Bash distribution of MSYS.
In this example:
- The last partition ends at sector: 146,88,255
- Each sector is 512 bytes: Remember to add +1, to account for sector 0.
- The total size is: (14,688,255+1) * 512 = 7,520,387,072
To truncate the image use this command:
truncate -s 7520387072 myimage.img
Write the partition table to the disk
Command (m for help): w
The partition table has been altered.
Calling ioctl() to re-read partition table.
Re_reading the partition table failed.: Device or resource busy

The kernel still uses the old table. The new table will be used at the next
reboot or after you run partprobe(8) or kpartx(8).
Reboot & Error: fsck exited with status code 8
Reboot the BBB, type the command: sudo reboot -f
During the next boot - the BBB might complain as follows:
Loading, please wait...
[    4.873285]  remoteproc1: failed to load am335x-pru0-fw
[    4.918852]  remoteproc1: request_firmware failed: -2
[    4.924046] pru-rproc 4a334000.pru0: rproc_boot failed
[    5.052414]  remoteproc1: failed to load am335x-pru1-fw
[    5.069652]  remoteproc1: request_firmware failed: -2
[    5.074889] pru-rproc 4a338000.pru1: rproc_boot failed
fsck: error 2 (No such file or directory) while executing fsck.ext4 for /dev/mmcblk0p1
fsck exited with status code 8
After a short 20 second pause, the login prompt appears.
For now Ignore this error, the error will be fixed in a few steps.
Grow (resize) the actual file system
In the previous step, and using the “picture frame” analogy - we have removed and replaced the smaller picture frame with a much larger picture frame. However we have not yet made the additional space within the frame available to the file system.
Once the BBB has rebooted, login and become root as before.
Note
In this example the data partition is: /dev/mmcblk0p1, if it was
partition 2, the parameter would be /dev/mmcblk0p2.
Use the resize command to resize the file-system.
(if needed, "sudo bash" to get the root prompt)
root@beaglebone:/home/debian# resize2fs /dev/mmcblk0p1
resize2fs 1.43 (17-May-2016)
Filesystem at /dev/mmcblk0p1 is mounted on /; on-line resizing required
old_desc_blocks = 1, new_desc_blocks = 1
The filesystem on /dev/mmcblk0p1 is now 1835008 (4k) blocks long.
Note
The resize2fs command can also shrink a file system.
Reset and Reboot the BeagleBone Black, type the command: sudo reboot -f
Fix the “fsck” error
Once the BBB has rebooted, login and become root as before. Then run this command:
debian@beaglebone:~$ sudo update-initramfs -u
(Enter password if needed)
update-initramfs: Generating /boot/initrd.img-4.4.54-ti-r93
Setting up Proxy Settings
There are many ways to configure a proxy. The most basic proxy can be
configured via environment variables. Edit the file: /etc/profile and add
the environment variables at the top of the file, as shown below:
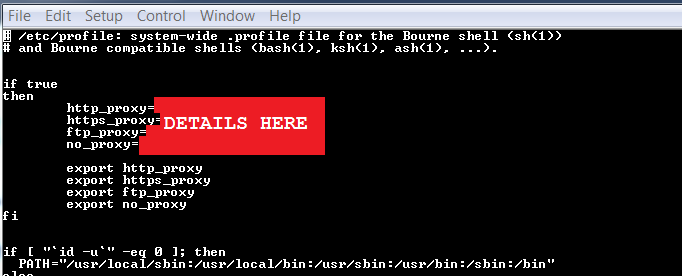
The environment variables you need to set per your network configuration are:
if true
then
    http_proxy=YOURDETAILSHERE
    https_proxy=YOURDETAILSHERE
    ftp_proxy=YOURDETAILSHERE
    no_proxy=YOURDETAILSHERE

    export http_proxy
    export https_proxy
    export ftp_proxy
    export no_proxy
fi
You will also need to modify the sudoers file (details below). For security
reasons, sudo will remove or strip environment variables including the proxy
configuration variables.
Note
The if true condition is to allow for multiple configurations in your
bash setup. You can easilly turn these settings off by changing true to
false.
visudo changes
The build process takes a long time therefore it is necessary to increase the sudo timeout to a very long time. If this is not done the build will halt and prompt for the sudo password.
Using sudo visudo add this line to the /etc/sudoers file:
Defaults timestamp_timeout=10000000
Warning
The above timeout (10 million minutes) is used only for the simple build scripts of this example. It should never be left in production.
If you have set proxy settings, it is necessary to propagate those settings
into the super user environment. The super user environment is used when the
script executes sudo apt-get commands to install packages onto the BeagleBone Black.
List these variables as “keep” in the /etc/sudoers file.
Using visudo add this line to /etc/sudoers file:
Defaults env_keep="http_proxy https_proxy ftp_proxy no_proxy"
Building wpantund and libcoap
Note
The scripts provided with the SimpleLink CC26x2 SDK are tailored for the BeagleBone Black and have not been tested in other environments.
Copy the tar file to the BeagleBone Black
Within the SimpleLink CC26x2 SDK at <SDK_INSTALL_DIR>\tools\linux-min-br-scripts, you will
find the file ti-openthread-linux-scripts.tar.gz.
Copy this file to your BeagleBone Black, and place it here:
/home/debian/ti-openthread-linux-scripts.tar.gz
Login to the BeagleBone Black, and expand the tar file:
debian@beaglebone:~$ tar xf ti-openthread-linux-scripts.tar.gz
This should result in a directory /home/debian/ti-openthread-linux-scripts.
Within that directory should be a settings.mak and a Makefile
About the settings.mak and Makefile
It may be necessary to edit the settings.mak for your environment. This
section will explain some of the settings you can tune.
Network Settings
The Makefile assumes that you are using the BeagleBone Black in an isolated network. For example, at your desk using a network router/wifi access point to create a standalone network.
The settings.mak file, and the Makefile will install the radvd
service on the BeagleBone Black. The BeagleBone Black will set the network interface up to enable
IPv6 address allocation via SLAAC. The address range used is specified
in the settings.mak file.
If you are connecting the BBB to a larger network, not under your control, you should consult with the network administrators for proper configuration.
Embedded Settings
The definitions for channel an PANID settings are set in the settings.mak
file. If you are using the pre-commissioned versions of the example
applications in the SimpleLink CC26x2 SDK, these settings must match the ones set in the
otstack.h. If you have not set the pre-commissioned setting in the embedded
applications, consult the application’s README.html for information on how
to commission the devices into your network.
Make Targets
The Makefile has the target:
$ make help
This command will list the various targets that are present.
Note
In many cases the commands are suppressed with an “@” prefix, this is
actually implemented with a macro: HIDE=@ at the top of the Makefile.
Comment out this macro to see the steps.
Build the tools
The Makefile has the target:
$ make everything
This will will perform all of the build steps.
This process takes 1 to 3 hours to complete; the main factors effecting the speed are:
- Network speed
- The apt-get take a while
- In total, the network speed has some but not a lot of impact.
- Most of the impact is in the next two operations.
- Processor Speed & Cache Size
- The BeagleBone is not your high performance desktop machine.
- Disk Speed (specifically SD Card)
- In contrast with your desktop machine:
- Your desktop has 4 to 8 times more RAM available.
- Your desktop has a high performance Disk Drive.
- Most likely a multi gigabit SATA interface to the disk drive.
- The BeagleBone Black
- has 512M of RAM
- SD Cards sustained write speed.
- For More detail: https://www.sdcard.org/developers/overview/speed_class/
- The SD Card interface on the BBB is not a multi-gigabit IO channel.
- In contrast with your desktop machine:
The only controllable item is the sustained SD card write speed.
Hint
Before you start, verify:
- You did increase the disk space otherwise hours from now, this build
will fail with an
No space left on deviceerror. Type this command:df -Th /and verify that you have a large available space. - Your Network is connected, and the proxy works in both user mode and after you have performed the ‘sudo’ step.
- To avoid entering the
sudopassword multiple times… you have extended thesudotimeout period.
Reboot the BeagleBone Black
To start some of the services, you will need to reboot the BeagleBone black.
Type this command: sudo reboot -f
Connect the NCP Device to the BeagleBone Black
Using CCS program the CC26X2R1 LaunchPad with NCP-FTD application at
<SDK_INSTALL_DIR>\examples\rtos\<BOARD>\thread\ncp_ftd and then
connect CC26X2R1 LaunchPad to the BeagleBone Black.
Note
At this point as you are using a XDS110 debugger, the UART drivers (Linux ttyACM) are built in and ready to go.
Bring up the services (non-configured)
The Makefile has the target:
$ make at-boot
You may get the message in Figure 19.. This is expected. Please move to step 7.
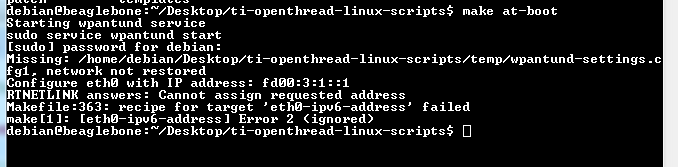
Figure 19. make at-boot message
This step starts the wpantund, and performs a few preliminary steps. If previously a network was formed, that network would be restored.
Various services are not enabled and configured by default and the Thread
Network is not yet setup. At this point the make at-boot step is purely
manual.
Form a network using the BeagleBone Black
The network settings are in the file: settings.mak
Note
If you change some of the settings (for example: The IPv6 addresses) you may or may not need to re-execute some of the earlier internal make targets. Please read the Makefile documentation for details. Specifically the radvd files will need to be updated.
The Makefile has the target:
$ make wpantund-form
This make target will configure wpantund, and the ncp creating a Thread Network. This step will also save the settings in a few data files in the local ‘temp’ directory.
If desired, the Makefile has the target:
$ make wpantund-erase
This make target will leave the network and remove all settings from both the Linux host and the NCP device.
Each time the BeagleBone Black is rebooted, you will need to type the command make
at-boot to restore the previous network
Optional, automatically configure the network at boot
To make the BeagleBone Black automatically restore the network at boot you can edit the
file: /etc/rc.local and add the following:
make -C /home/debian/ti-openthread-linux-scripts at-boot
Running libcoap Example
This section will explain how to interact with the example applications from
the SimpleLink CC26x2 SDK using the Linux application libcoap.
Required Hardware
- The CoAP Client will be the BeagleBone Black
- The CoAP Server will be the CC26X2R1 LaunchPad
- The NCP device will be a second CC26X2R1 LaunchPad
- (optional) doorlock, thermostat, temperature sensor, or shade example
Required OpenThread Configuration settings
This example assumes the devices are set up as Full Thread Devices.
In this and other examples it is important to enable these features in the Embedded Projects file. Consult Configuration Header Preprocessor Symbols for instructions on how to change the configuration settings.
| IDE #define value |
|---|
| OPENTHREAD_ENABLE_APPLICATION_COAP=1 |
| OPENTHREAD_ENABLE_BORDER_AGENT_PROXY=1 |
| OPENTHREAD_ENABLE_COMMISSIONER=1 |
| OPENTHREAD_ENABLE_JOINER=1 |
Set up a CLI Example
In this example a CLI FTD is used to interact with the border router. See CLI Example Application for instructions on how to configure a CC26X2R1 LaunchPad as a CLI.
Use the CLI and join the BeagleBone Black network
If the wpantund network is not setup on the BeagleBone Black, then follow these steps on the BeagleBone Black to start the network:
- Type:
make
at-boot
to start wpantund and other processes. - Type:
make wpantund-formto form your network.
On the BeagleBone Black, use ifconfig to determine the IPv6 address of the BeagleBone Black host.
Note
The target make wpantund-status will show the status of wpantund
interface.
Before proceeding, ensure:
- The network interface (wpan0) exists and has an IPv6 address.
- The NCP device is associated, and is either a
leader,router, orchild. - Determine the IPv6 address of the
wpantundinterfacewpan0
Note
In the settings.mak file, the on-mesh network is configured via the
macro: wpan0_IPv6_PREFIX=fd00:${MYNUMBER}:0:/64 where Where
${MYNUMER} ranges from is 0..6 and is defined in settings.mak.
Joining the Network from the CLI
On the CLI example, scan for the BeagleBone Black network and join using these steps:
Note
The values for panid, networkname, and channel are set in settings.mak.
And, can found on the BeagleBone Black with the make target make wpantund-status.
> panid 0x3333
Done
> networkname FooBar
Done
> channel 14
Done
> ifconfig up
Done
> thread start
Done
> state
child
Done
>
> ipaddr
fdde:ad00:beef:0:0:ff:fe00:4401
fdde:ad00:beef:0:c4a2:804d:53c8:5860
fe80:0:0:0:7c88:2a12:c531:b56d
Done
>
Note
- The addresses in the
fd00::/8range are probabilistically unique addresses. OpenThread uses this to create it’s Mesh local addresses. These addresses may change with network topoplogy. - The addresses in the
fe80::/10range are Link Local addresses. These are assigned by SLACC and will not change with network topology changes. - Globally unique addresses may be assigned or requested from a Border Router.
Determine the state of your CLI device, it should be a child or router. Either the BBB, or some other device would be the current Network leader. Determine the IPv6 address of the CLI device.
Test the connection via ping and/or ping6
The ping command allows you to send an ICMPv6 echo request to another node on the network. This allows you to determine if the node is alive and functioning. From the BeagleBone Black ping the CLI:
$ ping6 -I wpan0 fe80:0:0:0:fc67:6c45:30e1:d432
Note
ping is the Linux IPv4 command and ping6 is the Linux IPv6 command.
In the above command, we use the fe80/10 link local address and thus we
must also use the -I wpan0 parameter to specify the interface to use. This
will only work if a network edge exists between the NCP and the CLI because
link local addresses scopes are defined as one radio transmission by the Thread
Protocol.
From CLI ping NCP/wpantund:
> ping fe80:0:0:0:7c88:2a12:c531:b56d
> 8 bytes from fe80:0:0:0:7c88:2a12:c531:b56d: icmp_seq=2 hlim=64 time=7ms
Note
ping is used by the OpenThread CLI example since it doesn’t have to
support IPv4 backwards compatibility.
Start the CLI CoAP server
Note
This documentation is based on the public commit:
6fcab15f2ddfa4804b5efcfc5ba1604c26ffcc2b
Soon after that branch - Openthread PR#1864 occurred which changes the command line syntax for the cli-coap command. Some commands on doing the steps below may change.
To start the coap server do the following on the CLI-FTD application:
> coap server name MyTest
Changing resource name to 'MyTest': Done
> coap server start
Server started with resource 'MyTest': Done
From the Linux host, perform a CoAP request
Assuming the CLI CoAP server is operational try to send a CoAP request from the linux host.
Using a valid URL
The CLI example CoAP server will respond with a zero as data.
$ coap-client -m get coap://[fd00:3:0:0:972d:4cca:72ae:32b2]/MyTest
v:1 t:CON c:GET i:48f0 {} [ ]
0
$
Using an invalid URL, but correct IPv6 address
The CLI example will respond with a 4.04, not found, error message.
$ coap-client -m get coap://[fd00:3:0:0:972d:4cca:72ae:32b2]/abc123
v:1 t:CON c:GET i:516a {} [ ]
4.04
$
Invalid Address
The default timeout is 90 seconds, using the -B 3 option specifies a 3
second timeout.
$ coap-client -B 3 -m get coap://[fd00:3:0:0:972d:4cca:72ae:1111]/MyTest
v:1 t:CON c:GET i:b02e {} [ ]
$
Note
In the 3rd example, using an invalid/non-existent IP address there is no response and only 2 lines of output are produced. Where as in the first example the value “0” is produced, and the second a “4.04” error code is produced.
Going further
libcoap can also be used as a CoAP server, and the CLI device can be used
as a CoAP client, fetching data from your Linux host. The steps do this are
left as an exercise for the reader.
From a different host
This step is optional and can be completed later.
In the real world the request will come from some far away device, some example applications that you may be:
- Mozilla FireFox Copper Plugin
- SpitFireFox Android CoAP application
- LibCoap from some other machine
An important step is to determine if the other device has connectivity with the
OpenThread network. An easy means is to verify that an IPv6 address is present.
The radvd will advertise the prefix on other interfaces than the Thread
interface. Below are two examples of these address propagations:
BeagleBone Black connected to a WiFi Router
Connect your smartphone to the same WiFi network and verify the smartphone receives an IPv6 address from your test network.
To determine the IPv6 address of an Android phone or tablet go to Settings -> About Phone -> Status -> Ip Addresses.
Verify your phone has an IPv6 address in the same range as your BBB.
The SpitFireFox app can be used to send CoAP requests.
Windows or Linux Host
A Windows or Linux host can receive router advertisements if it is on the same
network as the BeagleBone Black. Use the Linux command ifconfig or the Windows command
ipconfig to verify that your host has an IPv6 address in the range
advertised from the BeagleBone Black.
The Copper plugin for Mozilla FireFox can be used to send CoAP requests.
Using Other Examples
- The doorlock, thermostat, temperature sensor, and shade automatically form and join a network at boot.
- Make sure
settings.makin the BeagleBone Black andottask.hin the example application are in agreement. - The same CoAP command, but with a different URL will work.