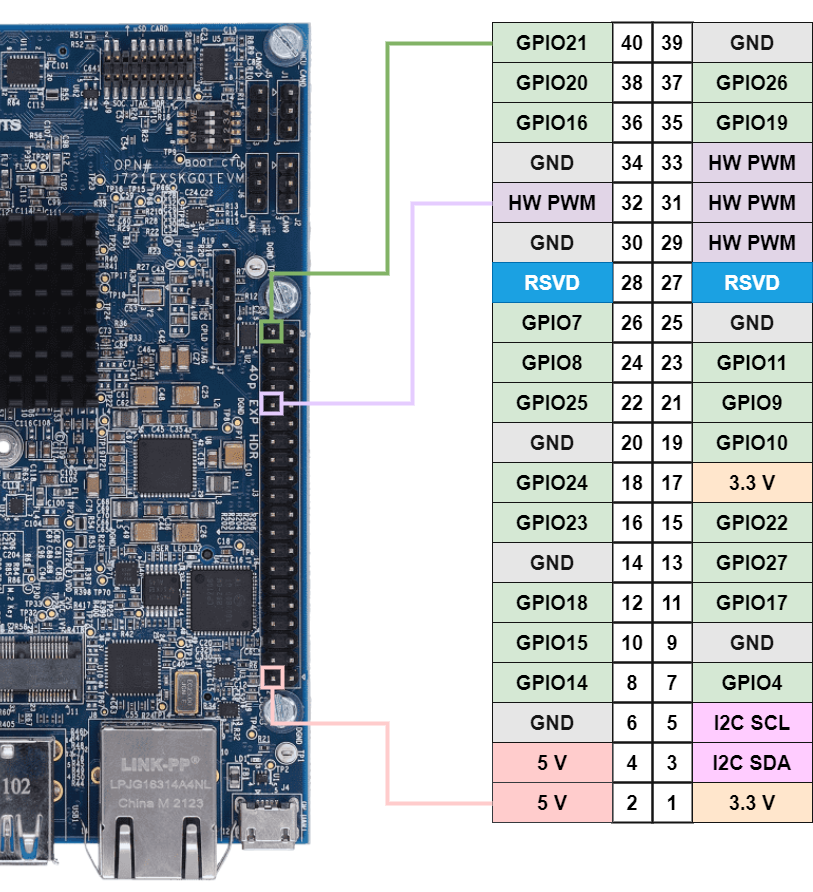
RPi 40-pin header programming
TI J72e SK development board contain a 40 pin GPIO header, similar to the 40 pin header in the Raspberry Pi. These GPIOs can be controlled for digital input and output using the Python/CPP libraries provided in the TI GPIO Library packages. The libraries have the same API as the RPi.GPIO library for Raspberry Pi in order to provide an easy way to move applications running on the Raspberry Pi to the TI board.
TI GPIO Libraries are packaged under /opt directory. Run the below script
to build and install the gpio libraries
root@tda4vm-sk:/opt/edge_ai_apps# ./scripts/install_ti_gpio_libs.sh
By default, the 40-pin header is not enabled on TDA4VM SK board. This can be enabled by
specifying the dtb overlay file k3-j721e-sk-rpi-exp-header.dtbo in
/run/media/mmcblk0p1/uEnv.txt as given below.
name_overlays=k3-j721e-edgeai-apps.dtbo k3-j721e-sk-rpi-exp-header.dtbo
Reboot the board after editing and saving the file.
40-pin header default configuration
The default pin configuration on the SK board is as follows. Any deviation from this needs modifications to the Linux DTBO. The table below lists pin numbers in all three supported modes, namely BOARD, BCM, and SOC.
BOARD: Physical Pin Number BCM : Broadcom SOC Numbering SOC : TI SOC Naming

BOARD |
BCM |
SOC |
Function |
|---|---|---|---|
3 |
2 |
GPIO0_84 |
I2C SDA |
5 |
3 |
GPIO0_83 |
I2CSCL |
7 |
4 |
GPIO0_7 |
GPIO |
8 |
14 |
GPIO0_70 |
GPIO |
10 |
15 |
GPIO0_81 |
GPIO |
11 |
17 |
GPIO0_71 |
GPIO |
12 |
18 |
GPIO0_1 |
GPIO |
13 |
27 |
GPIO0_82 |
GPIO |
15 |
22 |
GPIO0_11 |
GPIO |
16 |
23 |
GPIO0_5 |
GPIO |
18 |
24 |
GPIO0_12 |
GPIO |
19 |
10 |
GPIO0_101 |
GPIO |
21 |
9 |
GPIO0_107 |
GPIO |
22 |
25 |
GPIO0_8 |
GPIO |
23 |
11 |
GPIO0_103 |
GPIO |
24 |
8 |
GPIO0_102 |
GPIO |
26 |
7 |
GPIO0_108 |
GPIO |
29 |
5 |
GPIO0_93 |
HW PWM |
31 |
6 |
GPIO0_94 |
HW PWM |
32 |
12 |
GPIO0_98 |
HW PWM |
33 |
13 |
GPIO0_99 |
HW PWM |
35 |
19 |
GPIO0_2 |
GPIO |
36 |
16 |
GPIO0_97 |
GPIO |
37 |
26 |
GPIO0_115 |
GPIO |
38 |
20 |
GPIO0_3 |
GPIO |
40 |
21 |
GPIO0_4 |
GPIO |
NOTE: Please refer to SK-TDA4VM User’s Guide for details on the expansion header pin names and functionality. Also refer to section 2.1.2 Power Budget Considerations for power/voltage limits on the expansion header pins.
Constraints on the HW PWM functionality
The physical pins 29, 31, 32, and 33 support HW PWM functionality.
All four pins are individually controllable with a few constraints noted below:
Pin pair {29, 31} is internally linked to a common HW block. If both pins are enabled, then they must be programmed to the same frequency.
Pin pair {32, 33} is internally linked to a common HW block. If both pins are enabled, then they must be programmed to the same frequency.
The duty cycle on each of the HW pins can be controlled independently, whether they belong to the same pin-pair or not.
If both pins of a given pin-pair are enabled and if a frequency change needs to be made on the pin-pair, then follow the sequence below:
Disable PWM operation on one of of the pins
Update the frequency on the active pin with new_frequency
Setup the disabled pin with new_frequency and enable it
This is the only case where the operations across pins need to be co-ordinated when using the Python or CPP GPIO API.
Repositories
The Python and CPP projects are hosted on Texas Instruments githib. The links to the projects are given below. The details on installation and testing can be found in the respective project documentation.
Python Library: https://github.com/TexasInstruments/ti-gpio-py.git
CPP Library: https://github.com/TexasInstruments/ti-gpio-cpp.git
The above repositories are cloned and installed during the initialization process upon initial boot.
The gpiozero library is also installed as a part fo the initialization.
Additional References
Please refer to the lik below for information on the 40-pin header numbering and naming conventions:
