1. Overview
1.1. Processor SDK Android Software Developers Guide
Welcome to the Processor SDK Android Software Developer’s Guide
Note
Thank you for choosing to evaluate one of our TI Processors ARM microprocessors. Please bookmark this page and refer back to it as needed. It is designed to quickly provide the information you need most while evaluating a TI microprocessor, specifically running one of the Software Architectures available, embedded Android. We are always striving to improve this product. Please let us know if you have ideas or suggestions.
Version
This information covers Processor SDK Android 4.0.0 and above.
Feedback
If you have feedback, suggestions, or ideas on how to improve the SDK, it is very appreciated. Please post your ideas to the E2E Processor Support Forum.
1.2. Processor SDK Android Getting Started Guide
Welcome to the Android Getting Started Guide
Thanks for your interest in learning more about the Android Software Development Kit (SDK). The SDK as we affectionately call it is our attempt to provide a great starting point to develop an embedded system on a TI Processor running Android. Given this goal, we wanted to provide something that is more than just a typical Board Support Package (BSP) containing a bootloader, Linux kernel, and Android filesystem. While these are certainly necessary elements, we feel they are just a starting point, especially for those that aren’t experts in developing with Android. So, the SDK also contains tools for developing on TI Processors (a validated cross-compiling toolchain, for example), pre-built libraries that you can use without having to rebuild them yourself, and some documentation to help explain how all of these pieces work together. We package all of this together with a working Android Embedded System that has been built with all of the things mentioned above.
What it really serves as is a “known good” starting point. One of the big challenges with starting development on a new platform (not to mention, a new Operating System (OS) for many), is getting an environment set up where you can build and debug code on hardware. The SDK attacks this problem with providing everything you need to do development, and it is validated on standard TI hardware platforms (EVMs). It wraps all of this up into one simple installer that helps get everything you need in the right place to do development. For example, you can start off with simply re-building the Android Embedded System that we provide to validate that everything is working on your system. This simple step gives you confidence that you can move forward from a good baseline.
As you go along your development journey and have questions, there is documentation and support available to you. Make sure to save a pointer to the Android SDK Software Developer’s Guide (SDG). If you don’t find what you need, take a look at the active E2E Processor Support Forum and see if the topic has been covered before. If not, post a new thread and we’ll do our best to provide some guidance.
What would you like to do with the SDK?
As described above, the SDK has a lot to it. Let’s break it down to two pieces to simplify things a bit:
- The example embedded Android system. Essentially, a working bootloader (U-Boot), Linux kernel, and Android filesystem that can be put on an SD card and ran on a TI AM57xx EVM.
- Everything needed to create the above embedded system from “scratch”:
- U-Boot sources and configuration files
- Kernel sources and configuration files
- An Android cross-compiling toolchain as well as other host binaries and components
- The Android Open Source Project (AOSP) filesystem and sources for example applications (after syncing using the repo tool)
- A variety of scripts and Makefiles to automate certain tasks
- Other components needed to build an embedded Android system that don’t fit neatly into one of the above buckets
With these two pieces more clearly defined, we can now get back to that all important question, “What would you like to do with the SDK?”. If the answer is clearly “I want to build something and I’m ready to start developing now!”, then go ahead and skip down to the “I want to Develop!” (or, Developing with the SDK) section below for instructions on installing the SDK on a Linux Host System. This is a somewhat involved process focusing on the second of the two parts of the SDK listed above and may be more than some people want to start with. However, it provides access to the full spectrum of development from rebuilding the SDK from sources to fully adapting it with new device drivers and applications.
So, if you’re not quite there yet, let’s discuss some other options. Maybe you’d like to evaluate the SDK a bit to see if it is how you’d like to get started.
If this is not good enough and you really want to get your hands on something, check out the next section which shares how to play with the embedded Android system. All you’ll need is access to a Windows/Linux computer, an SD card, an SD card reader, some free, open-source software, and a supported Hardware platform.
Evaluating the SDK Embedded Android System
If you’re a hands on person, reading documentation and looking at presentations gets old fast. So, if you want to see an example of what you can build with the SDK and actually hold it in your hands and play with it (or show it to someone else that needs help understanding what you want to do with it), with minimal effort, you can simply run the SDK Embedded Android System on a supported Hardware platform. This will allow you to poke and prod and interact. It’s a powerful way to get the imagination active and engaged.
If you’ve recently purchased a TI AM572x GP EVM or an AM57xx IDK, move on to the next step to install the SDK and boot your board using the provided prebuilt images.
Start your Android Development
OK, you’re all in. Either you’ve known this is what you wanted to do, or you’ve gone through the above steps and you want to do more. It’s time to develop! Here’s a high level overview:
- Get a Linux host up and running if you don’t already have one
- Install the SDK and run some scripts to get everything set up
- Put the SDK Embedded Android System on an Evaluation Module to play with
- Build something to validate set up – the SDK for example
- Add something to the SDK, like a simple Hello World app
After completing these steps, you’ll have a known good baseline from which you can start development.
Configure a Linux Host - If you already have a Linux host machine, go to Step 2. To do Android development with the SDK, you’ll need a host PC running Linux. The Linux host is generally much faster and has a lot more memory (both RAM and hard disk space) than the typical embedded system. While it is certainly possible to do all development natively, we feel the advantages of using a host provide a better way to go and what is supported out of the box with the SDK. There are many, many ways to get access to a Linux host. We simply can’t validate all possibilities and iterations, therefore we focus on validating using Ubuntu as the host Linux distribution, running natively. We validate the Long-term Support (LTS) versions of Ubuntu at the time of a SDK release (Ubuntu 14.04 is the currently supported LTS version). Can you use other versions of Ubuntu or even other distributions? Theoretically, yes, as long as you can get it to work and there may be more “assembly” required. If you can use the Ubuntu version validated against the SDK, it will be the smoothest path and we will be able to help you more if you do run into trouble. Likewise, we would strongly recommend getting a native 64-bit Ubuntu LTS machine set up for development. For the cost of a little bit of hard drive space, Ubuntu can have direct access to the host’s hardware. Virtual Machines (VMs) have come a long way over the years, and many people use them daily without problems. However, when you are working with a target embedded system (that may be a prototype board), whether it be a TI board or eventually your own, removing the complexity of a VM from the get go can avoid a lot of frustration (i.e. wasted time). When using a VM while connecting and disconnecting hardware components, you have to be very diligent about making sure what is connected to what. You might prefer using an hour to get more work done than debugging a perceived problem caused by the fact the virtual host grabbed a USB port when you weren’t watching. When you’re ready to proceed, Ubuntu provides a great overview for how to install natively. If you eventually want to rebuild the Android filesystem from source, you’ll also need to follow the instructions from the official Android page here for setting up the packages required for building Android.
Install the SDK - Within your Linux host machine, Install the Android SDK Processor SDK Installer is 64-bit, and installs only on 64-bit host machine. Support for 32-bit host is dropped as of the Gingerbread Android release At least 70 GB of free space is required on the host machine in order to pull and then rebuild the full AOSP filesystem
Create an SD Card using the SDK Create SD Card Script You will need a >4GB SD Card and the capability to connect that card to your Linux Host machine (using a USB SD Card reader, for example). If using a virtual machine as your Linux host, you may need to import the SD Card reader into your virtual machine (disconnect it from the host and connect it to the VM so that the Linux VM can see it).
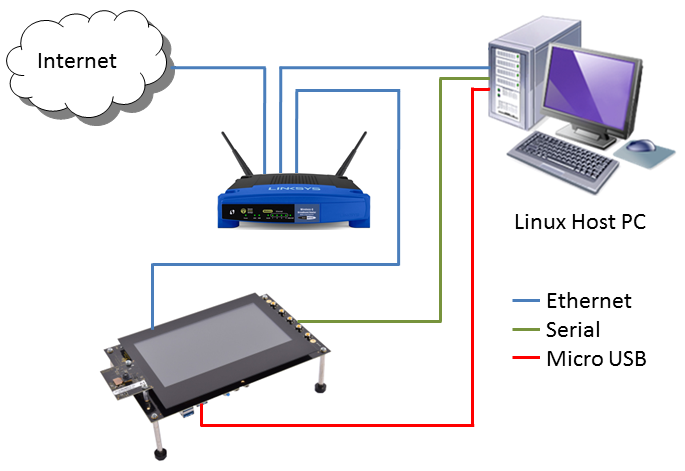
Configure your development environment There are many ways to connect the host development platform and the target board. These connections will vary depending on how you like to develop and what you are trying to do. Here is an example of a common set up with a serial connection for console, an Ethernet for networking, and a USB connection for flashing and ADB:
Run the Setup Script - Once the SDK has been installed and the SD card has been created and placed into the device, **run the setup.sh Script** on your host to guide you through the process of flashing the bootloader, kernel, and Android filesystem to the onboard eMMC.
Note
The eMMC flashing process utilizes the fastboot utility of U-Boot in order to place the bootloader (U-Boot), kernel, and Android filesystem into non-volatile eMMC memory. For this reason, U-Boot running on the SD card is only needed for the initial flashing procedure, after this, the bootloader can be run from the eMMC in order to flash updated bootloaders, kernels, or filesystems.
Note
Booting Android solely from the SD card is not supported on the Processor SDK Android v4.2 release. The SD card should only be used to run U-Boot in order to flash the onboard eMMC.
- Rebuild sources using the top-level makefile in the SDK root directory. For example:
make allrebuilds all components in the SDKmake linuxconfigures and builds the kernelmake u-boot-splbuilds u-boot and u-boot-spl
The Android filesystem can be rebuilt, and then flashed to the onboard eMMC, by following these instructions.
What Would You Like to do Next?
Now that you have a solid baseline set up, you can choose what you’d like to do next based on what you need to do. Here are some of the many possibilities:
| Link | Summary |
|---|---|
| AM57X | Download the SDK |
| Processor SDK Android Software DeveloperâGuide | The SDK’s Homepage, a must have link for SDK users. |
| Processor SDK Android How-To Guides | The SDK How-To pages. The Hands On with the SDK has some great information for developing your first Android application. |
1.2.1. Install the Android SDK
Overview
The Processor SDK Installer (ti-processor-sdk-android-am57xx-evm-xx.xx.xx.xx-Linux-x86-Install.bin) will install the necessary components to start your development on the TI microprocessor. The SDK consists of source for the universal bootloader (u-boot), the Linux kernel, toolchain and board support package, ease of use scripts and documentation. The Android file system sources can also be cloned to the SDK using the provided repo tool and manifest file. The Processor SDK was built and tested against a specific Linux Distribution name and version, Ubuntu 14.04. Note this does not prevent the user from installing the SDK on other Linux distributions.
How to Get the SDK Installer
Download from the Android SDK download page. This will always host the latest version of SDK.
How to Run the SDK Installer
Make sure that the execute permissions are set. Bring up a terminal window and change directories to the where the installer is located (probably the Downloads directory if downloaded) and run the following commands:
chmod +x
./ti-processor-sdk-android-am57xx-evm-xx.xx.xx.xx-Linux-x86-Install.bin**
Alternatively, you can give execute permissions and run the SDK Installer by double clicking on it within your Linux host PC.
Note
If nothing seems to happen, you are probably running a 32-bit version of Linux. The installer is 64-bit, and will not execute properly.
Additional Installer Options
Invoking the installer with argument –help will list available options for the installer (e.g. text installer, etc.):
./ti-processor-sdk-linux-[platformName]-evm-xx.xx.xx.xx-Linux-x86-Install.bin --help
SDK Installer Execution Steps
- Environment Support Message User is to acknowledge the host operating system recommendations.
- GPLv3 Components Notice User is to acknowledge the use of GPLv3 components in the SDK.
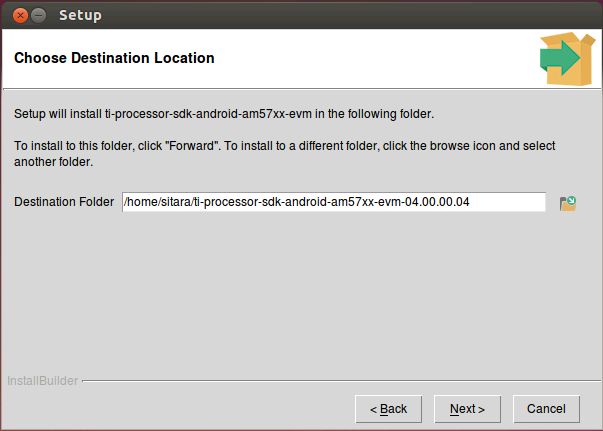
- Directory Install Location The user will be prompted for a location on where to put the Processor SDK. An example is given below.
- Review and Confirm User is to confirm if loading the Processor SDK is ok. This is important to note if the user is trying to over-install on an existing directory and has made changes to the directory.
- Installation of software The software is installed.
Where to install the Processor SDK package
The default selection of where to install is the user’s home directory. In this particular example the name of the user is ‘sitara’.
1.2.2. SD Card Creation
Overview
The Android SDK includes a script in the <ANDROID SDK INSTALL DIR>/bin directory named create-sdcard.sh. The purpose of this script is to create SD cards for the following high-level use case:
- Create the SD card using default images from the Processor SDK for Android
The script will give you information about each step, but the following sections will go over the details for the use case above and walk you through how to use the script as well.
Common Steps
Invoking the Script
The create-sdcard.sh script can be run from any location but must be run with root permissions. This usually means using the sudo command to start execution of the script. For example:
sudo <ANDROID SDK INSTALL DIR>/bin/create-sdcard.sh
If you fail to execute the script without root permissions you will receive a message that root permissions are required and the script will exit.
Select the SD Card Device
The first step of the script will ask you to select the drive representing the SD card that you want to format. In most cases your host root file system drive has been masked off to prevent damage to the host system. When prompted enter the device number corresponding to the SD card. For example if the output looks like:
Availible Drives to write images to:

#  major   minor    size   name
1:   8       16    7761920 sdb

Enter Device Number:
You would enter 1 to select the sdb device
Note
For most common installations, this script works fine. However, if you are using more advanced disk slicing and volume management, the presented list of device nodes are off by one; in the best case (picking the last item) it will flag a range error, and in the worst case (anything in the middle) the wrong DASD can be destroyed. The problem originates when it attempts to determine the $ROOTDRIVE to “mask” the volume where “/” is mounted from the selection list using a “grep -v $ROOTDRIVE” For the naive partitioning case, its heuristic is fine, yielding something like “sda” — but for LVM, it grabs some chunk of the device name, e.g. “mapp” (out of “/dev/mapper/kubuntu–vg-root on / type ...”)
Re-Partitioning the SD Card
Any partitions of the device that are already mounted will be un-mounted so that the device is ready for partitioning.
If the SD Card already has partition you will see a prompt like the following asking you if you would like to repartition the card. If the card was not already partitioned then this step will be skipped and you can move on to the next step.
Would you like to re-partition the drive anyways [y/n] :
- Options:
- y - This will allow you to change the partitioning of the SD card. For example if you have a 3 partition card and want to create a 2 partition card to give additional storage space to the root file system you would select y here. NOTE: This operation WILL ERASE the contents of your SD card
- n - If the SD card already has the desired number of partitions then this will leave the partitioning alone. If you select n here skip on to the **Installing SD Card Content** section.
Installing SD Card Content
After the SD card is partitioned, you will be prompted whether you want to continue installing the file system or safely exit the script.
- Options:
- y - Selecting yes here will begin the process of installing
the SD card contents. This operation WILL ERASE any existing
data on the SD card. Refer to one of the following sections for
additional instructions depending on which use case you are
creating an SD card for
- Create the **SD card using default images**
- n - Selecting no here will allow you to have partitioned your card but will leave the partitions empty.
- y - Selecting yes here will begin the process of installing
the SD card contents. This operation WILL ERASE any existing
data on the SD card. Refer to one of the following sections for
additional instructions depending on which use case you are
creating an SD card for
SD Card Using Default Images
The purpose of this section is to cover how to use the create-sdcard.sh script to populate an SD card that can be used to boot the device using the default images that ship with the Processor SDK for Android.
Prerequisites
- The Processor SDK for Android is installed on your host system
- The SD card you wish to create is inserted into the host system and has a size sufficiently large to hold at least the bootloaders, kernel, and Android file system.
- You have started running the script as detailed in the Common Steps section above.
Choose Install Pre-built Images
You should now see a prompt like:
now installing:  ti-processor-sdk-android-am57xx-evm-04.00.00.01

0. BOOTFILEPATH = ....00.00.01//board-support/prebuilt-images
1. MLO          = GP_MLO
2. BOOTIMG      = u-boot-am57xx-evm.img
3. BOOTUENV     = uEnv.txt
4. KERNELIMAGE  = zImage-am57xx-evm.bin
5. DTBDIR       = ....00.00.01//board-support/prebuilt-images
    * am571x-idk-lcd-osd.dtb
    * am571x-idk-lcd-osd101t2587.dtb
    * am571x-idk.dtb
    * am572x-idk-lcd-osd.dtb
    * am572x-idk-lcd-osd101t2587.dtb
    * am572x-idk.dtb
    * am57xx-beagle-x15-revb1.dtb
    * am57xx-beagle-x15.dtb
    * am57xx-evm-reva3.dtb
    * am57xx-evm.dtb
6. RAMDISKIMG   = ...oard-support/prebuilt-images/ramdisk.img
7. SYSTEMIMG    = ...board-support/prebuilt-images/system.img
8. USERDATAIMG  = ...ard-support/prebuilt-images/userdata.img


Would you like to continue? [y/n] :
You should choose option y to create an SD card using the pre-built images from the SDK. If you choose n then the script will exit.
You should execute this script from within the SDK so the script can determine the SDK path automatically. The script will start copying the contents to the SD card. Once the files are copied the script will exit.
1.2.3. Run Setup Scripts
Overview
After installation of the SDK on the Linux host, the setup script can be run to flash the prebuilt images to the onboard eMMC. Some of the tasks require administrator privileges. The script will prompt you when these administrator privileges are required. The setup script does the following things:
- Minicom setup (to create a serial connection to the board)
- u-boot setup (to configure the environment variables for the fastboot process)
- Flashes the prebuilt images to the onboard eMMC (to allow you to boot the board from the eMMC)
Prerequisites
To run the SDK’s setup script the following steps should be taken first:
- Install Minicom on your Linux host machine and add the current user to the dialout group. A Minicom script is used to configure the u-boot environment variables as well as put the device into fastboot mode.
- Run the create-sdcard.sh script provided in the SDK’s bin/ directory This will create an SD card using the prebuilt images, including a fastboot enabled u-boot.
- Put the newly created SD card into your EVM
- Connect a serial cable from your Linux host machine (the one from which you will run the setup.sh script) to your EVMs serial port. The AM572x GP EVM will require a 6-pin USB-to-serial cable. The 6-pin connection is on the underside of the board. FTDI Serial cable The AM57xx IDK boards have an onboard USB to serial IC so only a micro USB cable is required. The silkscreen next to the correct micro USB port will say ‘USB JTAG’ (both JTAG and serial connection are on the same port) and will be on the corner of the board that is opposite from the RJ-45 connectors.
- Connect a micro USB cable (used for fastboot and ADB connections) from your Linux host machine to your EVMs (other) micro USB port. The AM572x GP EVM only has one micro USB port and it is located next to the SD card slot The AM57xx IDK has two micro USB ports. The second port is located underneath the RJ-45 jacks.
- Connect the provided power cable to the barrel jack.
- Power up your board and use ls /dev/ | grep ttyUSB on your Linux host machine to find your serial port connection to your board The AM572x GP EVM will show up as a single connection (e.g. /dev/ttyUSB0) The AM57xx IDK boards will have two connections, one for serial communication and one for JTAG (e.g. /dev/ttyUSB0 and /dev/ttyUSB1). The higher numbered port is the serial connection that we are looking for.
- Note down the serial connection device path, for instance /dev/ttyUSB1
How to run the setup script
The Setup Script is located in the Processor SDK Android installation directory. By default, this directory has a name that has the form ti-processor-sdk-android-am57xx;-<Version>. Navigate to that ti-processor-sdk-android install directory. Then run the script:
./setup.sh
Detailed description of what the script is doing
Minicom Setup
This step let’s the rest of the process now which serial port the board connection is on. You should respond to the following question with the device found in step #7 above.
Which serial port do you want to use with minicom?
[ /dev/ttyUSB0 ]
- A minicom configuration will be saved for you at /home/user/.minirc.dfl
- The old configuration if there was one will be saved at /home/user/.minirc.dfl.old
uboot Setup
This section will create a Minicom script to generate the necessary u-boot environment variables and commands to put your board into fastboot mode.
Would you like to create a minicom script to configure the board (y/n)?
[ y ]
If you answer ‘n’ to this question the script will exit.
Run the Setup Script
This section will run the remainder of the setup script and will create a series of action between the board and your Linux host that will configure the u-boot environment variables, put the EVM into fastboot mode, and then flash the prebuilt images to the eMMC on the device. You must select ‘y’ at the following question and then power cycle or reboot your board to start the process.
Would you like to run the setup script now (y/n)?
[ y ]
If you answer ‘n’ to this question the script will exit.
Boot Android
At the completion of the this process you will have a board that can boot Android through the newly flashed eMMC device. For AM57x IDKs, keep the SD card plugged in, power cycle the board to use MLO and u-boot.img from the SD card and the rest from the eMMC. For AM57x GP EVM, SD card can be removed before the power cycle to boot Android with everything from the eMMC.
1.3. Processor SDK Android Directory Structure
The Processor SDK for Android contains the following top-level directories and files

These directories contain the code and tools used to develop for Processor SDK Android devices.
- android-devkit - Contains the cross-compile toolchain and libraries to speed development for the target device.
- bin - Contains the helper scripts for flashing the eMMC on the development device as well as the Android Debug Bridge (adb) tool.
- board-support - Contains the SDK components that need to be modified when porting to a custom platform. This includes the kernel, boot loader, Android Open Source Project filesystem, as well as any out of tree drivers.
- docs - Contains various SDK documentation such as the software manifest and additional user’s guide. This is also the location where you can find the training directory with the device training materials.
- filesystem -
- Makefile - Provides build targets for many of the SDK components from the top-level of the SDK.
- Rules.make - Sets default values used by the top-level Makefile as well as sub-component Makefiles.
- setup.sh - Runs the fastboot.sh script (found in bin/) to flash the eMMC of the connected device using the files in the board-support/prebuilt-images/ directory.
1.3.1. Top-Level Makefile
Overview
Inside of the Processor Android SDK there is a top-level Makefile that can be used to build some of the sub-components found within the SDK. This Makefile uses the Rules.make file and gives an example of how the various components can be built and the parameters to use.
Rules.make
The following sections cover the Rules.make file found in the top-level of the Processor Linux SDK.
Purpose
The Rules.make file in the top-level of the Processor Linux SDK is used not only by the top-level Makefile, but also by many of the sub-component Makefiles to gain access to common shared variables and settings. The next section covers the main variables defined in the Rules.make file.
Variables Defined
- PLATFORM - This represents the machine name of the device supported by the SDK. The PLATFORM variable can be used by component Makefiles to make decisions on a per-machine basis.
- UBOOT_MACHINE - This us used when building u-boot to configure the u-boot sources for the correct device.
- TI_SDK_PATH - This points to the top-level of the SDK. This is the same directory where the Rules.make file itself is located.
- DESTDIR - This points to the base installation directory that applications/drivers should be installed to. This is usually the root of a target file system but can be changed to point anywhere. By default the initial value is a unique key value of __DESTDIR__.
- ANDROID_DEVKIT_PATH - This points to the android-devkit directory. This directory is the base directory containing the cross-compiler and cross-libraries.
- CROSS_COMPILE - This setting represents the CROSS_COMPILE prefix to be used when invoking the cross-compiler. Many components such as the Linux kernel use the variable CROSS_COMPILE to prepend the proper prefix to commands such as gcc to invoke the ARM cross-compiler.
- LINUXKERNEL_INSTALL_DIR - This points to the location of the Linux kernel sources, which is used by components such as out-of-tree kernel drivers to find the Linux kernel Makefiles and headers.
Makefile
The following sections cover the Makefile found in the top-level of the Processor Linux SDK
Target Types
For each of the targets discussed below the following target type are defined
- <target> - This is the build target which will compile the release version of the component
- <target>_install - This target will install the component to the location pointed to by DESTDIR
- <target>_clean - This target will clean the component
Top-Level Targets
The Processor Linux SDK provides the following targets by default which will invoke the corresponding component targets:
- all - This will call the build target for each component defined in the Makefile
- install - This will call the install target for each component defined in the Makefile
- clean - This will call the clean target for each component defined in the Makefile
Common Targets
The following targets are common to all platforms in Processor Linux SDK:
- linux - Compiles the Linux kernel using the default tisdk_<PLATFORM>_defconfig configuration
- u-boot - Compiles u-boot using the default config from the Rules.make file
Additional Targets
Depending on the capabilities and software available for a given device additional targets may also be defined. You can find the list of all the targets by looking at the all target as described in the **Top-Level Targets** section above. Add devices will have one or the other of the following targets depending on the u-boot version used:
- u-boot-spl - This target will build both u-boot and the u-boot SPL (MLO) binaries used in newer versions of u-boot. This actually provides a u-boot and u-boot-spl target in the Makefile.
Usage Examples
The following examples demonstrate how to use the top-level Makefile for some common tasks. All of the examples below assume that you are calling the Makefile from the top-level of the SDK.
- Build Everything
host# make
- Clean Everything
host# make clean
- Install Everything
host# make install
- Build the Linux kernel
host# make linux
- Install the Linux kernel modules
host# make linux_install
A Note about Out-of-tree Kernel Modules
Some drivers like the SGX drivers are delivered as modules outside of the kernel tree. If you rebuild the kernel and install it using the “make linux_install” target you will also need to rebuild the out of tree modules and install them as well. The modules_install command used by the linux_install target will remove any existing drivers before installing the new ones. This means those drivers are no longer available until they have been rebuilt against the kernel and re-installed.
A Note about the Linux Kernel Version
To simplify and accelerate rebuilding and installing the linux kernel, the file .scmversion is included in the kernel source tree to pin down the version of the kernel provided in the SDK. If upgrading the kernel sources or adding new commits, this file should be removed so that the appropriate version is built into the kernel image.
1.4. Processor SDK Android Building The SDK
Using the Prebuilt Release Images
SD Card
Note
Booting Android solely from the SD card is not supported in the Processor SDK Android v4.2 release. The SD card should only be used to run U-Boot in order to flash the onboard eMMC.
The prebuilt release image can be found in the ‘board-support/prebuilt-images/’ directory of the Processor SDK Android installation. The create-sdcard.sh script (found in the ‘bin/’ directory of the SDK) will create a bootable SD card using the prebuilt images that you can use to boot your AM572x GP EVM, AM571x IDK, or AM572x IDK.
Note
While the SD card boot method can be useful during development, the recommended setup is to flash the kernel and Android filesystem to the eMMC as described in the next step.
Note
SD card boot is not supported on Android for production environments.
Flashing to onboard eMMC
You can also use the top-level setup.sh script to flash the prebuilt release images to the eMMC of your EVM or IDK.
Note
You will still need to use the create-sdcard.sh script the first time that you flash your board. This will allow you to run u-boot off of the SD card for your first boot and then the flashing procedure will put u-boot into the eMMC (or QSPI on the IDKs) for subsequent boots.
Rebuilding Android from Sources
Build PC setup
You need a 64 bit Ubuntu 14.04 machine for building the Android file system.
Install Pre-requisite packages for building the Android File System Follow instructions from official Android page here for setting up the packages required for building Android.
Use the following command to install the same packages that were used during the SDK development process:
sudo apt-get install git-core gnupg flex bison gperf build-essential zip curl zlib1g-dev gcc-multilib g++-multilib libc6-dev-i386 lib32ncurses5-dev x11proto-core-dev libx11-dev lib32z-dev ccache libgl1-mesa-dev libxml2-utils xsltproc unzip openjdk-7-jdk lzop bc u-boot-tools
Proxy/Firewall If you are behind proxy/firewall, workaround it using the instructions in [1]. For installing repo make sure you also export https_proxy environment variable.
repo tool Google’s repo tool is used to clone all of the git repositories that you need to rebuild the full Android filesystem from source. A copy of the repo tool is provided in the Processor SDK Android in the board-support/aosp-6AM.1.3/.repo/repo/ directory. Instructions to use the repo tool are provided below in this guide.
Tool Chain for building Kernel and Drivers The Kernel and Driver sources are built using the Android linux-x86 toolchain for ARM GNU/Linux version . This tool chain is provided in the android-devkit directory of the SDK.
A note on Host binaries of Marshmallow Host binaries like simg2img, make_exr4fs etc.. that are built in Android M needs shared libraries now. You might see errors like below when trying to use those binaries
simg2img: error while loading shared libraries: libc++.so: cannot open shared object file: No such file or directory
To resolve it, export your LD_LIBRARY_PATH to include the libraries. Point it to either the daily build or the folder from your build system
export LD_LIBRARY_PATH=~/ti-processor-sdk-android-am57xx-evm-04.00.00.xx/board-support/aosp-6AM1.3/out/host/linux-x86/lib64/
U-Boot, Linux Kernel, and Android Filesystem Sources
Android Filesystem Sources
You can get the Android filesystem sources for this release by using the repo tool along with the provided manifest file.
cd ~/ti-processor-sdk-android-am57xx-evm-04.00.00.xx/board-support/aosp-6AM.1.3/
./repo sync
This command may take several hours as it is cloning hundreds of repositories and checking them out to a specific commit. This will also take up considerable space on your development machine’s hard drive (~70GB).
Note: The repo tool has already been initialized with the manifest file found in board-support/aosp-6AM.1.3/.repo/manifests/aosp-6AM.1.3_manifest.xml. That is why only the ‘repo sync’ command is required above.
TI Hardware Accelerated Graphics and MultiMedia Binaries
Multimedia (DCE) and accelerated graphics binaries are part of Android file system build
U-Boot Sources
The U-Boot sources are included in the Processor Android SDK in the board-support/u-boot-20xx-yy.zz/ directory.
Kernel & Driver Sources
The Linux kernel sources are included in the Processor Android SDK in the board-support/linux-x.y.zz/ directory.
Build Instructions
Setting up build environment
export CROSS_COMPILE=${HOME}/ti-processor-sdk-android-am57xx-evm-04.00.00.xx/android-devkit/arm-linux-androideabi-4.9.x-google/bin/arm-linux-androideabi-
Note
The lzop tool needs to be installed on Linux PC when building Kernel using Android 4.9 toolchain. lzop should have been installed while following the steps in this section of this guide.
Building U-boot sources
The top-level Makefile can be used to build MLO and U-Boot
cd ~/ti-processor-sdk-android-am57xx-evm-04.00.00.xx/
make u-boot
Building Kernel
The top-level Makefile can also be used to build the Linux kernel
cd ~/ti-processor-sdk-android-am57xx-evm-04.00.00.xx/
make linux
make linux-dtbs
Note
If you are making changes to kernel defconfig and need to rebuild SGX kernel module, refer here
Building Android Filesystem (AFS)
Instructions for building Android file system (Processor SDK 4.0, 4.1).
cd ~/ti-processor-sdk-android-am57xx-evm-04.00.00.xx/board-support/aosp-.../
. build/envsetup.sh
lunch full_am57xevm-userdebug
make -j8 clean
make -j8
See Android Build Tricks for tricks on building Android. Adjust -jX to match your build machine, where X is the number of jobs.
Instructions for building Android file system (Processor SDK 4.2 +)
Note
Starting with Processor SDK 4.2, users must build the android kernel image prior to building the Android file system.
cd ~/ti-processor-sdk-android-am57xx-evm-04.00.00.xx/board-support/aosp-.../
export KERNELDIR=~/ti-processor-sdk-android-am57xx-evm-04.00.00.xx/board-support/linux-.../
. build/envsetup.sh
lunch full_am57xevm-userdebug
make -j8 clean
make -j8
Building SGX Kernel Module
Instructions for rebuilding the SGX kernel module.
cd ~/ti-processor-sdk-android-am57xx-evm-04.00.00.xx/board-support/aosp-6AM.1.3/device/ti/proprietary-open/jacinto6/sgx_src/eurasia_km/eurasiacon/build/linux2/omap_android
export KERNELDIR=${HOME}/ti-processor-sdk-android-am57xx-evm-04.00.00.xx/board-support/linux-4.4.x...
export CROSS_COMPILE=${HOME}/ti-processor-sdk-android-am57xx-evm-04.00.00.xx/android-devkit/arm-linux-androideabi-4.9.x-google/bin/arm-linux-androideabi-
export KERNEL_CROSS_COMPILE=${HOME}/ti-processor-sdk-android-am57xx-evm-04.00.00.xx/android-devkit/arm-linux-androideabi-4.9.x-google/bin/arm-linux-androideabi-
export ARCH=arm
make TARGET_PRODUCT="am57xevm" BUILD=release
SGX module will be generated at:
~/ti-processor-sdk-android-am57xx-evm-04.00.00.xx/board-support/aosp-6AM.1.3/device/ti/proprietary-open/jacinto6/sgx_src/eurasia_km/eurasiacon/binary2_omap_android_release/target/pvrsrvkm.ko
Use ADB to push pvrsrvkm.ko file to the /system/lib/modules/ location on the AM57xx target and reboot the board.
Note
If you get an error about the kernel configuration then you may need to go through the steps mentioned above to build the kernel before completing these steps.
Preparing Android Image
Rebuild Android Filesystem (AFS) to include kernel
Copy Kernel Image (This step is for making your kernel to be part of boot.img)
cd ~/ti-processor-sdk-android-am57xx-evm-04.00.00.xx/board-support/aosp-6AM.1.3
cp -v ../linux-4.4.x.../arch/arm/boot/zImage device/ti/am57xevm/kernel
Rebuild AFS to generate update images
cd ~/ti-processor-sdk-android-am57xx-evm-04.00.00.xx/board-support/aosp-6AM.1.3/
. build/envsetup.sh
lunch full_am57xevm-userdebug
rm out/target/product/am57xevm/*.img
rm out/target/product/am57xevm/obj/PACKAGING/systemimage_intermediates/system.img
make -j2
Preparing eMMC binaries/images
cd ~/ti-processor-sdk-android-am57xx-evm-04.00.00.xx/board-support/
mkdir emmc_files
cp -v ./aosp-6AM.1.3/out/target/product/am57xevm/*img emmc_files
cp -v ./aosp-6AM.1.3/device/ti/am57xevm/fastboot.sh emmc_files
cp -v ./aosp-6AM.1.3/out/host/linux-x86/bin/{simg2img,make_ext4fs,mkbootimg,fastboot,adb} emmc_files
cp -v ./aosp-6AM.1.3/out/host/linux-x86/lib64/{libc++.so,libcutils.so,liblog.so,libselinux.so} emmc_files
cp -v ./linux-4.4.x.../arch/arm/boot/zImage emmc_files/kernel
cp -v ./linux-4.4.x.../arch/arm/boot/dts/am57*.dtb emmc_files
cp -v ./u-boot.20xx.yy.../MLO emmc_files/GP_MLO
cp -v ./u-boot.20xx.yy.../MLO emmc_files/
cp -v ./u-boot.20xx.yy.../u-boot.img emmc_files
Flashing eMMC images
The default setup is to flash MLO and u-boot.img ,kernel, dtb file and AFS to emmc.
- Instructions are same for AM57x GP EVM and the AM57x IDK boards
Flashing procedure
- Create an SD card containing MLO and u-boot.img using the create-sdcard.sh script provided in the SDK and then boot the target board from this external SD card.
- Connect a USB cable from the Linux PC to the micro USB port on the
EVM
- There is only one micro USB port on the AM57x GP EVM
- On the AM57xx IDK boards you need to connect the micro USB cable to the micro USB port on the opposite side of the (4) RJ-45 connectors (The other micro USB port on the IDK boards is used for serial communication and JTAG).
- Power on the board and stop the board at u-boot prompt by interrupting with key press
Hit any key to stop autoboot: 3
- Set the right environment variables for Android SDK and save (This step is needed only for fresh flash, for incremental flashing this is optional)
=> env default -f -a
=> setenv partitions $partitions_android
=> env save
- Reboot the board and stop it at the u-boot prompt again and put the board into fastboot mode
=> fastboot 1
on the host machine
=> cd ~/ti-processor-sdk-android-am57xx-evm-04.00.00.xx/board-support/emmc_files
=> sudo ./fastboot oem format
=> sudo ./fastboot reboot (reboot and stop the device again in u-boot)
Note
If the emmc_files directory does not exist, you need to following the instructions in the above Preparing eMMC binaries/images section first.
- Put the board in fastboot mode by typing in below command
=> fastboot 1
- On the Linux PC which has the emmc images run the fastboot.sh script to flash the binaries
cd ~/ti-processor-sdk-android-am57xx-evm-04.00.00.xx/board-support/emmc_files
sudo ./fastboot.sh
- NOTE: After the flashing is done, remove the external SD card and reboot the board.
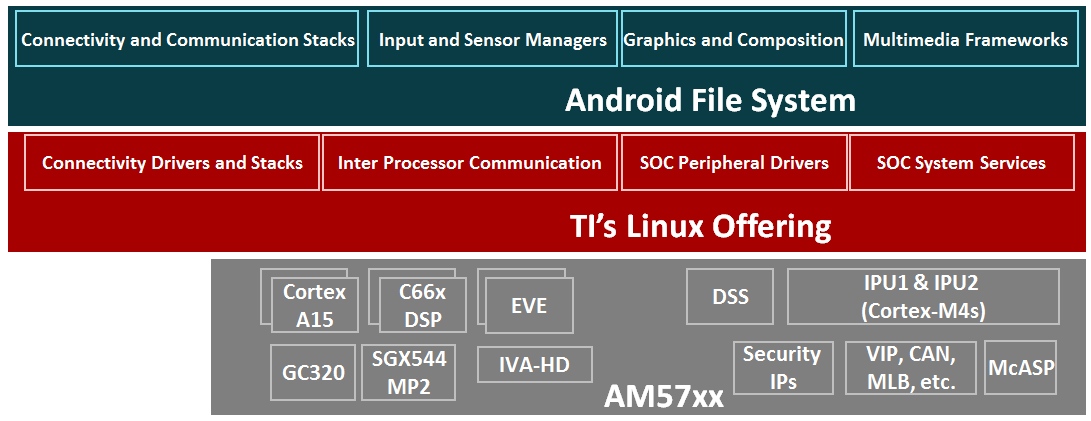
1.5. Software Stack
1.6. Processor SDK Technical Support
Technical support is a broad term. Our desire is to provide a solid product, good documentation, and useful training that defines a clear path for developing a product based on the Linux/RTOS/Android SDKs. However, we know we’ll never cover everything that can be done, and occasionally we even make mistakes <gasp>. So, when you can’t seem to find what you need, there’s a good place to search through previously answered questions and ask a new one - The E2E Support Forums.
There is an active community of TIers and other customers like you already using a TI Processor, on these forums. You may find your question has already been answered with a quick Search of the Forums. If not, a quick post will likely provide you the answers you need.
1.7. Processor SDK Android GPLv3 Disclaimer
There are GPLv3 licensed software components contained within the Processor SDK for Android on both the target and the host. The software manifest (Processor-SDK_Android_AM57X_Manifest.html) for the Android SDK is located in the docs/ directory of the installed SDK. The NOTICE.html file for the Android Open Source Project is also located in the docs/ directory. All GPLv3 components for both target and host are contained in the SDK directory.