PRU ICSS EthernetIP User Guide
Introduction
PRU-ICSS Ethernet/IP package is designed for the Sitara processor family (with PRU-ICSS IP) to enable customers add Ethernet/IP Adapter support to their system. The implementation consists of
- Firmware (provided as a binary)
- Driver
- PTP Driver
- EtherNet/IP Driver (includes DLR)
- Application
There are plenty of resources to get started with the development. This page is meant to be a landing page for getting all the resources at one place. Please refer to the Reference Link section for links to all the resources.
System Requirements
1.0.3 release uses the PROCESSOR-SDK-RTOS 05_01_00_11 which is available at:
- AM335x family : https://software-dl.ti.com/processor-sdk-rtos/esd/AM335X/05_01_00_11/index_FDS.html
- AM437x family : https://software-dl.ti.com/processor-sdk-rtos/esd/AM437X/05_01_00_11/index_FDS.html
- AM57x family: https://software-dl.ti.com/processor-sdk-rtos/esd/AM57X/05_01_00_11/index_FDS.html
Alternatively one can follow “Previous SDK Link” from Processor SDK RTOS release page ( https://software-dl.ti.com/processor-sdk-rtos/esd/<Soc>/latest/index_FDS.html )
1.0.3 release uses the EtherNet/IP stack version 3.5.0.0
Reference Documents
- White Paper
- Release notes
- Software Developer Guide
- Getting Started Guide
- EtherNet/IP Developer Guide
- PTP 1588 Developer Guide
Directory Structure
|   |--- docs
|       |---Industrial_Protocol_Package_Getting_Started_Guide.pdf
|       |---Industrial_Protocol_Package_Software_Developer_Guide.pdf
|       |---PRU_ICSS_EthernetIP_User_Guide.pdf
|       |---PRU_ICSS_EthernetIP_Release_Notes.pdf
|   |--- examples
|       |--- board
|           | --- common
|           | --- iceAM335x
|           | --- iceAM437x
|           | --- idkAM571x
|           | --- idkAM572x
|           | --- include
|       |--- ethernetip_adapter
|           | --- stc
|   |--- protocols
|       |--- ethernetip_adapter
|               |--- docs
|                       |--- doxygen
|               |--- drivers
|               |--- eds
|               |--- firmware
|                       |--- v1.0
|                       |--- v2.1
|               |--- include
|               |--- projects
|       |--- timeSync
|               |--- drivers
|               |--- include
|   |--- third_party
|       |--- protocols
|               |--- ethernetip_adapter
|                           |--- include
|                           |--- stack_lib
|                                |--- am57xx
|                                     |--- a15
|                                |--- am437x
|                                     |--- a9
|                                |--- am335x
|                                     |--- a8
|               |--- ptp
|                           |--- lib
|                                |--- am57xx
|                                     |--- a15
|                                |--- am437x
|                                     |--- a9
|                                |--- am335x
|                                     |--- a8
Note
Refer to install path to get updated view for any changes in directory structure
Generating Project files
Steps to generate Project files
- Setup the environment variables
- Edit the file
[INSTALL-DIR]/protocols/<protocol name>/projects/projectCreate.bat or .shto align to the environment in your machine. All these paths should be accurate and mandatory, and will cause errors otherwise- CCS_INSTALL_DIR - Set the path where the recommended version of CCS is installed in user machine(The path upto where folder ‘eclipse’ is located.)
- CCS_WORKSPACE_LOC - Set the CCS workspace location. This folder will be created if it doesn’t exist already.
- Edit the file
- IA_SDK_HOME - Specify the IA_SDK_HOME based on the the directory where the industrial package is installed. If the package is installed in a custom directory, make sure this path is modified properly.
- PDK_INSTALL_PATH - Set the path where PDK RTOS package is installed (Refer to default path in projectCreate.bat)
- PROJECT_CREATE_DIR - Set the folder where the created project will be kept. User can import the projects from this directory to CCS
- PROJECT_CREATE_OPTIONS_FILE_DIR - Specify the directory where the project create options files are kept. This folder contains the *.txt files which specify the project settings (linked files, predefined symbols, compiler and linker options for a specific project)
- Open Command/Shell Prompt and navigate to
[INSTALL-DIR]/protocols/<protocol name>/projects - Run projectCreate.bat or projectCreate.sh. The batch file intakes three mandatory command line arguments (The mandatory arguments are case sensitive!)
Usage format: projectCreate.bat [SOC] [PROCESSOR] [PROJECT_NAME]
- [SOC]
- The valid values for first command line argument [SOC] are
- AM571x - To generate an application project specific to AM571x
- AM572x - To generate an application project specific to AM572x
- AM437x - To generate an application project specific to AM437x
- AM335x - To generate an application project specific to AM335x
- AMIC110 - To generate an application project specific to AMIC110
- AM57xx - To generate a library project common to both AM572x and AM571x
- The valid values for first command line argument [SOC] are
- [PROCESSOR]
- The valid values for second command line argument [PROCESSOR] are
- arm - To generate a project specific to ARM core
- The valid values for second command line argument [PROCESSOR] are
- [PROJECT_NAME]
- The valid values for second command line argument [PROJECT_NAME]
to be used with EtherNetIP installer package
- ethernetip_adapter - to generate EtherNetIP adapter application project
- timeSync_lib - to generate PTP library project
- The valid values for second command line argument [PROJECT_NAME]
to be used with EtherNetIP installer package
Note
Ensure that Code Composer Studio is not running when executing projectCreate.bat or projectCreate.sh. If not, the eclipsec may throw errors
- Usage example 1 : projectCreate.bat AM572x arm ethernetip_adapter
- To generate the project files for EtherNetIP adapter application for AM572x platform by overwriting the project if it is already existing in PROJECT_CREATE_DIR\PROJECT_NAME_SOC_PROCESSOR
- Usage example 2 : projectCreate.bat AM57xx arm timeSync_lib
- To generate the project files for PTP library project common for both AM572x and AM571x platforms by overwriting the project if it is already existing in PROJECT_CREATE_DIR\PROJECT_NAME_SOC_PROCESSOR
- Usage example 3 : projectCreate.bat AM437x arm ethernetip_adapter
- To generate the project files for EtherNetIP adapter application for AM437x ARM core by overwriting the project if it is already existing in PROJECT_CREATE_DIR\PROJECT_NAME_SOC_PROCESSOR
Note
If the project create is successful, the generated project files will be found in [INSTALL-DIR]/protocols/<protocol name>/projects/PROJECT_NAME_SOC_PROCESSOR
More info
The projectCreate.bat or.sh utilizes the project arguments provides in
[INSTALL-DIR]/protocols/<protocol name>/projects/ccsproject_args to
generate the project file
EtherNet/IP Adapter
- NOTE 1:
- Permanent storage of Ethernet/IP device parameters are enabled and are stored in SPI Flash at various offsets as defined in file eip_main.h
- NOTE 2:
- To add ACD(Address Conflict Detection) support in the application, a legacy method is used for configuring NDK parameters. In this approach configuring of NDK is done using the Configuration APIs rather than the XGCONF configuration tool within CCS. This is because a configuration added through XGCONF tool will be overridden. Please refer the link for more information on this approach.
- NOTE 3:
- For passing the Subnet Mask tests (Test 4.1) specified in ODVA Conformance test report, rebuilding of the NDK is required. Macro _INCLUDE_ACD_SUPPORT must be defined in the file NDK_INSTALL_DIR\packages\ti\ndk\stack\lli\lliin.c. Then the NDK is rebuilt
- NOTE 4:
- The Ethernet/IP application can be modified to work as a Switch application by removing the Ethernet/IP dependencies. The steps to create Switch application can be found here
- NOTE 5:
- The NDK performance of the ICSS Emac Driver can be improved by increasing Queue size (Prioriy Queue 4 in case of Ethernet/IP). To enable this improvement change the macro QUEUE_4_SIZE in icss_switch.h from 97(3KB) to 194(6KB). However it is important that the total Queue size is not more than 12KB.
- NOTE 6
- To use PRU-ICSS1 on the AM571x IDK, the
#define PRUICSS_INSTANCEneed to set to1in [INSTALL-DIR]/examples/ethernetip_adapter/main.c
- NOTE 7
- The AM335x and AMIC11x application uses DMTimer4 as the clock source for the SYSBIOS Ticks (Refer to cfg file for details). The DMTimer module should be enabled for the application to load properly with the change. This needs to be done in the GEL file. Make the following changes in GEL File to enable DMTimer4
- Add the line inside hotmenu AM3359_ICE_Initialization()
- WR_MEM_32(CM_PER_TIMER4_CLKCTRL, PRCM_MODULEMODE_ENABLE);
- Add the defines in the GEL File
- #define CM_PER_TIMER4_CLKCTRL (PRCM_BASE_ADDR + 0x88)
- #define PRCM_MODULEMODE_ENABLE (2U)
The example is an EtherNet/IP adapter demo application based on Molex EtherNet/IP stack on top of NDK TCP/IP stack . The EtherNet/IP is an industrial networking standard that takes advantage of commercial off-the-shelf Ethernet communication chips and physical media. The EtherNet/IP uses an open protocol (CIP) at the application layer. This example is a limited demo application that is constrained so that a user will be allowed to execute it for one hour only. The EtherNet/IP adapter application is implemented over the low latency cut-thru switch implementation on ICSS
The ACD(Address Conflict Detection) feature is enabled in the example. Upon startup, the application checks for the ACD enable bit stored in the SPI Flash (at offset SPI_EEPROM_ACD_OFFSET). If disabled, the application starts immediately, otherwise it waits for the link to come up. Once the link is established, the ACD mechanism is started. The IP Address is obtained once the ARP probing is done and no duplicate IP Address is detected.
This application allows the user to carry out the following actions and can be configured via the serial console
- Start mode – Start stack in IO exchange mode
- Stop mode – Stop IO exchange mode
- Run mode – In this mode IO Data will be exchanged with scanner
- Idle mode - No Data exchange with scanner. Only communication.
- Copy in-out mode – Copy the data from scanner to the OUT data.
- Increment mode – Stack will increment the OUT data periodically
- Change IP Address - IP address of the device can be configured manually.
- Erase Non Volatile Memory - This option will erase the stored device configurations from the non volatile memory
The stc file used for the ODVA CTT is provided along with the
application in stc folder. The EDS file for the application is located
at [INSTALL-DIR]/protocols/ethernetip_adapter/eds.The Ethernet/IP
Application uses Industrial LED0 as Module status LED and Industrial
LED1 as network status LED.
Ethernet/IP adapter has an integrated two-port cut-through learning switch. Switch is integrated to TCP/IP (NDK) stack.Please see ICSS-EMAC LLD for more details on switch driver.
For a quick checkout and demonstration of the EtherNet/IP functionality, an EIPTool, available for free from Molex, can be used to establish CIP connections and query or set CIP attributes. Additional details on using EIPTool with an example application can be found here Using EIPTool with EtherNet/IP Adapter Application
The Ethernet/IP Driver API guide is available here -
[INSTALL-DIR]/protocols/ethernetip_adapter/docs/API_documetation.html
Half Duplex Support
Half Duplex support is not mandated in the latest version of the spec. Kindly refer to the spec for more info.
Device Level Ring
The Ethernet/IP on Industrial Communication SubSystem (ICSS) supports Beacon based DLR (Device Level Ring) node which is a ring redundancy protocol specified by ODVA, the main features of this implementation are
- Supports 200 us beacon interval and 400 us beacon timeout interval
- Supports learning table exception for Supervisor
- Dynamic start and stop. User can enable or disable DLR on the fly
- No user configuration required. The ring parameters get configured on their own.
To test DLR capability a DLR capable device is required. EtherNet/IP application is tested using a Rockwell PLC, part number 1769 L18ERM and a 3 port ETAP part number 1783-TD001
For more details on the implementation refer to the Developer Guide here
PTP/1588
Ethernet/IP adapter supports Annex D of PTP/1588 in End to End configuration. The application supports both Transparent and Ordinary Clock functionalities. Ethernet/IP adapter does not support PTP Master mode. The example makes use of PTPD stack to enable BMCA and Management messages support. The stack comes with a BSD style licensing.
PTP/1588 implementation can be tested using open source PTP implementations like Linux PTP or PTPd, they must be configured in Annex D or PTP over UDP mode and as End 2 End Clock.
In the application it’s possible to see the synchronization status of DUT. To do so press “p” in the EIP UART Menu. If a PTP master is connected and everything is ok, the following menu pops up in debug mode
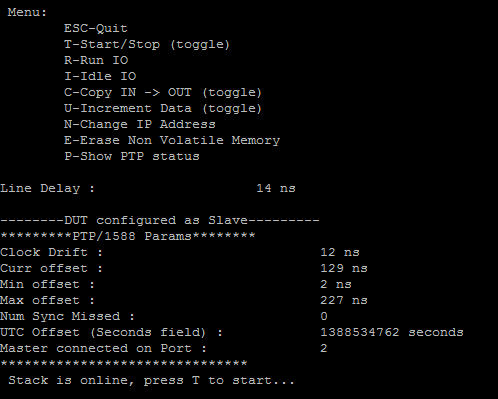
Here the master is connected on Port 2 and current offset with master is in the order of 129 nanoseconds. In release mode of the application the min and max offsets are not visible, rest is unchanged.
Limitations
BMCA is currently disabled in the PTP stack. So if the device is configured as a slave then it will sync to the first master it connects to, if another master comes online then it will become the new master. This will keep happening in a ping pong fashion so it’s best to enable only one Master for testing.
- BMCA support is not supported in this release.
- Multi domain support is not supported in this release.
- PTP support is not enabled for K2G platform
For more details on the implementation and usage refer to the PTP/1588 developer guide here.