From RTSC-Pedia
 | [printable version] [offline version] | offline version generated on 11-Jun-2009 18:06 UTC |
RTSC+CCStudio v4 QuickStart
Using CCStudio v4 to create, build, and debug RTSC projects
This page provides quick instructions for creating, building, and debugging a project that uses RTSC within an Eclipse IDE such as Code Composer Studio v4. If you don't have CCSv4 or prefer to use the the XDCtools command line tools directly, see Using XDCtools Commands.
Contents |
Creating CCSv4 projects that use RTSC
Follow these steps to use CCSv4 to create a project that can use RTSC:
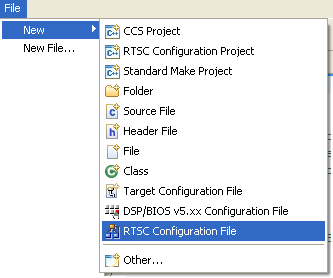
- Open CCSv4 and choose File > New > CCS Project from the menu bar.
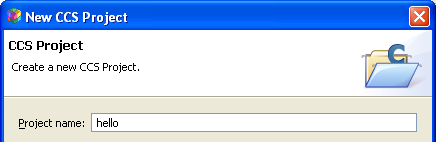
- In the New CCS Project dialog, type a Project Name. For example, to begin creating a project using "hello world" example code provided with DSP/BIOS, you can type "hello". The default project location automatically reflects the project name. Then, click Next.
- Select your platform type in the Project Type field. For example, you might select "C6000". Then, click Next.
- Click Next on the "Additional Project Settings" page.
- In the Device Variant row of the "CCS Project Settings" page, select a filter in the first field. This shortens the list of device variants in the second field. Then, select the actual device you are using. For example, you might select "TMS320C64X" in the filter field and "Generic C64x+ Device" in the second field. Depending on your device, you might also need to adjust the Device Endianness and Runtime Support Library settings.

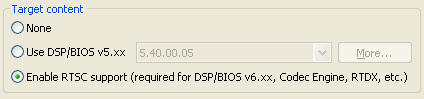
- In the Target content area, select the Enable RTSC support option. Then, click Next.
- On the "Referenced RTSC Configuration" page, choose whether you want to create a new RTSC configuration or use an existing one. If you are getting started with RTSC, you will probably need to create a new configuration. Then, click Next. (If you want to share configurations between projects, see the RTSC+Eclipse FAQs.)
- On the "New RTSC Configuration Page" page, accept the default name and location for the configuration project. Then, click Next.
- On the "RTSC Configuration Settings" page, make sure the versions of XDCtools, DSP/BIOS, and other products that you want to use are selected. By default, the most recent versions are selected.

- Also on the "RTSC Configuration Settings" page, click the drop-down arrow next to the RTSC Platform field. CCSv4 scans the available packages for available platforms. Click on the list and choose the platform you want to use.
- You can choose which libraries you want the configuration build to link with in the RTSC Build-Profile field. The RTSC Target setting is based on device settings you made on earlier pages, and should not need to be changed. Then, click Next.
- On the "RTSC Configuration Templates" page, check the Create a project using one of the templates box if you want to use a provided template as the basis for your configuration. For example, you can select the Hello example, which uses the XDCtools System module. If you don't want to use a template, you can later add files to your projects. Then, click Finish.
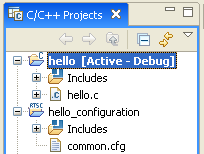
- The main project for your application, which will contain the application source code. This project references the RTSC configuration project.
- The RTSC configuration project, which contains a *.cfg file for static configuration of RTSC modules and objects (and for RTSC-based products like DSP/BIOS).
The RTSC target and platform are key parameters that describe your embedded hardware environment. See Using Targets and Platforms for more information on choosing a RTSC target and platform for your project. Check the ti.targets package and ti.platforms.* packages for pre-built targets and platforms suitable for use in CCSv4.
Using a RTSC configuration template
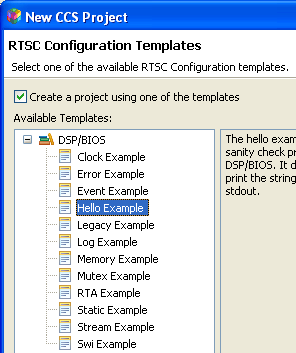
When you are creating a CCSv4 project that enables RTSC support, you can select a RTSC Configuration Template. When you highlight a template, a brief description is provided to the right.
When you use File > New > CCS Project and get to the RTSC Configuration Templates page of the project creation wizard, choosing a template copies both a default .c file into the CCS Project and a default .cfg file into the RTSC Configuration Project.
When you use File > New > RTSC Configuration Project and get to the RTSC Configuration Templates page of the project creation wizard, choosing a template copies only a default .cfg file into the RTSC Configuration Project (but no .c file).
See the DSP/BIOS Getting Started Guide (in the DSP/BIOS installation) for further descriptions of the DSP/BIOS templates you see on the RTSC Configuration Templates page of the project creation wizard.
Adding files to projects
If you create a project using a RTSC configuration template, source files are automatically added to your projects, and you can modify those files as needed.
If you chose not to use a template, you can add C source files to your project by selecting the main application project and doing any of the following:
- Creating a new file. From CCSv4's menus, choose File > New > Source File (or File > New > Header File).
- Copying an existing file. From CCSv4's menus, choose Project > Add Files to Active Project. Browse to the folder than contains the file you want to add. Select the file and click Open. This copies the file to the directory that contains your project.
- Linking to an existing file. From CCSv4's menus, choose Project > Link Files to Active Project. Browse to the folder than contains the file you want to add. Select the file and click Open. This links to the file in the directory where it was stored.
If you chose not to use a template, you can add a RTSC configuration file to your project by selecting the RTSC Configuration Project and making it the active project in CCSv4 (by right-clicking on the project and choosing Set as Active Project). Then, do any of the actions listed above for C source files, except that you create new files by choosing File > New > RTSC Configuration File.
The folders listed in the Includes list (except for the compiler-related folder) are folders that are on the RTSC package path.
If you expand the node for a source file in the project list, it lists the header files it references and the functions it contains.
Using XGCONF to edit RTSC configurations
XGCONF is a tool that allows you to graphically create and view RTSC configuration scripts. (If you have used DSP/BIOS 5.x, it is somewhat similar to the DSP/BIOS Configuration Tool.)
To start XGCONF, follow these steps:
- Make the project containing the RTSC configuration file (with a 'cfg' extension) the "Active" project. This may be accomplished by right-clicking on the project in the "C/C++ Projects" view and selecting Set as Active Project. This step is important since XGCONF works with the properties of the current active project in the workspace.
- Right-click on the RTSC configuration file and select Open with > XGCONF.
For information about using XGCONF, see the XGCONF User's Guide.
Building the project
When you build an application project, the associated RTSC configuration project is also rebuilt if the configuration has been changed.
To build the project, follow these steps:
- Make sure the main application project is the active project. (If it isn't active, right-click on the project and select Set as Active Project from the menu.)
- Choose Project > Build Active Project.
- Examine the Console log to see if errors occurred.
For help with build errors, see Troubleshooting.
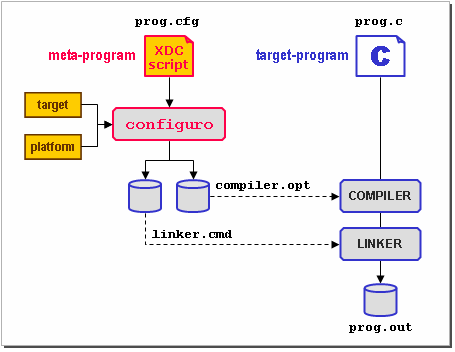
The RTSC configuration step occurs before compiling the .c files in your application, or whenever the prog.cfg file changes. CCStudio runs a command-line tool called "configuro" that processes the configuration script and outputs static C data structures and code to be linked with your application.
Configuro can be used to integrate RTSC configuration into other build systems, command-line or graphical. For more information, see Consuming Configurable Content.
After you build the project, look again at the C/C++ Projects view. You can expand the Debug folder to see the files that were generated by configuro and the build process. Notice that the project build flow diagram shown here references certain important files that were generated by configuro.
Rules for working with CCS Build Settings
After you have created a RTSC Configuration Project, you can change the properties of the project in CCSv4 by right-clicking the project name and choosing Properties.
However, you should be careful about changing the CCS Build Settings for a RTSC configuration project. The build settings for the configuration project much match or be compatible with those of all application projects that reference the RTSC configuration project. So, if you change the CCS Build Settings for a RTSC configuration project, you should also change the build settings for the application projects that use that configuration.
In the "CCS Build Settings" category of the Properties dialog, the General tab applies to compiler settings, the RTSC Configuration tab applies to the "configuro" utility used to process the .cfg file, and the Link Order tab applies to the linker settings.
Note that if there is any platform-specific configuration in your .cfg file, you much change those settings in addition to any changes you make to the CCS Build Settings.
Running and debugging an application
If you haven't already created a default target configuration, follow these steps:
- Choose File > New > Target Configuration File.
- Type a filename for the target configuration, which will be stored as part of the CCS project. For example, you might type TCI6482sim.ccxml if that reflects the target you want to use. Then, click Finish.
- In the Connection field for your target configuration, choose the type of connection you have to the target. Then type part of the target name in the Device filter field. For example, you might choose the "TI Simulator" connection and filter by "64xp" to find a C64x+ simulator.
- Choose File > Save or click the Save icon to save your target configuration.
- You can right-click on a target configuration and choose Set as Default Target to set which target configuration is used for debugging.
To debug an application, follow these steps:
- Choose Run > Debug Active Project or click the
 icon. This loads the program and switches you to the "Debug" perspective.
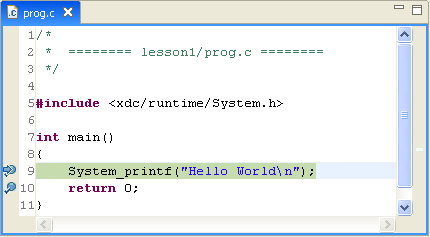
- Set a breakpoint at line 10 by placing your cursor in the line of prog.c and clicking the
 icon.
icon.
- Press F8 to run to the breakpoint.
- Look at the messages in the "Console" tab.
For Eclipse-based debugging of applications that use RTSC modules, XDCtools provides the Runtime Object Viewer (ROV). For information on using this tool, see Runtime Object Viewer (ROV).
See also
| RTSC+Eclipse FAQs | Using RTSC with Eclipse-Based Tools |
| XGCONF User's Guide | Using the RTSC Graphical Configuration Tool in CCSv4 |
| Runtime Object Viewer | Using ROV for Eclipse-Based Debugging |
| RTSC Module Primer | Producing and consuming spec'd modules |
| Using Targets and Platforms | Introduction to targets and platforms |
| Using xdc.runtime System | How to boot, print a message, and shutdown |
| Overview of xdc.runtime | Introduction to the xdc.runtime package |
| [printable version] [offline version] | offline version generated on 11-Jun-2009 18:06 UTC |
