1.1.5. Program EVM User Guide
1.1.5.1. Overview
This release provides the images for the factory to program on the eeprom, nand and nor for EVMK2H, EVM2E, and EVMK2L. The mechanism only applies to the devices with DSP core, and won’t work for devices without DSP, such as AM5K2E02 and AM5K2E04 devices.
1.1.5.2. Files Provided
The files used for programming the EVMs are provided under bin\program_evm\binaries\[evmk2h, evmk2e, evmk2l].
First, create the following symbolic links of nor.bin and nand.bin.
For EVMK2H:
cd bin/program_evm/binaries/evmk2h/
ln -sv ../../../../board-support/prebuilt-images/u-boot-spi-k2hk-evm.gph nor.bin
ln -sv ../../../../filesystem/tisdk-server-rootfs-image-k2hk-evm.ubi nand.bin
For EVMK2E:
cd bin/program_evm/binaries/evmk2e/
ln -sv ../../../../board-support/prebuilt-images/u-boot-spi-k2e-evm.gph nor.bin
ln -sv ../../../../filesystem/tisdk-server-rootfs-image-k2e-evm.ubi nand.bin
For EVMK2L:
cd bin/program_evm/binaries/evmk2l/
ln -sv ../../../../board-support/prebuilt-images/u-boot-spi-k2l-evm.gph nor.bin
ln -sv ../../../../filesystem/tisdk-server-rootfs-image-k2l-evm.ubi nand.bin
| File Name | Description |
| nand.bin | Nand UBIFS image (symbolic link to tisdk-server-rootfs-image-[k2hk, k2e, k2l]-evm.ubi) |
| nandwriter_evmk2h.out | Nand Writer DSP executable |
| nand_writer_input.txt | nand image writer input file |
| nor.bin | SPI NOR file for U-Boot (symbolic link to u-boot-spi-[k2hk, k2e, k2l]-evm.gph) |
| norwriter_evmk2h.out | NOR image writer DSP executable |
| nor_writer_input.txt | NOR image writer input file |
Then, modify nor_writer_input.txt and nand_writer_input.txt to update the file name.
nor_writer_input.txt:
file_name = nor.bin
nand_writer_input.txt:
file_name = nand.bin
MD5SUM utility used
Please use the md5sum utility from the following link: http://www.pc-tools.net/files/win32/freeware/md5sums-1.2.zip
1.1.5.3. Device Support
- EVMK2H in Little endian Mode.
- EVMK2E in little endian mode
- EVMK2L in little endian mode
1.1.5.4. Directory Structure
- The program_evm (top-level) directory is intended to hold the *DSS* script for the Code Composer Studio which programs the default images to NAND/NOR/EEPROM.
- The binaries/evmxxx directory is intended to hold all the factory default images and the respective writers.
- The configs/evmxxx directory is intended to hold the “CCS target configuration files”. Use evmxxx-linuxhost.ccxml for linux.
- The gel directory holds custom GEL files for the board. It also contains a README.txt for the gel file usage.
- The logs directory is empty and will be used to store logs. Logs are automatically generated when using program_evm.js to flash evmxxx devices.
├───program_evm
│   │   program_evm.js
│   │
│   ├───binaries
│   │   └───evmxxx
│   │           eepromwriter_evmxxx.out
│   │           eepromwriter_input.txt
│   │           eepromwriter_input50.txt
│   │           eepromwriter_input51.txt
│   │           nand.bin (symbolic link created as above)
│   │           nandwriter_evmxxx.out
│   │           nand_writer_input.txt
│   │           nor.bin (symbolic link created as above)
│   │           norwriter_evmxxx.out
│   │           nor_writer_input.txt
│   ├───configs
│   │   └───evmxxx
│   │           evmxxx.ccxml
│   │           evmxxx-linuxhost.ccxml
│   ├───gel
│   │           xtcievmk2x.gel
│   │           evmk2e.gel
│   │           tcievmk2l.gel
│   │           README.txt
│   └───logs (empty directory)
1.1.5.5. Programming the bin files
This section assumes you have installed Processor SDK 02.00.01 and above (which supports EVMK2H/EVMK2L/EVMK2E) and Code Composer Studio.
1.1.5.6. Verify CCS Connection
First, start CCS on linux host machine and configure the target configuration for the EVM (e.g., bin/program_evm/configs/evmk2h/evmk2h-linuxhost.ccxml). Then, launch the target configuration, and verify the connection to the ARM and DSP through JTAG.
After the CCS connection is verified, disconnect the target connection, exit CCS and continue to Set the Environment Variables
Update firmware on xd200 pod for USB3 Ports
Note
Please note that this section is needed only the CCS connection cannot be established successfully.
When USB3 ports are used for the JTAG, the following error can be reported when testing the connection to the target.
...
This utility has selected a 560/2xx-class product.
This utility will load the program 'xds2xxu.out'.
E_RPCENV_IO_ERROR(-6) No connection
Failed to open i/o connection (xds2xxu:0)
...
When this happens, it is required to update the firmware on the xd200 pod. This can be done on a PC which is able to communicate to the xd200 pod, and has CCS and the latest TI emulators package installed. Example:
cd ccsv6/ccs_base/common/uscif/xds2xx
xds2xx_conf.exe update xds2xxu 0 xds200_firmware_v1006.bin
xds2xx_conf.exe boot xds2xxu 0
Set the EVM for no-boot mode
For EVMK2H
Due to hardware NAND issue, EVM of certain revisions need to use alternative programming method:
| EVM Revision | NAND Known Issue | Programming Method |
| Rev 3.0 | Yes | Alternative U-Boot command |
| Rev 2.0 | Yes | Alternative U-Boot command |
| Rev 1.x | No | Program_evm |
For Rev 2.0 and 3.0 EVM using alternative U-Boot command to program NAND, please follow the steps below: Set the boot mode to SPI Little Endian boot mode
1. Set up TFTP server
2. copy filesystem/tisdk-server-rootfs-image-k2h-evm.ubi to tftp directory
3. Have Ethernet cable connected to the EVM and verify the connection to the TFTP server
4. Boot up the EVM to the U-boot prompt and type the following commands:
u-boot# setenv serverip <TFTP server IP address>
u-boot# setenv tftp_root <tftp directory>
u-boot# setenv addr_fs 0x82000000
u-boot# nand erase.part ubifs
u-boot# dhcp ${addr_fs} ${tftp_root}/tisdk-server-rootfs-image-k2h-evm.ubi
u-boot# nand write ${addr_fs} ubifs ${filesize}
u-boot# env default -f -a
u-boot# setenv boot ubi
u-boot# saveenv
Once it is completed, the EVM is ready to use.
For Rev 1.0 EVM, make sure the EVM dip switches are set for no-boot mode and continue.
| SWITCH | Pin1 | Pin2 | Pin3 | Pin4 |
| SW1 | Off | Off | Off | On |
See instruction here for K2H no boot mode for reference
For EVMK2E
Make sure the EVM dip switches are kept as below to put the board in no-boot mode, and continue.
| SWITCH | Pin1 | Pin2 | Pin3 | Pin4 |
| SW1 | On | On | On | On |
See instruction here for K2E no boot mode for reference:
For EVMK2L
Make sure the EVM dip switches are kept as below, and continue.
| SWITCH | Pin1 | Pin2 | Pin3 | Pin4 |
| SW1 | On | On | On | On |
See instructions here for K2L no boot mode for reference: K2L_NoBoot
Set the Environment Variables
Please make sure the below environment variables needs to be set. Otherwise there could be some unexpected behavior experienced.
1. Set the DSS_SCRIPT_DIR environment variable (Mandatory) to your Code Composer Studio scripting bin directory. Example:
export DSS_SCRIPT_DIR=~/ti/ccsv6/ccs_base/scripting/bin
2. Set the PROGRAM_EVM_TARGET_CONFIG_FILE environment variable. Please provide the path for the ccxml file that is created for the EVM for the CCS. Example:
export PROGRAM_EVM_TARGET_CONFIG_FILE=configs/evmk2h/evmk2h-linuxhost.ccxml
DSS Script Arguments
General Script Usage
Script Usage:
cd bin/program_evm
$DSS_SCRIPT_DIR/dss.sh program_evm.js evm(k2h|k2e|k2l)[-le] (nor|nand)
Formatting the NAND Flash
Note
Sometimes, NAND flash could be corrupted (e.g. EVM boots from UBI and does not gracefully shut down), NAND flash needs to be formatted before loading the program using program_evm utility.
The program_evm supports formatting the NAND device as below. Linux:
cd bin/program_evm
$DSS_SCRIPT_DIR/dss.sh program_evm.js evm(k2h|k2e|k2l)-le format-nand
Warning
Please note that this would erase all the nand blocks.
Executing the DSS script to restore factory default images
- cd “bin/program_evm” directory
- Set the necessary environment variables as described under Set the Environment Variables
- Run the “program_evm.js” script command from program_evm directory.
Example:
cd bin/program_evm
$DSS_SCRIPT_DIR/dss.sh program_evm.js evmk2h-le nor
This will write all the little endian images to K2H EVM.
Sample DSS Script Output
The sample output after running the DSS Script is as below.
Note
The loading of nand.bin can take up to a few minutes depending on the image size.
bin/program_evm$ $DSS_SCRIPT_DIR/dss.sh program_evm.js evmk2h nor
board: evmk2h
endian: Little
emulation: XDS2xx emulator
binaries: /home/user/ti-processor-sdk-linux-k2hk-evm-02.00.01.07/bin/program_evm/binaries/evmk2h/
ccxml: configs/evmk2h/evmk2h-linuxhost.ccxml
C66xx_0: GEL Output:
Connecting Target...

C66xx_0: GEL Output: TCI6638K2K GEL file Ver is 1.3

C66xx_0: GEL Output: Detected PLL bypass disabled: SECCTL[BYPASS] = 0x00000000

C66xx_0: GEL Output: (3a) PLLCTL = 0x00000040

C66xx_0: GEL Output: (3b) PLLCTL = 0x00000040

C66xx_0: GEL Output: (3c) Delay...

C66xx_0: GEL Output: (4)PLLM[PLLM] = 0x0000000F

C66xx_0: GEL Output: MAINPLLCTL0 = 0x07000000

C66xx_0: GEL Output: (5) MAINPLLCTL0 = 0x07000000

C66xx_0: GEL Output: (5) MAINPLLCTL1 = 0x00000040

C66xx_0: GEL Output: (6) MAINPLLCTL0 = 0x07000000

C66xx_0: GEL Output: (7) SECCTL = 0x00090000

C66xx_0: GEL Output: (8a) Delay...

C66xx_0: GEL Output: PLL1_DIV3 = 0x00008002

C66xx_0: GEL Output: PLL1_DIV4 = 0x00008004

C66xx_0: GEL Output: PLL1_DIV7 = 0x00000000

C66xx_0: GEL Output: (8d/e) Delay...

C66xx_0: GEL Output: (10) Delay...

C66xx_0: GEL Output: (12) Delay...

C66xx_0: GEL Output: (13) SECCTL = 0x00090000

C66xx_0: GEL Output: (Delay...

C66xx_0: GEL Output: (Delay...

C66xx_0: GEL Output: (14) PLLCTL = 0x00000041

C66xx_0: GEL Output: PLL has been configured (CLKIN * PLLM / PLLD / PLLOD = PLLOUT):

C66xx_0: GEL Output: PLL has been configured (122.88 MHz * 16 / 1 / 2 = 983.04 MHz)

C66xx_0: GEL Output: Power on all PSC modules and DSP domains...

C66xx_0: GEL Output: Power on all PSC modules and DSP domains... Done.

C66xx_0: GEL Output: WARNING: SYSCLK is the input to the PA PLL.

C66xx_0: GEL Output: Completed PA PLL Setup

C66xx_0: GEL Output: PAPLLCTL0 - before: 0x0x07080400    after: 0x0x07080400

C66xx_0: GEL Output: PAPLLCTL1 - before: 0x0x00002040    after: 0x0x00002040

C66xx_0: GEL Output: DDR begin

C66xx_0: GEL Output: XMC setup complete.

C66xx_0: GEL Output: DDR3 PLL (PLL2) Setup ...

C66xx_0: GEL Output: DDR3 PLL Setup complete, DDR3A clock now running at 666 MHz.

C66xx_0: GEL Output: DDR3A initialization complete

C66xx_0: GEL Output: DDR3 PLL Setup ...

C66xx_0: GEL Output: DDR3 PLL Setup complete, DDR3B clock now running at 800MHz.

C66xx_0: GEL Output: DDR3B initialization complete

C66xx_0: GEL Output: DDR done

Writer:/home/user/ti-processor-sdk-linux-k2hk-evm-02.00.01.07/bin/program_evm/binaries/evmk2h/norwriter_evmk2h.out

NOR:/home/user/ti-processor-sdk-linux-k2hk-evm-02.00.01.07/bin/program_evm/binaries/evmk2h/nor.bin

Start loading nor.bin
Start programming NOR
2016_01_7_174332
NOR Writer Utility Version 01.00.00.04

Flashing sector 0 (0 bytes of 458752)
Flashing sector 1 (65536 bytes of 458752)
Flashing sector 2 (131072 bytes of 458752)
Flashing sector 3 (196608 bytes of 458752)
Flashing sector 4 (262144 bytes of 458752)
Flashing sector 5 (327680 bytes of 458752)
Flashing sector 6 (393216 bytes of 458752)
Reading and verifying sector 0 (0 bytes of 458752)
Reading and verifying sector 1 (65536 bytes of 458752)
Reading and verifying sector 2 (131072 bytes of 458752)
Reading and verifying sector 3 (196608 bytes of 458752)
Reading and verifying sector 4 (262144 bytes of 458752)
Reading and verifying sector 5 (327680 bytes of 458752)
Reading and verifying sector 6 (393216 bytes of 458752)
NOR programming completed successfully
End programming NOR
Note
For EVMs without Security Accelerator components, PSC errors will show up due to a known issue in GEL file. The PSC errors can be ignored and are not fatal. The program EVM will proceed and complete successfully.
Programming the bin files for devices without DSP core
This section describes how to program the bin files to either NOR or NAND on the devices without DSP core (AM5K2E02 and AM5K2E04). The installation of Processor SDK and Code Composer Studio is required.
Set up TFTP server on the Linux host machine
Eable the TFTP server service on the Linux host machine, and copy u-boot-{platform].gph and isdk-server-rootfs-image-{platform].ubi from ProSDK installed directory to the tftp server directory. The files are located in board-support/prebuilt-images and filesystem directory respectively.
Have the Ethernet connection between the EVM and TFTP Server.
Set the EVM for no-boot mode
Follow the instruction in previous section to set the dip switch of the EVM in no-boot mode
Load and Run U-Boot on keystone EVMs using CCS
Follow the instructions in {Proc_SDK_Install_Dir}/board-support/u-boot-{Version}/board/ti/ks2_evm/README to run u-boot using CCS
Configuration for TFTP download
Interrupt the boot process when running u-boot using CCS. In the u-boot prompt console, configure the u-boot environment variables for TFTP download
# setenv serverip <TFTP_SERVER_IP>
# setenv tftp_root <TFTP_SERVER_DOWNLOAD_DIR>
Restore Factory default images
To restore the u-boot image in NOR:
# run get_uboot_net
# run burn_uboot_spi
To restore the combined kernel and fileystem UBI image in NAND:
# run get_ubi_net
# run burn_ubi
Note
When programming UBI image to NAND, be sure the UBI image size is enough to fit in NAND memory.
Reset U-Boot Environment Variables
Reset U-Boot environment variables if U-Boot version has been changed
# env default -f -a
# saveenv
Verification
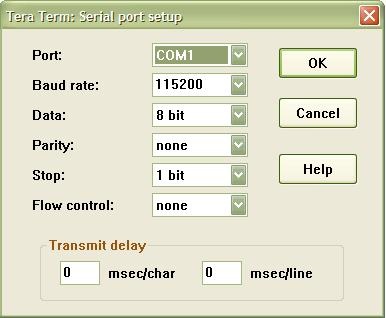
Serial Port Setup
Connect the RS232 Serial cable provided in the box to the serial port of the Host PC. If Host is running Windows OS, start tera term and configure the serial port settings as follows.
1.1.5.7. Verifying NOR
EVMK2H, EVMK2E, EVMK2L
- Set the dip switches as below to set SPI boot mode
| SWITCH | Pin1 | Pin2 | Pin3 | Pin4 |
| SW1 | Off | Off | On | Off |
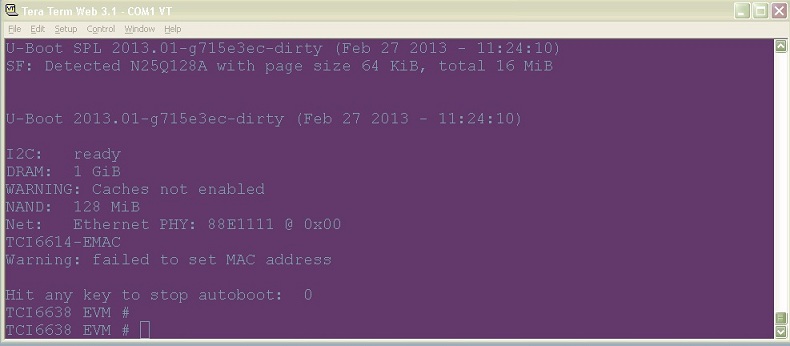
- Power Cycle the board.
- Make sure the evm is connected to the DHCP server.
- U-Boot will show up on the UART. A sample screen is shown below.
Verifying NAND
EVMK2H, EVMK2E, EVMK2L
NOR(U-Boot) must be flashed prior to performing any of the steps below.
For EVMK2H, EVMK2E & EVMK2L it is necessary to reformat the NAND Flash prior to burning the image. Example command to do this:
%DSS_SCRIPT_DIR%\dss.sh program_evm.js evmk2h format-nand
After entering the command, burn the NAND and perform the steps below to verify.
- Set the dip switches as below to set SPI boot mode
| SWITCH | Pin1 | Pin2 | Pin3 | Pin4 |
| SW1 | Off | Off | On | Off |
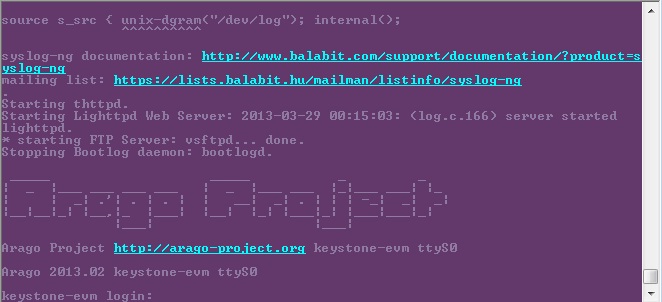
- Power Cycle the board. U-Boot will show up on the UART.
- Type the following commands into U-Boot:
env default –f –a
setenv boot ubi
boot
- A sample screen is shown below.