6.1.9. Ubuntu 14.04 Set Up to Network Boot an AM335x/AM437x Based Platform
The AM335x/AM437x processor families from Sitara can boot from the ROM Bootloader (RBL) using the BOOTP networking protocol that is supported by many standard tools. This capability allows developers to set up an environment where the U-Boot bootloader, Linux kernel, and even filesystem can be hosted from the development Linux box, using only a ethernet cable or even USB cable depending on the capabilities of the AM335x/AM437x based target system. This process sets up a very nice, efficient Linux development system where changes to U-Boot, the Kernel, or even the filesystem can be quickly tested for fast, iterative development.
This page describes how to set up an Ubuntu 14.04 based Linux Development host as a BOOTP server that will work well with the AM335x/AM437x RBL and U-Boot. While the specific steps and tools may be a bit different, the information provided should be enough to set up most Linux distributions. This set up assumes a fresh Ubuntu install and should include everything needed to get up to a U-Boot command prompt. From here, a variety of next steps can be used to acheive the desired Linux environment on the target (for example, setting up a Network File System (NFS) for filesystem development) or using an initramfs.
In order to get to a simple U-Boot command prompt, the following tools will be needed:
- Ubuntu 14.04 (instructions assume a fresh install for simplicity)
- A BOOTP/DHCP server - isc-dhcp-server is used, but others work as
well
- The server has to be configured to respond properly to the BOOTP requests from the AM335x/AM437x device
- A TFTP Server - atftpd is used, but others work as well
- A method to start/stop services - xinetd is used here
- A Hardware platform that can be set to boot from either Ethernet or USB RNDIS (this guide uses the Beaglebone Black as an example)
- A U-Boot image that includes the necessary peripheral booting support (Ethernet or USB RNDIS) often provided with SDK pre-builts
- The necessary cables and such to get everything hooked up appropriately
6.1.9.1. Step By Step
Here is the process to follow to get everything up and running. Most of the steps necessary are the same whether using Ethernet or USB. But, for USB there are some additional steps required.
Install Ubuntu 14.04 (preferably on a dedicated PC).
Note
Other versions of Ubuntu and other distributions will likely need small changes to configure this process correctly.
The Processor SDK for Linux provides a working Linux system for development (bootloader, kernel, filesystem and toolchain). This process should work with theoretically any system properly ported and configured for AM335x/AM437x.
Install the necessary services using a terminal on the Linux box.
sudo apt-get install isc-dhcp-server atftpd xinetd
Configure the BOOTP/DHCP Server
The RBL uses the vendor-id part of the BOOTP protocol to identify itself to the BOOTP host server. The following configuration takes this into account.
Edit /etc/dhcp/dhcpd.conf
subnet 192.168.2.0 netmask 255.255.255.0
{
   range dynamic-bootp 192.168.2.2 192.168.2.100;
   if substring (option vendor-class-identifier, 0, 10) = "AM335x ROM"
   {
      filename "u-boot-spl-restore.bin";
   }
   elsif substring (option vendor-class-identifier, 0, 10) = "DM814x ROM"
   {
      filename "u-boot-spl-restore.bin";
   }
   elsif substring (option vendor-class-identifier, 0, 10) = "AM43xx ROM"
   {
      filename "u-boot-restore.img";
   }
   elsif substring (option vendor-class-identifier, 0, 17) = "AM335x U-Boot SPL"
   {
      filename "u-boot-restore.img";
   }
   elsif substring (option vendor-class-identifier, 0, 10) = "AM43xx U-B"
   {
      filename "u-boot-restore.img";
   {
   else
   {
      filename "zImage";
   }

   range 192.168.2.101 192.168.2.199;
}
Note
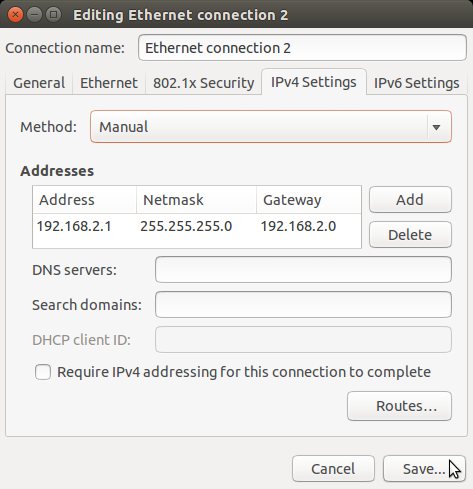
This configuration creates a subnet, 192.168.2.0, with a bootp IP Address range of 2 - 100. The isc-dhcp-server will use this pool of addresses to respond to the client (the Beaglebone Black or other target board in this case). The server (Ubuntu PC) needs to have an ethernet port configured to use an IP Address on this subnet (192.168.2.1 is recommended by this guide) or the server will not start. This address will be assigned properly in the below steps.
Warning
Note the file names that are used above. These must correspond to the U-Boot and Linux files that are placed in the /tftpboot directory. If these names are not in sync, the RBL will request files that don’t exist and the process will not work. For example, if the SPL file in the /tftpboot directory is named u-boot-spl.bin, then either it would need to be renamed or the above configuration changed and the service restarted.
Setup TFTP Server
Edit /etc/default/atftpd (create the file if necessary) with:
USE_INETD=false
OPTIONS="--tftpd-timeout 300 --retry-timeout 5 --maxthread 100 --verbose=5 --logfile /var/log/atftpd.log --port 69 /tftpboot"
Note
This is an example configuration and it can certainly be modified for specific situations.
Create directory to store TFTP files (/tftpboot used here)
sudo mkdir /tftpboot
sudo chmod -R 777 /tftpboot
sudo chown -R nobody /tftpboot
Make sure the server is configured to look at the port that you are using. Edit /etc/default/isc-dhcp-server and add the appropriate port (ex. usb0 or eth1) to the INTERFACES option. The example below includes eth0, eth1, and usb0.
INTERFACES="eth0 eth1 usb0"
Restart the services to pick-up the configuration changes
sudo service isc-dhcp-server restart
sudo service atftpd restart
Configure a static IP address for the appropriate interface (Ethernet or USB0). There are many ways to do this in Linux. Network Manager is used here as it is the Ubuntu default and arguably the easiest, especially for ethernet. The next step describes an alternative method to use the more traditional /etc/network/interfaces, which may be easier and more stable for USB. Only one of these methods needs to be used per interface.
Make sure the target board is configured to boot from the appropriate interface (ethernet or USB).
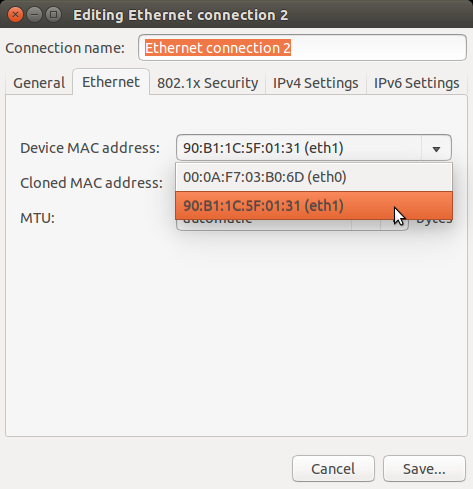
Connect the interface on the PC to the target board. This should create a new connection in Network Manager. Click on Network Manager and choose “edit connections”.
Choose the appropriate connection and edit it to have a static (Ubuntu refers to this as “manual”) IP address. Use the below settings unless there is a good reason not to (and the appropriate changes has been made throughout this guide).
Save all of your changes.
If using USB, there’s one additional step. The USB network interface goes up and down throughout the boot process. The isc-dhcp-server needs to be restarted when it comes up each time. Network Manager provides a capability to do this using the dispatcher.
As root, create /etc/NetworkManager/dispatcher.d/99am-usb-dhcp-server
#!/bin/sh

IF=$1
STATUS=$2

if [ "$IF" = "usb0" ] && [ "$STATUS" = "up" ]; then
     service isc-dhcp-server restart
fi
Make sure this file is executable.
sudo chmod +x /etc/NetworkManager/dispatcher.d/99am-usb-dhcp-server
Restart Network Manager:
sudo service network-manager restart
This step is an alternative to the above step which describes how to use Network Manager to set up a network connection. Depending on the configuration of the software running on your target board, it might be easier to configure the network interface using the more traditional /etc/network/interfaces. or ifconfig. For USB, this method can be easier and more stable, since the USB Network Gadget uses random host MAC addresses by default (it can be configured to use the same address, if desired). Network Manager uses the MAC address to configure a connection. For random booting to a kernel or for flashing or mounting NFS, this is not convenient. The more traditional ifconfig model is configured at an interface level and avoids these issues.
Configure /etc/network/interfaces by adding the below structure for usb0:
allow-hotplug usb0
iface usb0 inet static
address 192.168.2.1
network 192.168.2.0
netmask 255.255.255.0
broadcast 192.168.2.255
up /etc/network/if-up.d/usb-interfaces
Add the below script to /etc/network/if-up.d as sudo with the filename “usb-interfaces” (this is called by the “up” command in /etc/network/interfaces). This script restarts the DHCP/BOOTP server automatically.
#!/bin/sh

if [ "$IFACE" = usb0 ]; then
    sudo service isc-dhcp-server restart
fi
Make sure the script is executable as well.
chmod +x /etc/network/if-up.d/usb-interfaces
Finally, make sure Network Manager is set up to ignore interfaces managed by /etc/network/interfaces by adding the below code to /etc/NetworkManager/NetworkManager.conf:
[main]
plugins=ifupdown

[ifupdown]
managed=false
Restart Network Manager for the changes to take affect.
sudo service network-manager restart
At this point, the Ubuntu box should be set up to host the boot process for an AM335x/AM437x based board. If you already have files to use, copy them to /tftpboot on a Linux box or to Uniflash on a Windows system and reset/power-on the target board with the appropriate connections in place. It is very helpful to have a serial console connection to watch the process proceed. If you have trouble, please see the troubleshooting section below.
6.1.9.2. How to Get Images
The Processor SDK for Linux provides everything needed to create a network bootable set of files (SPL, U-Boot, and Kernel).
Here’s a quick review of the boot process needed.
- Board configured to boot from either Ethernet or USB0. By default, the Beaglebone Black will attempt to boot over USB0.
- U-Boot configured with either Ethernet (this is called CPSW on the AM335x/AM437x family) or USB RNDIS. The RBL will request the file set up in the steps above. This should be an appropriately configured SPL.
- SPL will need to be configured to include the appropriate networking components. It will use this to get U-Boot.
- U-Boot needs to be appropriately configured as well.
The prebuilt images that come with the SDK provide the support necessary to boot over either Ethernet or USB. These images are provided with the SDK in the board-support/prebuilt-images directory within the SDK install. For U-Boot, simply copy the appropriate .bin and and .img files to the /tftpboot directory and rename them to u-boot-spl-restore.bin and u-boot-restore.img, respectively.
6.1.9.3. Troubleshooting
Here are some things to do to debug the setup:
- Since we are dealing with network interfaces, Wireshark is invaluable. Use it to monitor the network connection and determine where things are going wrong:
- If you don’t see BOOTP requests coming from the board, it many not be set up correctly to boot from that interface.
- You can easily see IP Address mismatches if the client is trying to send packets to the wrong place.
- You can monitor the TFTP transfers that are trying to occur. This can reveal filename mismatches, incorrect configurations, etc.
- By default, the DHCP server logs output to /var/log/syslog. This can be very valuable information.