6.2. Target
6.2.1. How to Recalibrate the Touchscreen
Non-Weston based Graphic System
Where is the pointercal file?
The Processor SDK Linux moves the calibration file for the touchscreen from the default location of /etc/pointercal to instead be placed at /run/media/mmcblk0p1/pointercal if the SD device is present. This was done to allow user’s to easily delete this file and force a recalibration without requiring a Linux PC to mount the file system or a serial console to access the device. In this case the pointercal file is now written to a FAT partition of the SD card, which can be mounted on both Windows or Linux.
If the pointercal file is created at /run/media/mmcblk0p1/pointercal, and there is not already a file in /etc/pointercal then the file is also copied to the old default location. This is to prevent requiring the export of the TSLIB_CALIBFILE variable as described in later sections of this document.
In the case that there is no SD card available then the pointercal file will be written to the default /etc/pointercal location.
Recalibrating by Deleting pointercal
Because the pointercal file is now written to the FAT partition of the SD card recalibrating the touchscreen can be done by simply inserting the SD card into a PC and deleting the pointercal file found on the first partition (assuming the first partition is a FAT partition). When the system is then rebooted you will be asked to calibrate the touchscreen.
Recalibrating over Serial Console
If you do have access to the serial console you can always recalibrate the touchscreen using the ts_calibrate command as normal. However, in this case if you already have a pointercal file on the SD card you will need to export the TSLIB_CALIBFILE variable to point to that location before you run ts_calibrate. i.e.
target# export TSLIB_CALIBFILE=/run/media/mmcblk0p1/pointercal
target# ts_calibrate
NOTE: If you have Matrix or any other GUI application already running you should stop that application (How to Stop Matrix) before running ts_calibrate so that you can see the calibration screen.
Exporting TSLIB_CALIBFILE
The environment variable TSLIB_CALIBFILE is used by the tslib package to indicate the location of the pointercal file. The default value for TSLIB_CALIBFILE is /etc/pointercal. If you are writing a program that uses tslib you should make sure that you export TSLIB_CALIBFILE to point to the location of your pointercal file (as indicated in the previous section), or that you place a copy of the pointercal file at the default /etc/pointercal location.
Weston based Graphic System
Where is the ws-calibrate.rules file?
The Processor SDK Linux moves the Weston calibration file for the touchscreen from the default location of /etc/udev/rules.d/ws-calibrate.rules to instead be placed at /run/media/mmcblk0p1/ws-calibrate.rules if the SD device is present. This was done to allow user’s to easily delete this file and force a recalibration without requiring a Linux PC to mount the file system or a serial console to access the device. In this case the ws-calibrate.rules file is now written to a FAT partition of the SD card, which can be mounted on both Windows or Linux.
If the ws-calibrate.rules file is created at /run/media/mmcblk0p1/ws-calibrate.rules, and there is not already a file in /etc/udev/rules.d/ws-calibrate.rules then the file is also copied to the old default location.
In the case that there is no SD card available then the ws-calibrate.rules file will be written to the default /etc/udev/rules.d/ws-calibrate.rules.
Recalibrating by Deleting ws-calibrate.rules
To trigger touchscreen re-calibration, both ws-calbration.rules files need to be deleted. The ws-calbration.rules file which is now written to the FAT partition of the SD card can be deleted by simply inserting the SD card into a PC and deleting the ws-calbration.rules file found on the first partition (assuming the first partition is a FAT partition) and we also need to delete /etc/udev/rules.d/ws-calibrate.rules from the filesystem. After both ws-calibration.rules files are removed, you will be asked to calibrate the touchscreen when the Weston is launched at the first time or relaunched by issuing “/etc/init.d/weston start” command at the console.
Alternatively, you may delete the above listed files directly from the EVM’s console by issuing the following commands at EVM’s Linux prompt, and reboot the EVM to allow recalibration of the LCD.
rm /etc/udev/rules.d/ws-calibrate.rules
rm /run/media/mmcblk0p1/ws-calibrate.rules
reboot
6.2.2. SDK File System Optimization/Customization
Purpose
The purpose of this article is to explain the file systems that are delivered as part of the Processor SDK Linux and how those file systems can be modified to customize them for your use case. The tools discussed in this article are installed by default in the Processor SDK Linux file system for your convenience.
Pre-built File Systems
The Processor SDK Linux ships with two default file systems. They are:
- base-rootfs-<machine>.tar.gz - This file system is the simple file system that forms the base of the SDK file system. It has some basic utilities installed but is intended to be rather small and light weight.
- tisdk-rootfs-<machine>.tar.gz - This file system is created by taking the base file system and adding all the additional SDK components such as 3D graphics, matrix, profiling tools, etc. It is a larger file system but is meant to have most of the tools developers would need when working with TI processors.
Both of these file systems contain the opkg package manager and can be used as a starting point for system optimization as discussed in the next sections.
The Basics of OPKG
opkg - list commands
opkg is the package manager used in the SDK file systems to install and remove packages. You can get a list of the full commands supported by opkg by running the following command on the target device:
target# opkg
opkg - list installed packages
To the list of packages are part of the file system and the version of each package you can run the following command on the target device:
target# opkg list-installed
Note
This list only contains information about packages that were installed using the package manager. Applications that were built and copied to the file system and not installed as a .ipk package are not tracked by opkg
opkg - list package contents
Sometimes it is useful to know what files a package has installed. To do this you can use the following command:
target# opkg files <pkgname>
Where <pkgname> is the name of the package as given in the opkg list-installed output. This command will produce a list of all the files on the file system that belong to the given package.
opkg - find a file owner
Sometimes you may find a file on the target file system that you want to remove, or just know where it came from. In this case you can use the following command:
target# opkg search <file>
This command will find which package installed the given file. This may be useful later when you want to remove an particular file because this command can help you find the package to remove.
opkg - finding dependencies
Sometimes when you want to remove a package it is useful to find out what other packages depend on the package you are removing. While the opkg remove command will tell you the immediate dependencies you can find the longer list of dependencies using:
target# opkg whatdepends <pkgname>
This command will print the list of packages the depend on the package you entered, as well as the packages that depend on those packages, and so forth.
Removing Packages
One of the simplest ways to modify the contents of the file system is to use the opkg utility to remove packages (or install if you have pre-built packages). Removing a package is often as simple as:
target# opkg remove <pkgname>
However, sometimes a package is a DEPENDENCY of another package. In this case you have the following options:
- Use the –force-depends option
- This option will force the removal of the package but will leave any packages that depend on this package installed. This can be useful in the case that you want to remove a particular package, but that package is depended on by some other package that you do not want removed.
- Use the –force-removal-of-dependent-packages option
- This option will go up the dependency list and remove all packages in the dependency chain. You should check all the packages being removed to make sure they are indeed packages you want to remove and do not contain other files you want.
- Remove the individual packages that depend on this package first
- This way you can control exactly which dependent packages are removed and which are left in place.
target# opkg remove --force-removal-of-dependent-packages <pkgname>
Note
opkg will print the packages that depend on the package being removed. It is usually a good idea to use the opkg files command for the packages that depend on the one being removed so that you can make sure that no files you really want to keep are going to be removed.
Note
You can also use the whatdepends option discussed above to see the dependency list for a package
By using the opkg remove command in conjunction with the commands for listing packages, finding file owners, and listing package contents, you can quickly strip down a full file system into something smaller and more optimized for your use case. However, once a package is removed it cannot currently be re-installed without generating the .ipk file to install it.
Adding Applications
In most cases installing additional applications can be as simple as copying the the binary executable to the file system. However, if you have built your own .ipk packages you can use opkg to install those ipks into the target file system. One major advantage of using the package manager is the ability to track the package and it’s content with the opkg package manager. More details will be coming about how to build your own packages, but for now please refer to Building the SDK and this link to learn more about building custom file systems with Arago.
6.2.3. How to add a JVM
Introduction
This article shows the steps necessary to add an Oracle Hotspot Java Virtual Machine (JVM) to your Sitara SDK. Due to the licensing of this JVM, it can not be delivered with the Sitara SDK. You must download it and install it separately. Customers wishing to evaluate this JVM should also investigate and evaluate the Oracle Hotspot license. You must download the JVM that matches the ABI of the SDK version you are using. (see Download for more information)
Download the JVM
- Select the version that matches your processor.
- ARMv7 for Cortex-A8
- ARMv5 for ARM9
- Select a version that matches the ABI of the SDK, either hard float
or soft float.
- Hard float - for SDK 06.00 and later
- Soft float - for SDK 05.07 and earlier
- Select the headless version. To use the full capabilites of the headful version, you need to have some windowing support like X11 in your filesystem. Sitara SDK currently does not support X11. However if you download the headful version, you can run Caffeinemark, but you will not be able to use the display capabilites.
- Before you can download, you have to agree to their license and click through a few required inputs.
- Download the JVM
This can be done from the Oracle link:
For soft float: https://www.oracle.com/technetwork/java/embedded/downloads/javase/index.html
For Early Access Release for the Hard float ABI: link: https://jdk8.java.net/download.html
Install the JVM
Untar the JVM to your target filesystem. It can go anyplace you want. For this wiki we are assuming you install at /home/root
- See this article if you’re not sure how to untar
Setup your PATH environment variable on your target filesystem to point to the location of the “java” executable which can be found in the “bin” directory located in the root directory of the JVM.
to automate setting of the PATH, add the following line to the file: /etc/profile (NOTE: for this example version 1.7.0_04 was used, your version may be different)
PATH=$PATH:/home/root/ejre1.7.0_04/bin
add the above line before the following line which is found near the bottom of /etc/profile
export PATH PS1 OPIEDIR QPEDIR QTDIR EDITOR TERM
Now each time you login, your path will be automatically set up to include the “java” executable from your installed JVM. By typing “java -version”, you can verify you are setup correctly.
- you should see the JVM version displayed similar to the results below. Your version may be different depending on which one you downloaded:
root@am335x-evm:~# java -version
java version "1.7.0_04-ea"
Java(TM) SE Runtime Environment for Embedded (build 1.7.0_04-ea-b20, headless)
Java HotSpot(TM) Embedded Client VM (build 23.0-b21, mixed mode)
Running a benchmark - Pendragon Software’s CaffeineMark(tm) ver. 3.0
Caffeinemark is a Opensource benchmark which can be downloaded here: http://www.benchmarkhq.ru/cm30/info.html
Download the embedded version to your target file system.
To run:
java CaffeineMarkEmbeddedApp
Benchmark information:
- There are 6 tests associated with the Embedded version. Each tests runs for about the same amount of time and reports back how many iterations of the test could be completed in allocated time period. The higher the score the better. There is also an overall result which takes in to account all the test results.
Results for Caffeinemark running on Sitara
The following results were performed without independent verification by Pendragon Software and Pendragon Software makes no representations or warranties as to the result of the test
AM37x EVM running with a MPU clock rate of 1GHz
AM37x EVM achieved a CaffeineMark(tm) 3.0 score of 16046 running on linux-2.6.37
root@am37x-evm:~/ttt# java CaffeineMarkEmbeddedApp
Sieve score = 13991 (98)
Loop score = 29054 (2017)
Logic score = 24167 (0)
String score = 8910 (708)
Float score = 10483 (185)
Method score = 18603 (166650)
Overall score = 16046
AM335x EVM running with a MPU clock rate of 720MHz
AM335x EVM achieved a CaffeineMark(tm) 3.0 score of 11172 running on linux-3.2
root@am335x-evm:~/ttt# java CaffeineMarkEmbeddedApp
Sieve score = 9747 (98)
Loop score = 20384 (2017)
Logic score = 17383 (0)
String score = 6047 (708)
Float score = 7091 (185)
Method score = 13136 (166650)
Overall score = 11172
AM180x EVM running with a MPU clock rate of 300MHz
AM180x EVM achieved a CaffeineMark(tm) 3.0 score of 2213 running on linux-2.6.37
root@am180x-evm:~/CaffieneMark# ../ejre1.7.0_06/bin/java -version
java version "1.7.0_06"
Java(TM) SE Embedded Runtime Environment (build 1.7.0_06-b24, headless)
Java HotSpot(TM) Embedded Client VM (build 23.2-b09, mixed mode)
root@am180x-evm:~/CaffieneMark# ../ejre1.7.0_06/bin/java CaffeineMarkEmbeddedApp
Sieve score = 2185 (98)
Loop score = 4852 (2017)
Logic score = 3624 (0)
String score = 1533 (708)
Float score = 570 (185)
Method score = 3502 (166650)
Overall score = 2213
6.2.4. How to use a Mouse instead of the Touchscreen with Matrix
Introduction
A mouse can be used instead of touchscreen input with the Matrix GUI by following these steps. It is also possible to use touchscreen and mouse input simultaneously.
Restrictions: For AM37x and AM35x: The mouse must be connected through a USB 2.0 hub to the EVM. It must not be connected directly to the EVM.
Enable Mouse
On your Target File system, edit the file: /etc/init.d/matrix-gui-2.0 This script file will set Mouse support by default, but if it detects a touchscreen, then it will setup touchscreen support. If you comment out the touchscreen support then the default will remain mouse support. Use the ‘#’ to comment out the line below:
For Mouse support, Replace:
if [ -e /dev/input/touchscreen0 ]
then
    export QWS_MOUSE_PROTO=Tslib:/dev/input/touchscreen0
fi
with
#   if [ -e /dev/input/touchscreen0 ]
#   then
#       export QWS_MOUSE_PROTO=Tslib:/dev/input/touchscreen0
#   fi
To Enable both Mouse and touchscreen simultaneously: Replace
export QWS_MOUSE_PROTO=Tslib:/dev/input/touchscreen0
with
export QWS_MOUSE_PROTO="Tslib:/dev/input/touchscreen0 Auto"
Warning: If you enable both, the touchscreen now requires a double touch instead of a single touch.
Kernel
The Kernel has been configured to enable mouse support in your SDK, so this step is not necessary if you are using the SDK.
If you have built your own kernel: The kernel must be configured to include the PS/2 mouse support. To verify this, run the menuconfig utility.
Device Drivers —> Input device support —> <*> Mouse interface
Device Drivers —> Input device support —> <*> Mice —>
If mouse support is not already included in the kernel, enable the above two configuration by typing ‘y’ and rebuild the kernel. You can find instructions for rebuilding kernel here:
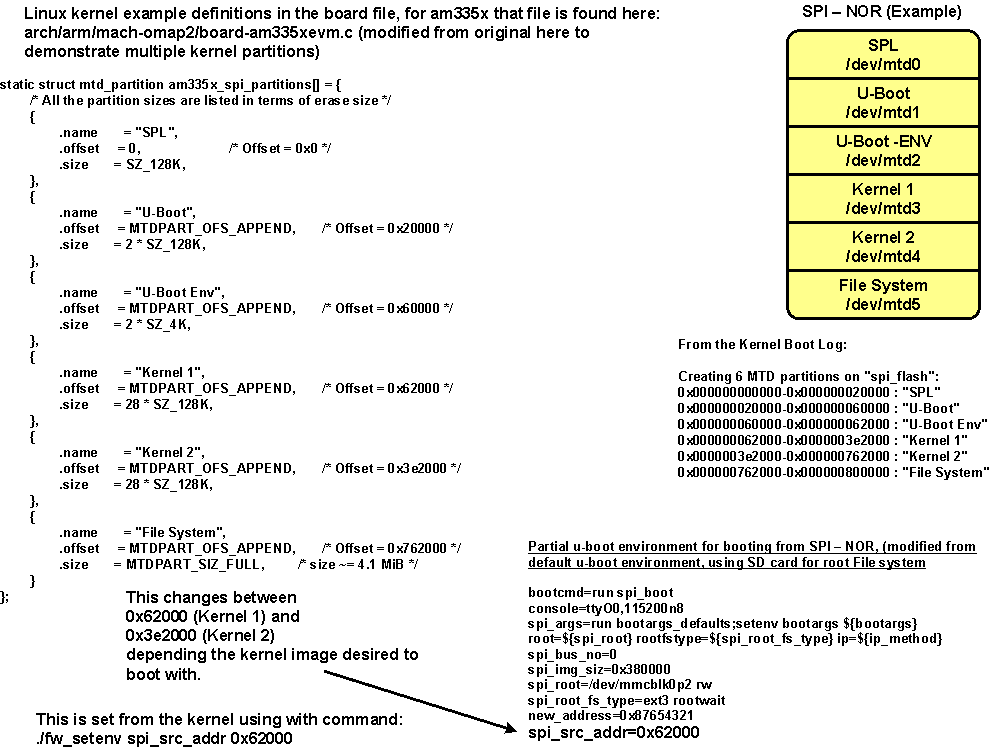
6.2.5. Update U-Boot Environment Variables stored in SPI Flash from Linux
Purpose
The purpose of this article is to demonstrate how the U-Boot Environment variables stored in SPI Flash can be accessed from a Linux command line using a tool provided from U-Boot.
Assumptions
- This example is based on the AMSDK, AM335x GP EVM and the User is has the latest version of the AMSDK installed
Summary/Checklist
- Build(Cross Compile) fw_printenv/fw_setenv U-Boot Tool provided with U-Boot source in the AMSDK
- Prepare configuration file for U-Boot Tool fw_printenv/fw_setenv
- Load fw_printenv/fw_setenv into target file system
- Test fw_printenv/fw_setenv tool
Overview
To access the environment variables from Linux one of the tools from u-boot must be cross compiled and copied into the file system. This tool is located in the board-support/u-boot<version>/tools/env directory of the latest AMSDK.
Build(Cross Compile) fw_printenv/fw_setenv U-Boot Tool
Please note that all paths are refereneced to the u-boot source within the AMSDK, ti-sdk-am335x-<version>/board-support/u-boot<version>.....
Prior to building the The flag in board-support/u-boot<version>/tools/envfw_env.h “HAVE_REDUND” must be undefined as only a single env partition has been defined in the AMSDK SPI MTD partitioning.
Please note that the CROSS_COMPILE flag is not used by the u-boot makefile here, the HOSTCC= variable must be set.
host# make HOSTCC=arm-arago-linux-gnueabi-gcc env
This command is issued from the top of the u-boot source directory. Please be sure to see that the cross compiler was actually called and not just gcc.
Prepare configuration file for U-Boot Tool fw_printenv/fw_setenv
After building the executable a configuration file must be created and placed into a specific directory that is called in fw_env.h in the board-support/u-boot<version>/tools/env directory. The default location for the configuration file (fw_env.config) is /etc/.
/dev/mtd2 0x0000 0x2000 0x1000
Load fw_printenv/fw_setenv into target file system
This creates the executable fw_printenv, this file must be copied into the target file system, place in /sbin or the user’s directory.
You must copy fw_printenv to fw_setenv to be able to set variables. The program detects the name it was called as and sets the context it will run in.
Test fw_printenv/fw_setenv tool
The executable fw_printenv will dump the entire environment space, individual variables can be read by:
target# ./fw_printenv autoload
To set an environment variable use fw_setenv . This example will set the variable autoload to no, use fw_printenv to read back the change.
target# ./fw_setenv autoload no
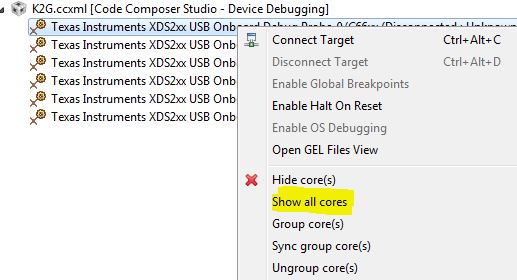
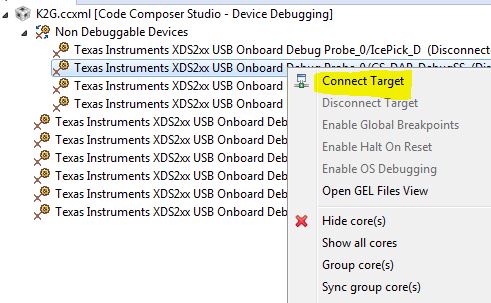
6.2.6. Taking the C66x Out Of Reset with Linux Running on the ARM A15
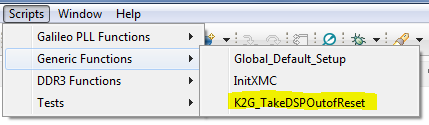
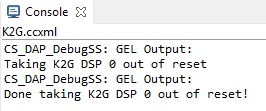
How to take the C66x DSP out of reset with Linux running on A15
This document describes the procedure to bring the C66x core out of reset after booting Linux, or at the u-boot prompt. These steps are necessary in to order to load an application on the C66x core, without interfering with the operation of Linux running on the A15.
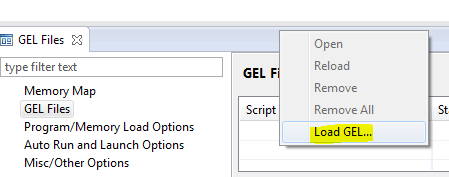
NOTE Prior to proceeding with the below instructions, please ensure that the latest Emulation package is downloaded/installed through CCS. This will ensure the GEL files in your machine has the reset routines described below.
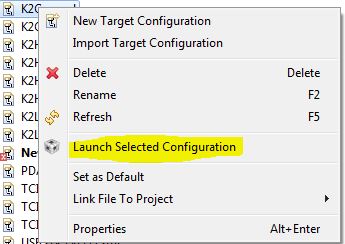
- Once Linux has booted, launch the target configuration.
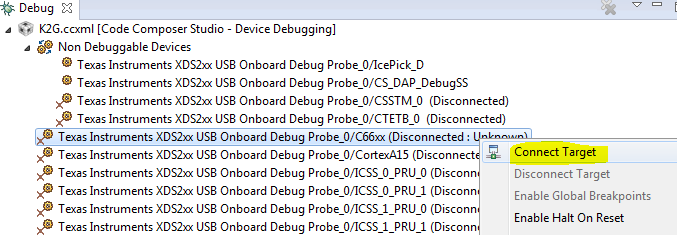
NOTE Once the DSP core is connected following the above out of reset routine, the DDR and PLL settings done by u-boot would be overwritten by what’s in the GEL. In order to avoid this, please ensure that the gel is NOT preloaded on the DSP core in the ccxml by leaving the initialization script blank.

6.2.7. How to Change dtb File
Introduction
In some scenarios, it is required to manually change the dtb file used by the target. For example, AM437X GP EVM uses LCD display by default. But it also supports HDMI display. In order to switch from LCD display to HDMI display, user needs to set the dtb file as desired.
Specify dtb File
The dtb files are located on the target filesystem under “/boot” directory. First, identify the dtb file to be used, e.g., am437x-gp-evm-hdmi.dtb for AM437X GP EVM with HDMI display.
Then, modify “uEnv.txt” on the boot partition (“/run/media/mmcblk0p1” directory on filesystem) to specify fdtfile with the desired dtb file name.
Using AM4 as the example, the default uEnv.txt has the lines below. Follow the instructions to set fdtfile so that HDMI display can be enabled. In order to go back to LCD dispaly, unset fdtfile to use the default am437x-gp-evm.dtb.
# Uncomment the following line to enable HDMI display and disable LCD display.
#fdtfile=am437x-gp-evm-hdmi.dtb
After the dtb file is changed, reboot the EVM so that the new dtb file will be used for booting the EVM.
6.2.8. How to Set Display for AM572x GP EVM
Introduction
AM572x GP EVM can have two active displays at the same time: LCD and HDMI. By default, LCD is the primary display. This wiki page describes the procedure/options of enabling/disabling the displays as well as changing the primary/secondary order of the displays.
Set Displays for AM572x GP EVM
With 0 for LCD and 1 for HDMI, the following options are available:
- omapdrm.displays=0,1: represents the original order (LCD is the primary display, while HDMI is the secondary display)
- omapdrm.displays=1,0: represents reverse order (HDMI is the primary display, while LCD is the secondary display)
- omapdrm.displays=0: only the LCD is enabled
- omapdrm.displays=1: only the HDMI is enabled
- omapdrm.displays=-1: disable all displays
To set one of the options above, stop at u-boot, and setenv for optargs. Run saveenv to save the setting if needed. For example, the
setenv below will use HDMI as the primary display.
setenv optargs omapdrm.displays=1,0
6.2.9. How to Boot Beagle Bone Black with Processor SDK Linux
Introduction
By default, BeagleBone Black EVM boots with the Debian image on eMMC. This page describes two ways to boot a BeagleBone Black EVM with Processor SDK Linux. First, create an SD card with processor SDK Linux (SDK Create SD Card Script, Creating a SD Card with Windows). Then, choose either of the two procedures below to boot with Processor SDK Linux.
Press S2 Button
With the SD card plugged in, simply keep button S2 pressed while powering up the BeagleBone Black EVM. This needs to be executed every time powering up the EVM to use Processor SDK Linux.
Erase eMMC
With the SD card plugged in, stop at uboot. Then run the following two commands to erase eMMC.
mmc dev 1
mmc erase 100 2800
With eMMC erased (one-time change), the booting falls back to use the SD card. Power cycle the BeagleBone Black EVM to boot with Processor SDK Linux.