5.1. Matrix User Guide
Important Note
This guide is for the latest version of Matrix that is included in Processor SDK Linux. If you are looking for information about the old Matrix then this can be found at the following link **Previous Version of Matrix*** *
Supported Platforms
This version of Matrix supports all Sitara devices, as well as K2H/K2K, K2E, and K2L platforms.
Initial Boot Up
When you first boot up a target system which has display device attached (e.g., AM335x, AM437x, and AM57x platforms), Matrix should be automatically started. Matrix can be either operated by touchscreen or mouse. Default startup for most SDK platforms is touchscreen. Should you encounter any problems below are some tips to get everything running smoothly. See **Matrix Startup Debug**
When you boot up a target system without display (e.g., K2H/K2K, K2E, and K2L platforms), Matrix will not be automatically started during booting, and only Remote_Matrix is available for use after the booting.
Overview
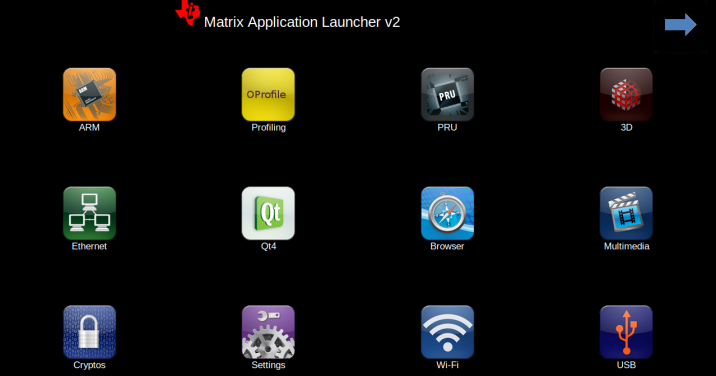
Matrix is an HTML 5 based application launcher created to highlight available applications and demos provided in new Software Development Kits. There are two forms of Matrix, local and remote Matrix. All of the example applications and demos are available using either the local or remote version. The local version launches by default when the target system is booted and uses the target system’s touchscreen interface for user input. Matrix comes as a 4x3 matrix of icons or as a 4x2 matrix depending on the display resolution.
Local and Remote Matrix
Local Matrix
Local Matrix refers to Matrix being displayed on a display device attached to the target system. The launcher for Matrix is just a simple QT application that displays a Webkit base browser that points to the URL http://localhost:80
NOTE Local matrix is not available for platforms without display support, nor the Keystone-2 platforms, such as K2H/K2K, K2E, K2L, and K2G platforms.
Remote Matrix
Remote Matrix refers to Matrix being ran in any modern day web browser not located on the target system.
The URL for Remote Matrix is http://<target system’s ip address>
You can find the target’s ip address by using local Matrix and clicking on the Settings icon and then on the Network Settings icon. Or using a terminal logged in to the target system enter the below command:
ifconfig
From the output displayed, look in the section that starts with eth0. You sould see an IP address right after “inet addr”. This is the IP address you should use for remote Matrix.
With Remote Matrix you can interact with Matrix on your PC, cellphone, tablet, or any device with a modern web browser. You can now launch text based applications or scripts and have the output streamed back to your web browser! Launching a gui application from Matrix requires you to still look at the display device connected to the target system.
Matrix Project Webpage
The offical website for Matrix is located at **gforge.ti.com/gf/project/matrix-gui-v2/** Any comments or bug reports for Matrix should be posted there.
How to Use the Matrix
Matrix is based on HTML 5 and is designed to be easily customizable. All applications and submenus for Matrix can be found in the target system’s usr/share/matrix-gui-2.0/apps/ directory. Matrix utilizes the .desktop standard along with some additional parameters to easily allow modifying, adding and removing an application or directory.
Matrix Components
Below is a summary of all the Matrix web pages:
- Contains all the directories or application that belongs to each directory level.
Application Description
- Optional and associated with a particular application.
- Provide additional information which can be useful for various reasons
- Displayed when the associated application icon is pressed.
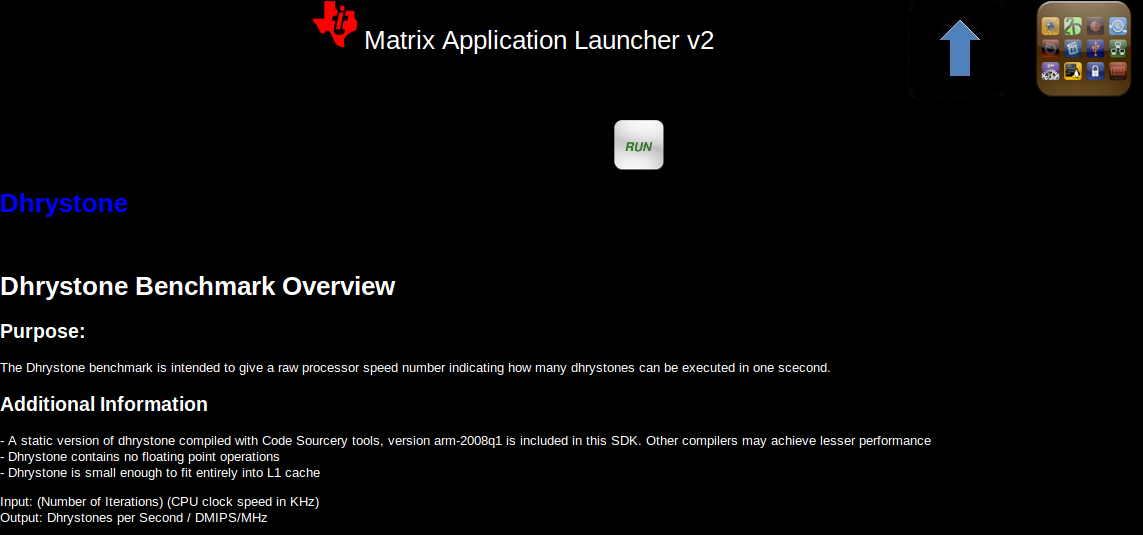
Example Application Description Page
Below is an example application description page. Description pages can be used to add additional information that may not be obvious.
Coming Soon Page
- Displayed for Matrix directories that doesn’t contain any applications within it.
Application/Script Execution Page
- For console based application, displays the output text of the application
Icons
- 96x96 png image files which are associated to a submenu or an application.
- Can be re-used by many applications
Applications
- Any application can be launched by Matrix
- Local Matrix uses the graphics display layer. If a launched application also uses the graphics display layer there will be a conflict.
Updating Matrix
Matrix 2 utilizes a caching system that caches the information read from the .desktop files and also the html that is generated from the various php pages. While this provides a substantial performance boost, developers must be aware that any changes to the Matrix apps folder which includes adding, deleting and modifying files can result in many problems within Matrix. To properly update Matrix with the latest information, Matrix’s caches need to be cleared.
Automatically Clearing Matrix Cache
The simpliest way to clear Matrix’s cache is to use the Refresh Matrix application found within Matrix’s Settings submenu. Simply running the application will cause Matrix to clear all the cached files and regenerate the .desktops cache file. Once the application is done running, Matrix will be updated with the latest information found from within the apps folder.
Manually Clearing Matrix Cache
Matrix caching system consists of 1 file and 1 directory. Within Matrix’s root directory there contains a file called json.txt. Json.txt is a JSON file that contains information gathered from all the .desktops located within the apps directory. This file is generated by executing the generate.php file.
Also located in Matrix’s root directory is a folder called cache. This folder contains all of the html files cached from the various dynamic php webpages.
To clear Matrix’s caches you need to perform only two steps:
- Execute the generate.php file.
In the terminal of the target system, enter the folllowing line of code.
php generate.php
or
In a browser enter the following url. Note replace <target ip> with the IP address of the target system.
http://<target ip>:80/generate.php
Viewing generate.php in the browser should display a blank page. There is no visual output to this webpage.
2. You need to clear the files located within Matrix’s cache folder. Enter the following commands.
cd /usr/share/matrix-gui-2.0/cache
rm -r *
Once the above steps are completed, Matrix will be updated.
Launching Matrix
Use the following shell script in the target’s terminal window to run Matrix as a background task:
/etc/init.d/matrix-gui-2.0 start
This script ensures that the touchscreen has been calibrated and that the Qt Window server is running.
Alternatively, Matrix can be launched manually with this full syntax:
matrix_browser -qws http://localhost:80
The “-qws” parameter is required to start the Qt window server if this is the only/first Qt application running on the system.
The third parameter is the URL that you want the application’s web browser to go to. http://localhost:80 points to the web server on the target system that is hosting Matrix.
Matrix Startup Debug
The following topics cover debugging Matrix issue at startup or disabling Matrix at start up.
Touchscreen not working
Please see this wiki page to recalibrate the touch screen: **How to Recalibrate the Touchscreen**
Matrix is running but I don’t want it running
- Exit Matrix by going to the Settings submenu and running the Exit Matrix application. Note that exiting Matrix only shuts down local Matrix. Remote Matrix can still be used.
- Or if the touchscreen is not working, from the console, type:
/etc/init.d/matrix-gui-2.0 stop
I don’t want Matrix to run on boot up
From the console type the following commands:
cd /etc/rc5.d
mv S97matrix-gui-2.0 K97matrix-gui-2.0
How to Enable Mouse Instead of Touchscreen for the Matrix
You can enable mouse by referring to the following: **How to Enable Mouse for the Matrix GUI*** *
How to Switch Display from LCD to DVI out for the Matrix
You can switch the display output by referring to the following: **How to Switch Display Output for the Matrix GUI*** *
Adding a New Application/Directory to Matrix
Below are step by step instructions.
- Create a new folder on your target file system at /usr/share/matrix-gui-2.0/apps/. The name should be a somewhat descriptive representation of the application or directory. The folder name must be different than any existing folders at that location.
- Create a .desktop file based on the parameters discussed below. It is recommended the name of the desktop file match the name of the newly created folder. No white spaces can be used for the .desktop filename. The .desktop file parameters should be set depending on if you want to add a new application or a new directory to Matrix. The Type field must be set according to your decision. The .desktop file must have the .desktop suffix.
- Update the Icon field in the .desktop to reference any existing Icon in the /usr/share/matrix-gui-2.0 directory or subdirectories. You can also add a new 96x96 png image and place it into your newly created folder.
- Optionally for applications you can add a HTML file that contains the application description into your newly created directory. If you add a description page then update the X-Matrix-Description field in the .desktop file.
- Refresh Matrix using the application “Refresh Matrix” located in the Settings submenu.
Run your new application from Matrix! See reference examples below: **Examples**
Blank template icons for Matrix can be found here: **gforge.ti.com/gf/download/frsrelease/712/5167/blank_icons_1.1.tar.gz**
Creating the .Desktop File
The .desktop file is based on standard specified at the **standards.freedesktop.org/desktop-entry-spec/latest/** Additional fields were added that are unique for Matrix.
Format for each parameter:
<Field>=<Value>
The fields and values are case sensitive.
Examples
Creating a New Matrix Directory
You can get all the files including the image discussed below from the following file: **Ex_directory.tar.gz**
Create a directory called ex_directory
Create a new file named hello_world_dir.desktop
Fill the contents of the file with the text shown below:
#!/usr/bin/env xdg-open
[Desktop Entry]
Name=Ex Demo
Icon=/usr/share/matrix-gui-2.0/apps/ex_directory/example-icon.png
Type=Directory
X-MATRIX-CategoryTarget=ex_dir
X-MATRIX-DisplayPriority=5
This .desktop above tells Matrix that this .desktop is meant to create a new directory since Type=Directory. The directory should be named “Ex Demo” and will use the icon located within the ex_directory directory. This new directory should be the 5th icon displayed as long as there aren’t any other .desktop files that specify X-MATRIX-DisplayPriority=5 and will be displayed in the Matrix Main Menu. Now any applications that wants to be displayed in this directory should have their .desktop Category parameter set to ex_dir.
- Note that sometimes Linux will rename the .desktop file to the name specified in the Name field. If this occurs don’t worry about trying to force it to use the file name specified.
- If you are writing these files in Windows, be sure to use Unix-style EOL characters
Now move the .desktop file and image into the ex_directory directory that was created.
Moving the Newly created Directory to the Target’s File System
Open the Linux terminal and go to the directory that contains the ex_directory.
Enter the below command to copy ex_directory to the /usr/share/matrix-gui-2.0/apps/ directory located in the target’s file system. Depending on the targetNFS directory premissions you might have to include sudo before the cp command.
host $ cp ex_directory ~/ti-processor-sdk-linux-[platformName]-evm-xx.xx.xx.xx/targetNFS/usr/share/matrix-gui-2.0/apps/
If NFS isn’t being used then you need to copy the ex_directory to the the /usr/share/matrix-gui-2.0/apps/ directory in the target’s filesystem.
Updating Matrix
Now in either local or remote Matrix go to the Settings directory and click on and then run the Refresh Matrix application. This will delete all the cache files that Matrix generates and regenerates all the needed files which will include any updates that you have made.
Now if you go back to Matrix’s Main Menu the 5th icon should be the icon for your Ex Demo.
Creating a New Application
This example is assuming that you completed the **Creating a New Matrix Directory** example.
You can get all the files including the image discussed below from the following file: **Ex_application.tar.gz*** *
Create a new directory called ex_application
Create a file named test.desktop
Fill the contents of the file with the below text:
#!/usr/bin/env xdg-open
[Desktop Entry]
Name=Test App
Icon=/usr/share/matrix-gui-2.0/apps/ex_application/example-icon.png
Exec=/usr/share/matrix-gui-2.0/apps/ex_application/test_script.sh
Type=Application
ProgramType=console
Categories=ex_dir
X-Matrix-Description=/usr/share/matrix-gui-2.0/apps/ex_application/app_desc.html
X-Matrix-Lock=test_app_lock
Type=Application lets Matrix know that this .desktop is for an application. The name of the application is “Test App”. The icon example-icon.png can be found within the ex_application directory. The command to execute is a shell script that will be located within ex_application. The script that is being ran is a simply shell script that output text to the terminal. Therefore, the ProgramType should be set to console. This application should be added to the Ex Demo directory from the previous example. Therefore, Categories will be set to ex_dir which is the same value that X-MATRIX-CategoryTarget is set to. You could optionally remove the Categories field to have this application displayed in Matrix’s Main Menu. This application will also have a description page. The html file to be used is located within the ex_application directory. A lock is also being used. Therefore, any other application including itself that has the same lock can’t run simultaneously.
Create a file named test_script.sh
echo "You are now running you first newly created application in Matrix"
echo "I am about to go to sleep for 30 seconds so you can test out the lock feature if you want"
sleep 30
echo "I am finally awake!"
host $ chmod 777 test_script.sh
Create a new file called app_desc.html
<h1>Test Application Overview</h1>
<h2>Purpose:</h2>
<p>The purpose of this application is to demonstrate the ease in adding a new application to Matrix.</p>
Now move the .desktop file, script file, the png image located in the Ex_application.tar.gz file and the html file into the ex_application folder.
Moving the newly created Directory to the Target System
Open the Linux terminal and go to the directory that contains the ex_application directory.
Enter the below command to copy the ex_application directory to /usr/share/matrix-gui-2.0/apps/ located in the target’s file system. Depending on the targetNFS directory permissions you might have to include sudo before the cp command.
host $ cp ex_application ~/ti-processor-sdk-linux-[platformName]-evm-xx.xx.xx.xx/targetNFS/usr/share/matrix-gui-2.0/apps/
If your not using NFS but instead are using a SD card then copy ex_application into the /usr/share/matrix-gui-2.0/apps/ directory in the target’s filesystem.
Updating Matrix
Now in either local or remote Matrix go to the Settings directory and click and then run the Refresh Matrix application. This will delete all the cache files that Matrix generates and regenerate all the needed files which will include any updates that you have made.
Now if you go back to the Matrix’s Main Menu and click on the Ex Demo directory you should see your newly created application. Click on the application’s icon and you will see the application’s description page. Click the Run button and your application will execute. If you try to run two instances of this application simultaneously via local and remote Matrtix you will get a message saying that the program can’t run because a lock exists. Because of X-Matrix-Lock being set to test_app_lock, Matrix knows not to run two instances of a program simultaneously that share the same lock. You can run the application again when the previous application is done running.
You have just successfully added a new application to Matrix using all the possibly parameters!