- Note
- To see the exact sequence of steps in which applications and secondary bootloader (SBL) are converted from compiler generated .out files to boot images, see the makefile
makefile_ccs_bootimage_gen that is included in every example and secondary bootloader (SBL) CCS project.
-
If you are using makefile based build, then see the file named
makefile in the example folder.
Introduction
This section describes the various tools that are used to create boot images for all the SDK applications
Important files and folders
| Folder/Files | Description |
${SDK_INSTALL_PATH}/tools/boot/
|
| multicoreImageGen/ | Tool to combine multiple RPRC into a single binary |
| out2rprc/ | Tool to convert compiler generated ELF .out for a CPU to a compact and loadable binary representation, called RPRC. |
| sbl_prebuilt/ | Pre-built secondary bootloader (SBL) images and flash configuration files for different supported EVMs
|
| signing/ | Security signing scripts need to create boot images that can be booted by ROM bootloader (RBL)
|
| xipGen/ | Tool to split a RPRC file generated from out2rprc into two files containing non-XIP and XIP sections. |
| uart_bootloader.py | Python script used to send the SBL and appimage binaries over UART using XMODEM protocol in UART boot mode |
| uart_uniflash.py | Python script used to flash SBL and applications to EVM flash using UART. See Flashing Tools for more details.
|
Out2RPRC
- This tool converts the application executable (.out) into custom TI RPRC (.rprc) image - an image loadable by the secondary bootloader (SBL).
- This tool strips out the initialized sections from the executable file (*.out) and places them in a compact format that the SBL can understand.
- The output RPRC file is typically much smaller than the original executable (*.out) file.
- The RPRC files are intermediate files in a format that is consumed by
MulticoreImageGen tool that generates the final binary that is flashed (*.appimage)
- The RPRC file format contains header to various sections in the executable like section run address, size and a overall header which mentions the number of sections and the start offset to the first section.
- The RPRC magic word is
0x43525052 - which is ASCII equivalent for RPRC
- Shown below is the file header and section format for RPRC files.
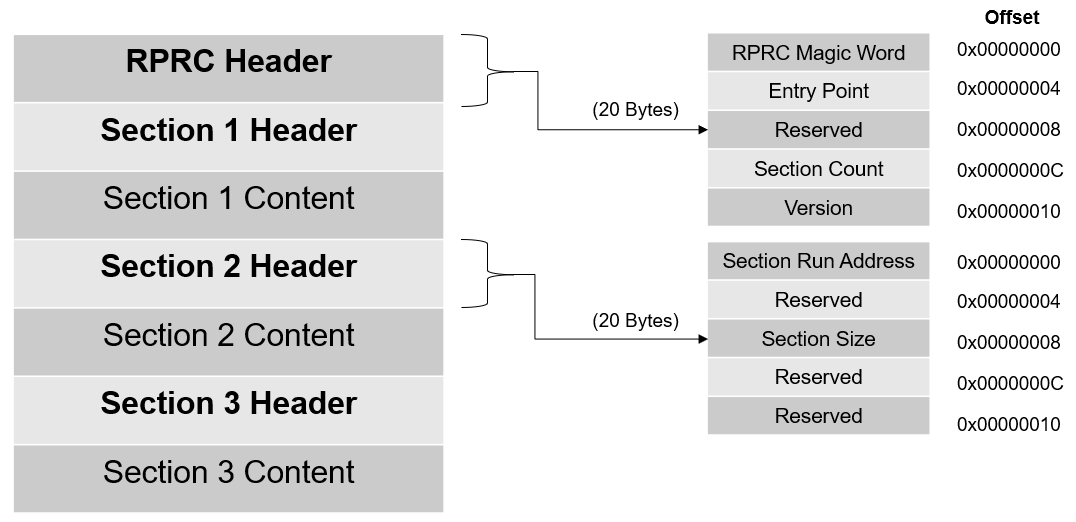
RPRC File Format
- This tool is provided as a minified JS script. To convert the application executable into RPRC image file, it can be used as
cd ${SDK_INSTALL_PATH}/tools/boot/out2rprc
${NODE} elf2rprc.js {input application executable file (.out)}
Multi-core Image Gen
- This tool converts the RPRC files created for each CPU into a single combined multicore application image that can be booted by the secondary bootloader (SBL)
- Shown below is the file format for multicore image files.

Multi-core Image File Format
- The number of meta headers present is equal to the number of cores included.
- The meta header magic word is
0x5254534D - which is ASCII equivalent for MSTR
- In Windows or Linux, use the following command to convert RPRC images into a multicore
.appimage file cd ${SDK_INSTALL_PATH}/tools/boot/multicoreImageGen
${NODE} multicoreImageGen.js --devID {DEV_ID} --out {Output image file (.appimage)} {core 1 rprc file}@{core 1 id} [ {core n rprc file}@{core n id} ... ]
- In case of AM62X,
DEV_ID is 55.
- The various core ID to be used are as below.
| CORE | CORE ID |
| r5fss0-0 | 4 |
| m4fss0-0 | 5 |
| hsm-m4fss0-0 | 6 |
Signing Scripts
- To run these scripts, one needs
openssl installed as mentioned here, OpenSSL
- Signing scripts are a collection of scripts needed to sign ROM images (image booted by ROM - mostly the SBL) and application images (image booted by the SBL)
- The RBL requires the boot image (mostly SBL), to be signed always, even if we are not using secure boot.
- We follow a combined boot method for ROM images. Here the ROM Bootloader (RBL) boots the SBL, SYSFW and BOARDCFG together. The boot image would be a binary concatenation of x509 Certificate, SBL, SYSFW, BOARDCFG (and the SYSFW inner certificate in case of HS device) binary blobs. We use a python script to generate this final boot image. This script has a dependency on
openssl as mentioned before, so make sure you've installed it. To generate a combined boot image, one can do as below:
- For GP devices
cd ${SDK_INSTALL_PATH}/tools/boot/signing
${PYTHON} rom_image_gen.py --swrv 1 --sbl-bin <path-to-sbl-binary> --sysfw-bin <path-to-sysfw-binary> --boardcfg-blob <path-to-boardcfg-binary-blob> --boardcfg-sbldata-blob <path-to-boardcfg-sbldata-blob> --sbl-loadaddr ${SBL_RUN_ADDRESS} --sysfw-loadaddr ${SYSFW_LOAD_ADDR} --bcfg-loadaddr ${BOARDCFG_LOAD_ADDR} --bcfg-sbldata-loadaddr ${BOARDCFG_SBLDATA_LOAD_ADDR} --key ${BOOTIMAGE_CERT_KEY} --rom-image <path-to-output-image> --enable-sbldata yes --keyversion $(VERSION)
- For HS devices, we have to pass the HS SYSFW binaries and also the SYSFW inner certificate to the signing script.
cd ${SDK_INSTALL_PATH}/tools/boot/signing
${PYTHON} rom_image_gen.py --swrv 1 --sbl-bin <path-to-sbl-binary> --sysfw-bin <path-to-sysfw-binary> --sysfw-inner-cert <path-to-sysfw-inner-cert-binary> --boardcfg-blob <path-to-boardcfg-binary-blob> --boardcfg-sbldata-blob <path-to-boardcfg-sbldata-blob> --sbl-loadaddr ${SBL_RUN_ADDRESS} --sysfw-loadaddr ${SYSFW_LOAD_ADDR} --bcfg-loadaddr ${BOARDCFG_LOAD_ADDR} --bcfg-sbldata-loadaddr ${BOARDCFG_SBLDATA_LOAD_ADDR} --key ${BOOTIMAGE_CERT_KEY} --rom-image <path-to-output-image> --enable-sbldata yes --keyversion $(VERSION)
- For examples which is loaded by SBL, we use a different signing script. This is solely because of the x509 certificate template differences between ROM and SYSFW. In GP devices appimages are not signed. The signing happens only in HS devices. The script usage is:
cd ${SDK_INSTALL_PATH}/tools/boot/signing
$(PYTHON) appimage_x509_cert_gen.py --bin <path-to-the-binary> --authtype 0 --loadaddr 84000000 --key <signing-key-derived-from-devconfig> --output <output-image-name> --keyversion $(VERSION)
- In the case of encryption, two extra options are also passed to the script like so:
cd ${SDK_INSTALL_PATH}/tools/boot/signing
$(PYTHON) appimage_x509_cert_gen.py --bin <path-to-the-binary> --authtype 0 --loadaddr 84000000 --key <signing-key-derived-from-devconfig> --enc y --enckey <encryption-key-derived-from-devconfig> --output <output-image-name> --keyversion $(VERSION)
- These scripts are invoked in makefiles, and the image generation happens automatically along with the example build. So mostly these scripts need not be manually run.
- Here,
SBL_RUN_ADDRESS is 0x43C00000- In the case of GP device,
BOOTIMAGE_CERT_KEY is app_degenerateKey.pem
- In the case of HS device,
BOOTIMAGE_CERT_KEY is custMpk.pem.
For more details about this see Enabling Secure Boot
These scripts are invoked in makefiles, and the image generation happens automatically along with the example build. So mostly these scripts need not be manually run. If the user build-system is different from TI's makefile system, it needs to be ensured that the same is followed as part of the post build steps.
The devconfig has ENC_SBL_ENABLED=yes and that is why for HS-SE devices, the SBL image is encrypted by default.
UART Bootloader Python Script
- This script is used in UART boot mode for sending the SBL and appimage binaries to the EVM via UART using XMODEM protocol
- Make sure that python3 and its dependent modules are installed in the host machine as mentioned in Python3
- Booting via UART is slow, but is useful if application loading via CCS or OSPI boot is not an option
- Make sure the UART port used for terminal is identified as mentioned in Setup UART Terminal
- Make sure you have the EVM power cable and UART cable connected as shown in Cable Connections
- To boot applications using this script, POWER OFF the EVM
- Switch to UART BOOT MODE.
- POWER ON the EVM
- To confirm that the board is in UART boot mode, open the UART terminal and confirm that you see the character 'C' getting printed on the console every 2-3 seconds.
- Now close the terminal. This is important as the script won't be able to function properly if the UART terminal is open.
- Update the appimage path on sbl_prebuilt/{board}/default_sbl_uart_hs_fs.cfg file
- Note
- For HS-SE device, use default_sbl_uart_hs.cfg as the cfg file.
- Open a command prompt and run the below command to send the SBL and application binary to the EVM
- on Linux
cd ${SDK_INSTALL_PATH}/tools/boot
python uart_bootloader.py -p /dev/ttyUSB0 --cfg=sbl_prebuilt/{board}/default_sbl_uart_hs_fs.cfg
- on Windows
cd ${SDK_INSTALL_PATH}/tools/boot
python uart_bootloader.py -p -p COM<x> --cfg=sbl_prebuilt/{board}/default_sbl_uart_hs_fs.cfg
- When you execute this, the script first sends the uart bootloader, and then the multicore appimage
- After the multicore appimage is successfully parsed, the uart bootloader sends an acknowledgment to the script and waits for 5 seconds before running the application binary
- Upon receiving the ack, the script will exit successfully
- Connect to the UART terminal within 5 seconds to see logs from the application
- Below are the logs of the script after all the files have been sent
Sending the UART bootloader sbl_prebuilt/{board}/sbl_uart.release.tiimage ...
Sent bootloader sbl_prebuilt/{board}/sbl_uart.release.tiimage of size 243975 bytes in 23.94s.
Sending the application ../../examples/drivers/udma/udma_memcpy_polling/{board}/r5fss0-0_nortos/ti-arm-clang/udma_memcpy_polling.release.appimage ...
Sent application ../../examples/drivers/udma/udma_memcpy_polling/{board}/r5fss0-0_nortos/ti-arm-clang/udma_memcpy_polling.release.appimage of size 99580 bytes in 11.74s.
[STATUS] Application load SUCCESS !!!
Connect to UART in 5 seconds to see logs from UART !!!
Linux Appimage Generator Tool
- Note
- Change DEVICE_TYPE to HS in ${SDK_INSTALL_PATH}/devconfig/devconfig.mak and then generate Linux Appimage for HS-SE device.
- This tool generates a Linux Appimage by taking the Linux binaries (ATF, OPTEE, SPL) as input and generates a Linux appimage containing the input Linux binaries.
- In the falcon mode, A53 SPL is replaced by the Linux kernel so that Linux can boot up directly. For more information on obtaining Kernel and DTB, refer to Processor-SDK-Linux.
- The input file location can be mentioned in the
config.mak file located at {SDK_INSTALL_PATH}/tools/boot/linuxAppimageGen/board/am62x-sk
- PSDK_LINUX_PATH mentions the path of Processor-SDK-Linux installer.
- PSDK_LINUX_PREBUILT_IMAGES mentions the path of prebuilt images necessary for Linux appimage.
- PSDK_LINUX_PREBUILT_IMAGES?=$(PSDK_LINUX_PATH)/board-support/prebuilt-images/am62xx-evm
- In case of AM62X-SK-LP board,
- PSDK_LINUX_PREBUILT_IMAGES?=$(PSDK_LINUX_PATH)/board-support/prebuilt-images/am62xx-lp-evm
- In case of AM62X-SIP-SK board,
- PSDK_LINUX_PREBUILT_IMAGES?=$(PSDK_LINUX_PATH)/board-support/prebuilt-images/am62xxsip-evm
- The input file names for ATF, OPTEE and SPL can also be mentioned in the
config.mak file.
#Input linux binaries
ATF_BIN_NAME=bl31.bin
OPTEE_BIN_NAME=bl32.bin
SPL_BIN_NAME=u-boot-spl.bin-am62xx-evm
- In the falcon mode
ATF_BIN_NAME=bl31.bin
OPTEE_BIN_NAME=bl32.bin
KERN_BIN_NAME=Image
FDT_BIN_NAME=k3-am625-sk.dtb
- The load address for ATF, OPTEE and SPL need to be mentioned in the
config.mak file.
#Linux image load address
ATF_LOAD_ADDR=0x80000000
OPTEE_LOAD_ADDR=0x9e800000
SPL_LOAD_ADDR=0x80080000
- In the falcon mode
ATF_LOAD_ADDR=0x80000000
OPTEE_LOAD_ADDR=0x9e800000
KERN_LOAD_ADDR=0x82000000
FDT_LOAD_ADDR=0x88000000
- Note
- In case of AM62x SIP board, the load address for ATF, OPTEE and SPL is
#Linux image load address
ATF_LOAD_ADDR=0x80000000
OPTEE_LOAD_ADDR=0x80080000
SPL_LOAD_ADDR=0x82000000
- In the falcon mode
ATF_LOAD_ADDR=0x80000000
OPTEE_LOAD_ADDR=0x80080000
KERN_LOAD_ADDR=0x82000000
FDT_LOAD_ADDR=0x88000000
- The output appimage name can be mentioned in the
config.mak file.
#Output appimage name
LINUX_BOOTIMAGE_NAME=linux.appimage
- Run the makefile at {SDK_INSTALL_PATH}/tools/boot/linuxAppimageGen to generate the Linux appimage
- For Windows
  cd ${SDK_INSTALL_PATH}/tools/boot/linuxAppimageGen
  gmake -s BOARD=am62x-sk all
- For Linux
  cd ${SDK_INSTALL_PATH}/tools/boot/linuxAppimageGen
  make -s BOARD=am62x-sk all
- For Falcon
  cd ${SDK_INSTALL_PATH}/tools/boot/linuxAppimageGen
  make -s BOARD=am62x-sk all FALCON_MODE=1
- In case of AM62X-SK-LP board, use
am62x-sk-lp as the BOARD in make command
- In case of AM62X-SIP-SK board, use
am62x-sip-sk as the BOARD in make command
- The Linux appimage wil be generated at {SDK_INSTALL_PATH}/tools/boot/linuxAppimageGen/board/am62x-sk after running the makefile
HSM Appimage Generator Tool
- Note
- Change DEVICE_TYPE to HS in ${SDK_INSTALL_PATH}/devconfig/devconfig.mak and then generate Linux Appimage for HS-SE device.
- Attention
- GCC AARCH64 compiler installation is required for HSM appimage generation. Refer GCC AARCH64 Compiler
- This tool generates a HSM Appimage by taking the HSM binaries (.bin file) as input and generates an appimage containing the input HSM binary.
- The input file location can be mentioned in the
config.mak file located at {SDK_INSTALL_PATH}/tools/boot/HSMAppimageGen/board/am62x-sk
- The input file name for HSM bin file can be mentioned in the
config.mak file.
#Input binary name
HSM_BINARY_NAME = HSM_min_sample.bin
- The output appimage name can be mentioned in the
config.mak file.
#Output appimage name
HSM_APPIMAGE_NAME=hsm.appimage
- Run the makefile at {SDK_INSTALL_PATH}/tools/boot/HSMAppimageGen to generate the HSM appimage
- The HSM appimage wil be generated at {SDK_INSTALL_PATH}/tools/boot/HSMAppimageGen/board/am62x-sk after running the makefile
 1.8.20