Vision Apps User Guide
ETHFW Demos

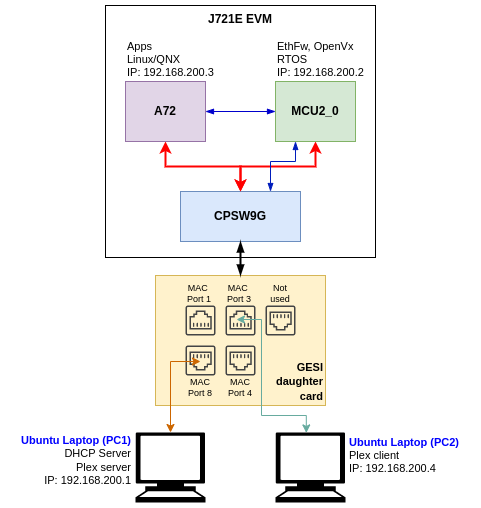
Ethernet firmware is integrated part of vision_apps and enabled by default. One can run all the OpenVx based demos alongside with Ethfw running on CPSW9G IP on J7ES EVM.

ethfw_demo_setup.png

Hardware Setup

The below are required to run Ethfw

  • J7ES EVM
  • GESI daughter card
  • QPENET (i.e. QSGMII) daughter card
  • Linux machine running DHCP server, this was tested on Ubuntu 18.04 but any version which supports hosting DHCP server would do
  • A client machine runnig Linux/Windows with a browser
  • A pair of network cables, connected as shown in the setup diagram above
    • One cable connected to port8 on the GESI card and other end connected to Linux machine (i.e. the DHCP server)
    • Second cable connected to port3 on the GESI card and other end connected to client machine
  • eDP cable connected to a eDP capable display monitor for running OpenVx demos
  • UART cable connected to main UART port on the J7ES EVM
  • 12V power supply for the EVM
  • SD card

Software Setup

  • Install and run a DHCP server on Ubuntu 18.04 machine by following the instructions here https://help.ubuntu.com/community/isc-dhcp-server This machine will provide IP to R5F (Main MCU2_0), A72 and any client connected via GESI card.
  • Install and run a Plex media server on the same Ubuntu 18.04 machine by following the instructions here https://www.plex.tv/en-gb/media-server-downloads/
  • Optional: The SDK includes a Linux base GUI control interface to enable/disable/configure features like VLAN, multicast, rate limiting, interVLAN routing and also to show the load of the CPU. The configuration GUI can be run on either of the Ubuntu laptops (PC1 or PC2) shown in the setup diagram above and requires Python and other software components to be installed on the host PC. Please refer to the setup instructions provided in section Python3 and Pip3 of Ethernet Firmware Demo user guide.

    Note: The GUI tool can be executed from either PC 1 or PC 2, so Python and its dependencies must be installed only on the selected PC.

Running the demo (Linux + RTOS) or (QNX + RTOS)

  • Build the application and related libraries as mentioned in Build Instructions
  • Open UART client like minicom on /dev/ttyUSB0 (instance 0) where Linux and OpenVx logs usually appear.
  • Power on the EVM and let the OS come up.
  • Login and navigate to /opt/vision_apps on linux and /ti_fs/vision_apps on QNX, run the ./vision_apps_init.sh script.
  • Upon sucessfull completion you should see Ethfw initialization logs and version as given below.
j7-evm login: root
Last login: Mon Nov 29 14:43:33 UTC 2021
root@j7-evm:~# source /opt/vision_apps/vision_apps_init.sh
...
...
[MCU2_0] 17.235797 s: ETHFW: Init ... !!!
[MCU2_0] 17.256561 s: ETHFW: Shared multicasts (software fanout):
[MCU2_0] 17.256629 s: 01:00:5e:00:00:01
[MCU2_0] 17.256683 s: 01:00:5e:00:00:fb
[MCU2_0] 17.256729 s: 01:00:5e:00:00:fc
[MCU2_0] 17.256772 s: 33:33:00:00:00:01
[MCU2_0] 17.256815 s: 33:33:ff:1d:92:c2
[MCU2_0] 17.256858 s: 01:80:c2:00:00:00
[MCU2_0] 17.256900 s: 01:80:c2:00:00:03
[MCU2_0] 17.256945 s: ETHFW: Reserved multicasts:
[MCU2_0] 17.256981 s: 01:80:c2:00:00:0e
[MCU2_0] 17.257029 s: 01:1b:19:00:00:00
[MCU2_0] 17.257269 s: EnetMcm: CPSW_9G on MAIN NAVSS
[MCU2_0] 17.268444 s: PHY 0 is alive
[MCU2_0] 17.268525 s: PHY 3 is alive
[MCU2_0] 17.268575 s: PHY 12 is alive
[MCU2_0] 17.268612 s: PHY 15 is alive
[MCU2_0] 17.268655 s: PHY 23 is alive
[MCU2_0] 17.268948 s: EnetPhy_bindDriver: PHY 12: OUI:080028 Model:23 Ver:01 <-> 'dp83867' : OK
[MCU2_0] 17.269237 s: EnetPhy_bindDriver: PHY 0: OUI:080028 Model:23 Ver:01 <-> 'dp83867' : OK
[MCU2_0] 17.269530 s: EnetPhy_bindDriver: PHY 3: OUI:080028 Model:23 Ver:01 <-> 'dp83867' : OK
[MCU2_0] 17.269796 s: EnetPhy_bindDriver: PHY 15: OUI:080028 Model:23 Ver:01 <-> 'dp83867' : OK
[MCU2_0] 17.271513 s:
[MCU2_0] ETHFW Version : 0.02.00
[MCU2_0] 17.271583 s: ETHFW Build Date: Dec 6, 2021
[MCU2_0] 17.271616 s: ETHFW Build Time: 13:05:54
[MCU2_0] 17.271643 s: ETHFW Commit SHA: 55d0bef1
[MCU2_0] 17.271710 s: ETHFW: Init ... DONE !!!
[MCU2_0] 17.271742 s: ETHFW: Remove server Init ... !!!
[MCU2_0] 17.271916 s: CpswProxyServer: Virtual port configuration:
[MCU2_0] 17.271981 s: mpu_1_0 <-> Switch port 0: mpu_1_0_ethswitch-device-0
[MCU2_0] 17.272031 s: mcu_2_1 <-> Switch port 1: mcu_2_1_ethswitch-device-1
[MCU2_0] 17.272076 s: mpu_1_0 <-> MAC port 1: mpu_1_0_ethmac-device-1
[MCU2_0] 17.272115 s: mcu_2_1 <-> MAC port 4: mcu_2_1_ethmac-device-4
[MCU2_0] 17.273139 s: CpswProxyServer: initialization completed (core: mcu2_0)
[MCU2_0] 17.273207 s: ETHFW: Remove server Init ... DONE !!!
[MCU2_0] 17.274312 s: Starting lwIP, local interface IP is dhcp-enabled
[MCU2_0] 17.280756 s: Host MAC address: 70:ff:76:1d:92:c3
[MCU2_0] 17.284536 s: [LWIPIF_LWIP] Enet LLD netif initialized successfully
[MCU2_0] 17.316149 s: [LWIPIF_LWIP_IC] Interface started successfully
[MCU2_0] 17.316220 s: [LWIPIF_LWIP_IC] NETIF INIT SUCCESS
  • You should also see the IP addresses assigned to the R5F and A72 cores as shown below. Note that 'br4' IP is the IP address of the R5F core. The addresses shown in your logs may be different.
[MCU2_0] SNo. IP Address MAC Address
[MCU2_0] 22.675608 s: ------ ------------- -----------------
[MCU2_0] 22.675643 s: 1 192.168.1.216 70:ff:76:1d:92:c1
[MCU2_0] 22.677839 s: Function:CpswProxyServer_filterAddMacHandlerCb,HostId:0,Handle:a37e1074,CoreKey:38acb7e6, MacAddre0
[MCU2_0] 22.679926 s: Function:CpswProxyServer_filterAddMacHandlerCb,HostId:0,Handle:a37e1074,CoreKey:38acb7e6, MacAddre0
[MCU2_0] 25.274278 s: Added interface 'br4', IP is 192.168.1.219
[MCU2_0] 25.287624 s: EthFw: TimeSync PTP enabled
[MCU2_0] 25.293106 s: Rx Flow for Software Inter-VLAN Routing is up

You are now ready to run any of the OpenVx applications including DL applications using the SDK.

  • To demostrate the switching capabily, on the server share a media file like a video file.
  • On the client machine open a browser and connect to the Plex server by typing the URL Eg. http://192.168.7.202:32400/web/index.html
  • Once connection is established you can stream the video file via the J7ES CPSW9G running Ethfw in the background alongside other OpenVx demos.

For QNX after running the vision_apps_init.sh script bring up the CPSW ethernet virtual driver as below,

slog2info -c
slog2info -w &
io-pkt-v6-hc -d cpsw9g verbose=0x0
dhclient -nw an0
ifconfig -v

GUI Configurator Tool (Optional)

  • The instructions to run the GUI configurator tool are provided in section GUI Configurator Tool of Ethernet Firmware Demo user guide.
  • Please follow these instructions and use the the IP address of the R5F core in the settings tab. The IP address assigned to the R5F core is shown as 'br4' IP in the console logs as mentioned earlier.

Known Issues

  • The GESI card uses the same connector pins as infotainment card so only one of them can be connected
  • With Ethfw enabled by default, if infotainment board is connected it results in HDMI display corruption. eDP to HDMI adaptors also cannot be used with Ethfw enabled. To workaround this issue disable Ethfw if required or switch display to eDP.

How to disable ETHFW

  • In file vision_apps_build_flags.mak, set BUILD_ENABLE_ETHFW?=no
  • Run "make vision_apps_scrub" prior to re-building
  • Note: Ethernet firmware must be disabled in order to use the HDMI display