8.1. Installation
8.1.1. Can I install multiple versions of CCS on my computer?
Yes. Multiple versions of CCS can be installed on the same machine as long as they are installed in different directories.
8.1.2. What is the difference between the web installer and the offline installer?
The web installer is a lightweight installation program. The initial download is very small and enables the selection of features and device support to install. Once the selections are made the installer will then download the appropriate packages to complete the desired selection.
The offline installer, or full installer, is a larger installation program. The download contains all of the available installation options. This installer does not require internet connectivity to run. This installer is recommended if your firewall or anti-virus software is blocking the web installer.
8.1.3. My username has Unicode characters and CCS fails to install. How do I resolve this?
Due to a limitation in the Eclipse Application Framework used by CCS, the username cannot contain any Unicode characters. In order to install the product, please create a temporary admin user without any Unicode characters and install CCS for all users.
8.1.4. Why does the Linux installer just exit without doing anything?
The installer requires some packages to be installed in order to run. You are likely missing one or more of these packages. Please refer to Linux Host Support for more information on installing on Linux.
8.1.5. Why does the Windows installer just exit without doing anything?
There is some software that sets up the TCL_LIBRARY environment variable which is interfering with the CCS installer. Please unset this variable temporarily, before trying the install.
8.1.6. After installing on Linux, why does CCS refuse to open?
When double-clicking the desktop icon nothing happens, and if launching from a command line, the following error is shown:
user@host:/opt/ti/ccsv6/eclipse$ ./ccstudio
Permission denied
If this continues, please run fsclean or set TI_APPDATA_DIR to directory you have permissions to access
This may happen when updating or installing a newer version of the same stream of CCS (8.0.0 to 8.1.0, for example). The cause is that, if CCS was previously launched as root, the temporary directory in the user area may have become tainted and its ownership was set to root. In other words, the temporary CCS directory would look similar to:
user@host:~/.ti$ ls -al
total 20
drwxr-xr-x   3 root     root      4096 Jan 24  2014 .
drwxr-xr-x 135 user     user      12288 Jan 26 11:25 ..
drwxr-xr-x   3 root     root      4096 Jan 24  2014 CCSv6
-rw-r--r--   1 root     root         0 Jan 24  2014 .lock
To fix this, use chown to change the ownership of all the directories and the .lock file back to the user
user@host:~/.ti$ sudo chown -hR user:user * .lock
8.1.7. After installing CCS, I found out some features (such as certain processor families or debug probes) are missing. Is there a way to add these features?
Yes. Simply re-run the installer executable (either online or offline). Follow the installer screens and select the same directory as the original install. Keep following the installer screens and select the missing components.
Certain features (such as code generation tools updates) can be installed from inside CCS (using menu Help → Install New Software), however this method cannot be used to add support for additional processsor families and debug probes. You would need to re-run the installer to add this support. Check the CCS Updates page for more details.
8.1.8. When installing CCS it says “An error occured: can’t read”update“: no such variable”. How do I resolve this?
Make sure you are installing CCS to a clean directory where a previous installation does not exist.
8.1.9. When trying to install compiler tools, CCS says it is already installed but it is actually not. How do I fix it?
This could happen if a prior attempt at installing the compiler tools did not complete properly. In such cases, the menu Help → Installation Details → Installed Software will list that version of compiler tools as installed, however the files will really not be in the file system and the compiler version will not be in the list of Discovered Tools under menu Window → Preferences → Code Composer Studio → Build → Compilers.
To resolve the issue, look for the compiler installer executable in the folder <ccs_install_dir>/ccsv[x]/eclipse/downloads. It will be named something like ti_cgt_tms470_5.0.11_windows_installer.exe, for example. Run the installer manually as administrator and tell it to install into the <ccs_install_dir>/ccsv[x]/tools/compiler/arm_<version> directory.
8.1.10. How can I perform a silent or unattended installation of CCS?
Default installation:
The CCS installer can be run on the command line in unattended mode. The parameters required are:
<installer> --prefix <install_directory> --mode unattended
For example:
ccs_setup_8.1.0.00011.exe --prefix c:\ccs_810 --mode unattended
This will install all of CCS in the install_directory provided, without any user interaction or GUI.
If running on Windows, it must be run as admin so the installer can install drivers.
On Linux, if run as sudo or root, it will install driver files. If run as a regular user, you will need to then run <install_directory>/ccsv8/install_scripts/install_drivers.sh as sudo.
Response files:
While the default behaviour will install all of CCS in unattended mode, you can provide a response file to limit the content.
To generate a response file, run the installer with these options:
<installer> --save-response-file <full_path_to_response_file/responsefile_name> --skip-install true
For example:
ccs_setup_8.1.0.00011.exe --save-response-file c:\temp\response.txt --skip-install true
Note that the directory for the response file must already exist.
Any Processor families and debug probe selections made while clicking through the installer will be saved in the response file. The skip-install parameter will skip the install step and directly generate the response file. If you omit that option, it will continue with the installation.
To run the installer in unattended mode using the response file:
<installer> --prefix <install_directory> --mode unattended --response-file <full_path_to_response_file/responsefile_name>
For example:
ccs_setup_8.1.0.00011.exe --prefix c:\ccs_810 --mode unattended --response-file c:\temp\response.txt
8.2. Licensing
8.2.1. What is the licensing policy for CCS?
There is no license fee associated with CCS. Users are free to download and install Code Composer Studio without having to purchase a license.
8.3. Updates
8.3.1. How do I get updates to CCS?
By default CCS automatically checks for updates each time it starts. This update check will find updates to features that are already installed. For example, it will find updates to the CCS IDE, compiler bug fix release, and device support. It will not find new features including new feature revisions of the compiler. See the CCS Updates page for more details.
8.3.2. How do I search for new features for CCS?
The CCS App Center which is accessible from the View menu is useful for finding new features. The App Center will highlight a selection of new features that are relevant to the device families that you have installed.
There are a few other ways to find and install new compiler tools. Refer to the procedures described in the Compiler Updates article.
8.3.3. How do I get TI-RTOS Updates?
The main way to get TI-RTOS is via Resource Explorer which will automatically show you the latest version of TI-RTOS or the SDK that it is included in.
8.3.4. When installing CCS updates I get a dialog box that warns me that the feature is unsigned. Is this a problem?
Most updates released by TI are signed, however not all of them are. Similarly an update or feature from a partner may not be digitally signed. When this happens CCS produces a warning noting that the feature has not been signed. In general these are safe to ignore but it is best to always make sure you know where the update is coming from before installing it.
8.4. Projects
8.4.1. How do I override the TEMP and TMP environment variables that are used to determine where temporary files are placed during CCS build process?
During the CCS build process, gmake creates temporary batch files in the directory that corresponds to the user’s TEMP and TMP System Environment Variables. The compiler also uses this directory for temporary files during compilation. CCS has the ability to let the user override these environment variables within the scope of CCS, so you don’t have to modify your global System variables.
In CCS, open the menu Window → Preferences → C/C++ → Build → Environment, and use the Add button to add the two variables:
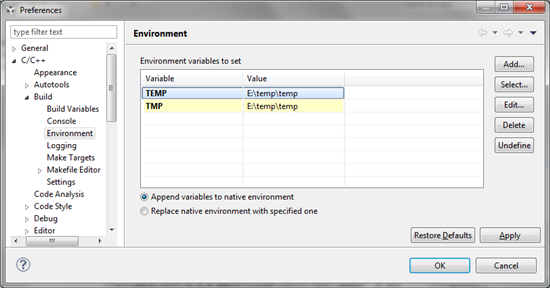
Set the appropriate button to either “Append” or “Replace” variables to native environment. On Windows, make sure to use backslashes (not forward slashes) in the paths. Also make sure the directory specified for the variables exists before running the build.
8.4.2. Is it possible to convert a non-RTSC CCS project to a RTSC project, and vice-versa?
To convert a non-RTSC project to a RTSC project, simply add a RTSC configuration file (.cfg) to the project. CCS will ask if you want to enable RTSC support for the project and if you click Yes, will convert it to a RTSC project.
It is not possible to convert a RTSC project to a non-RTSC project. In this case, you would need to start over by creating a new project.
8.4.3. During project build, a ccsLinker.opt file sometimes gets passed to the linker instead of the list of object files . What is this file and when is it used?
The ccsLinker.opt file is generated by CCS and passed to the linker if the list of linker options and input files on the linker command line exceeds the maximum command line length of the host operating system. A project with a large number of object files (.obj) may pass the linker options and input files to the linker via the ccsLinker.opt file rather than directly on the command line.
8.5. Debug
8.5.1. I get Data Verification errors when loading my program. What does it mean?
See this article on Data Verification Errors
8.5.2. What is the difference between Run/Resume and Free Run?
Free Run disables breakpoints before executing code on the target. Essentially you are running free of the debugger. You will not see updates to any views or printfs when performing a Free Run.
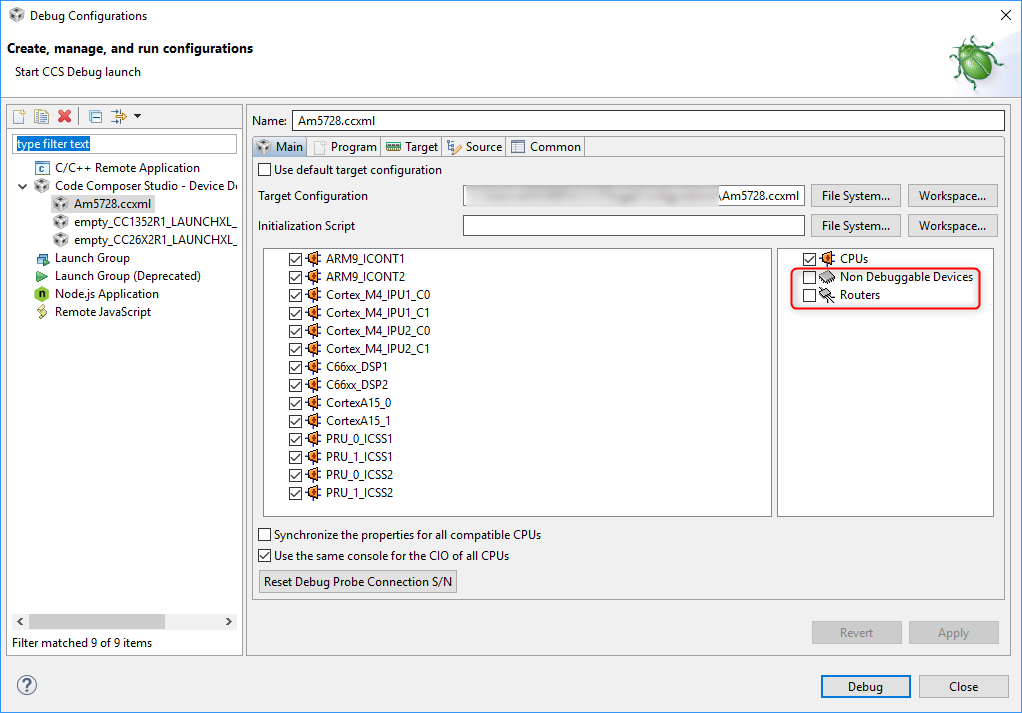
8.5.3. How can I view non debuggable devices and routers in the Debug view?
The Debug view hides non-debuggable devices by default. If you wish to view these devices:
Right-click in the Debug view and select Show All Cores in the context menu. A node called Non Debuggable Devices will appear which you can then expand to see the devices.
You can also set this within a given debug configuration so every time a debug session is launched with that debug configuration (with or without associated project), the settings will take effect. To do this, go to CCS menu Run → Debug Configurations, and enable Non Debuggable Devices and Routers for the desired debug configuration.
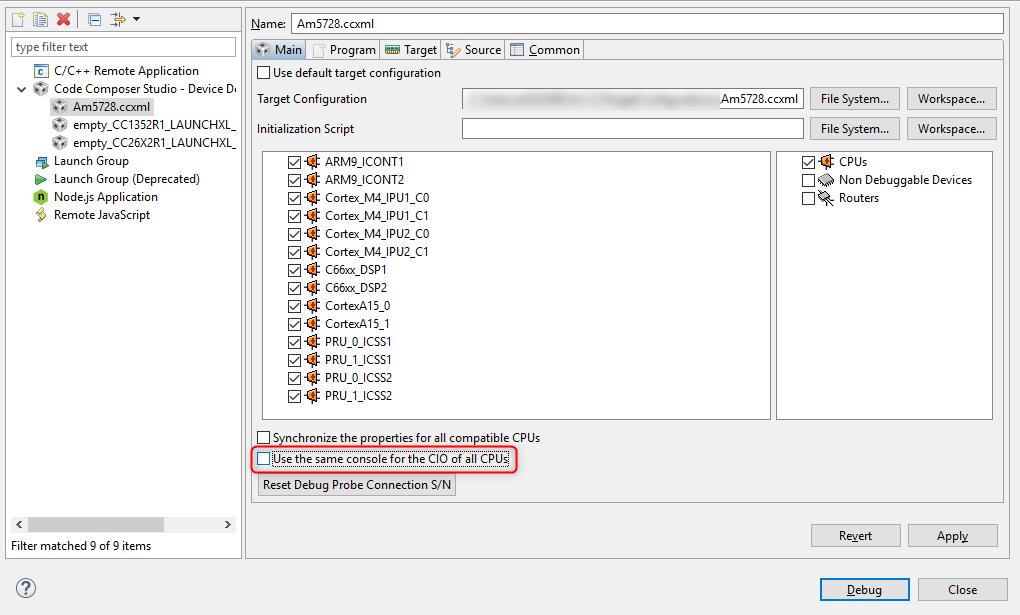
8.5.4. In multi-core devices, the CIO console prints out the CPU-core name after every output character. Is there a way to prevent this?
In CCS all the CIO output goes to a single console by default, so CCS inserts the CPU-core name in front so that you can tell which core it is coming from. For assert() statements, the CPU-core name is added whenever a given CPU flushes its CIO buffer, making the output very difficult to read.
There is an option to control this. Go to menu Run → Debug Configurations, select your debug configuration and uncheck the option Use the same console for the CIO of all CPUs.
8.5.5. My BeagleBone is Rev A5 and greater, but I still can’t connect to CCS . Why?
If you are getting this error when trying to connect to the board:
Error connecting to the target:
(Error -151 @ 0x0)
One of the FTDI driver functions used during
the connect returned bad status or an error.
The cause may one or more of: invalid emulator serial number,
blank emulator EEPROM, missing FTDI drivers, faulty USB cable.
Use the xds100serial command-line utility in the 'common/uscif'
folder to verify the emulator can be located.
(Emulation package n.n.nnn.n)
Or getting this when running the xds100serial utility:
C:\ti\ccsv6\ccs_base\common\uscif>xds100serial.exe
Scanning for XDS100 emulators...

VID/PID     Type         Serial #  Description
0403/6010   blank EEPROM unknown   no description available
Or the Windows control panel is showing two USB serial ports when you connect the board to the PC, then you have a BeagleBone board with a blank (non-programmed) FTDI device.
The solution is to program the board with a known good configuration. One can be found at CircuitCo’s BeagleBone page.
8.5.6. Can I debug two boards using two separate emulators at the same time?
Yes, this is possible. See this article for more details: Debugging with Multiple Debug Probes.
8.5.7. When debugging program in cache why do cache lines get invalidated?
For any kind of action that involves setting software breakpoints (this also includes single-stepping or running to an address) on C6x, the corresponding cache line is invalidated. This is expected behavior since software breakpoints require the breakpoint opcode being written to the program memory at that address.
8.5.9. How do I resolve this error when launching a debug session “Could not fetch next record for SQL statement” and running fsclean does not help.
Try deleting the target cache files as described in the Troubleshooting chapter
8.5.10. How do I resolve error “Cannot read System Setup data from XML file <file path/name>.ccxml. XML configuration file has no <configurations> root node”?
Try creating and using a new target configuration file.
8.5.11. Is it possible for the Graphs view and properties to carry over from one CCS session to another, so when CCS is restarted the graphs come up again?
CCS saves the arrangement and contents of graph views when a debug session is terminated and restarted, but not when CCS itself is shut down and restarted. The solution to help streamline the input of graphing properties is the Export and Import buttons at the bottom of the graph properties. You could export the graph properties to a file and then import it back when you restart CCS.
8.6. General
8.6.1. Are simulators no longer included with CCS?
Starting with CCSv6, simulators are no longer included. We are moving away from providing simulators and instead focusing on providing low cost development boards.
8.6.2. Are C54x devices supported in CCS?
The last release to support C54x is CCSv5.5.
8.6.3. Can I use DSP/BIOS with current releases of CCS?
Yes you can use DSP/BIOS with current releases of CCS and build projects. However, the Real-time analysis features are not supported with DSP/BIOS.
8.6.4. Which operating systems are supported by CCS?
Please see the article on System Requirements.
8.6.5. Is the XDS510LC emulator from Spectrum Digital supported with F2837xS/D and F2807x devices?
These devices have an Icepick router which is NOT supported by the XDS510LC. For these devices, please use one of the supported emulators as mentioned in this forum post.
8.6.6. How do I modify the maximum Java heap size for Eclipse?
If you see an “out of memory” error in CCS, try changing the Eclipse heap setting. To do this, open ccstudio.ini in the /ccsv[x]/eclipse folder (/ccs/eclipse/Eclipse.app/Contents/Eclipse for MacOS) and adjust the “-Xmx” argument. Note that on Windows, CCS versions upto CCSv9 are 32-bit applications, hence there is a cap on how much this value can be increased for it to have effect. Also, having too high a value may cause other IDE stability problems depending on how much content is open in the workspace and what features are being used. If you have 4+ GB of system RAM, the “sweet spot” seems to be between 512m to 768m, and it works best for most users.
More information on Heap and Java Virtual Machine (JVM) memory settings can be found in the Troubleshooting section.