The process of migrating an F28 project to an F29 device is broken down into the following key steps :
F29 devices are supported only on CCS Theia. If you are working with an Eclipse-based project, it must first be imported into CCS Theia. You can directly import the Eclipse based project in CCS Theia. For more details on how to import projects in CCS Theia, refer to CCS Theia User Guide
C2000Ware-F29SDK Project migration tool is integrated into the CCS IDE and can be initiated from the Sysconfig UI (for Sysconfig enabled projects) or through the Project Properties dialog.
If your project uses Sysconfig, you can switch the project to an F29 device using the SWITCH button in the Sysconfig tool. Note that cross-SDK migration is supported starting from C2000Ware v5.04.00.
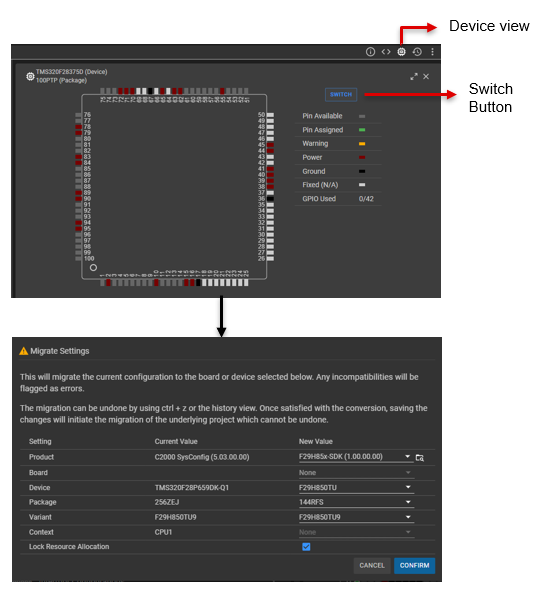
If Sysconfig is not enabled, it is recommended to add Sysconfig support, especially for complex peripherals like SSU. However, migration can still proceed by adding the F29 SDK as a dependency to the project. Note that this migration works only if C2000Ware / C28 DigitalPower SDK / C28 MotorControl SDK is already included as a dependency in the project.
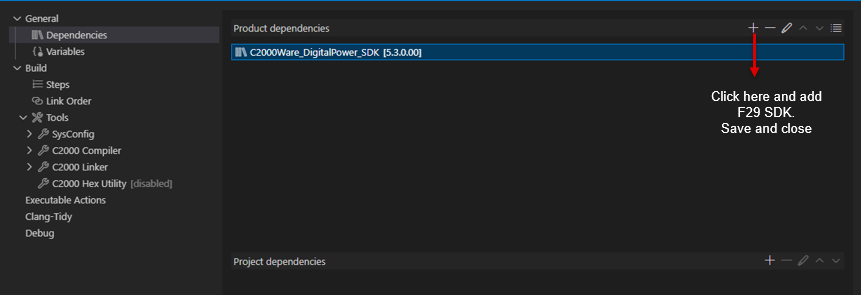
The C2000Ware-F29SDK Project migration tool performs the following tasks automatically during migration:
The details of all the changes made by the tool are recorded in the project.log file which is added to the project directory.
Upon completing the migration, you will receive a prompt indicating that the process is finished.

All the libraries and include paths from the F29-SDK are pre-configured in the CCS environment variables (COM_TI_*) and are automatically included in the project settings. Therefore, manual addition of SDK paths under Compiler or Linker settings is not necessary.
Once the project settings are migrated, it is essential to replace all local device-specific files with their F29 equivalents. The following files needs to be updated:
F29 devices memory architecture is very different compared to F28. F28 devices had dedicated RAMs per CPU subsystem and shared RAMs which could be allocated to either one of the CPU subsystems. In contrast, F29 devices have shared RAMs across all cores and is accessible to DMA. F29 devices have the following RAM blocks :
For a scenario where an F28 application is being migrated to F29 device with the following core mapping :
RAMs can be mapped as follows :
| C28 RAM | C29 RAM |
|---|---|
| Mx/Dx RAM - CPU1 | LDAx RAM |
| Mx/Dx RAM - CPU2 | CDAx RAM |
| LSRAM - CPU1 | LDAx RAM in case used for data sections, LPAx RAM in case used for code sections |
| LSRAM - CPU2 | CDAx RAM in case used for data sections, CPAx RAM in case used for code sections |
| GSRAM | CDAx RAM in case used for data sections, CPAx RAM in case used for code sections |
| CPU MSG RAM | CDAx RAM |
| CLA MSGRAM | LDAx RAM |
| CLA-DMA MSG RAM | LDAx RAM |
Since all the RAMs in the F29 devices are shared across all the cores, it first needs to be properly allocated for each core. This can be done using the Sysconfig Memory Configuration tool, which allows user to specify the code and data memory requirements for each of the core, and the tool will allocate the RAMs accordingly with minimal wait states.

The application code migration can be divided into two main parts:
Due to the architectural differences between the F28 and F29 devices, as well as variations in the peripheral IPs, the APIs provided in C2000Ware and F29 SDK may not be directly compatible. Detailed information on these differences is covered in the section SDK Differences. To assist with this migration, we provide the C2000-IDEA (C2000 IDE-Assist) tool. This is a plugin that can be installed on CCS Theia which helps identify and resolve such incompatibilities. The plugin is available for download from the Open VSX Registry and is also hosted in GitHub.
Once installed, the C2000-IDEA icon will appear on the left panel of CCS.

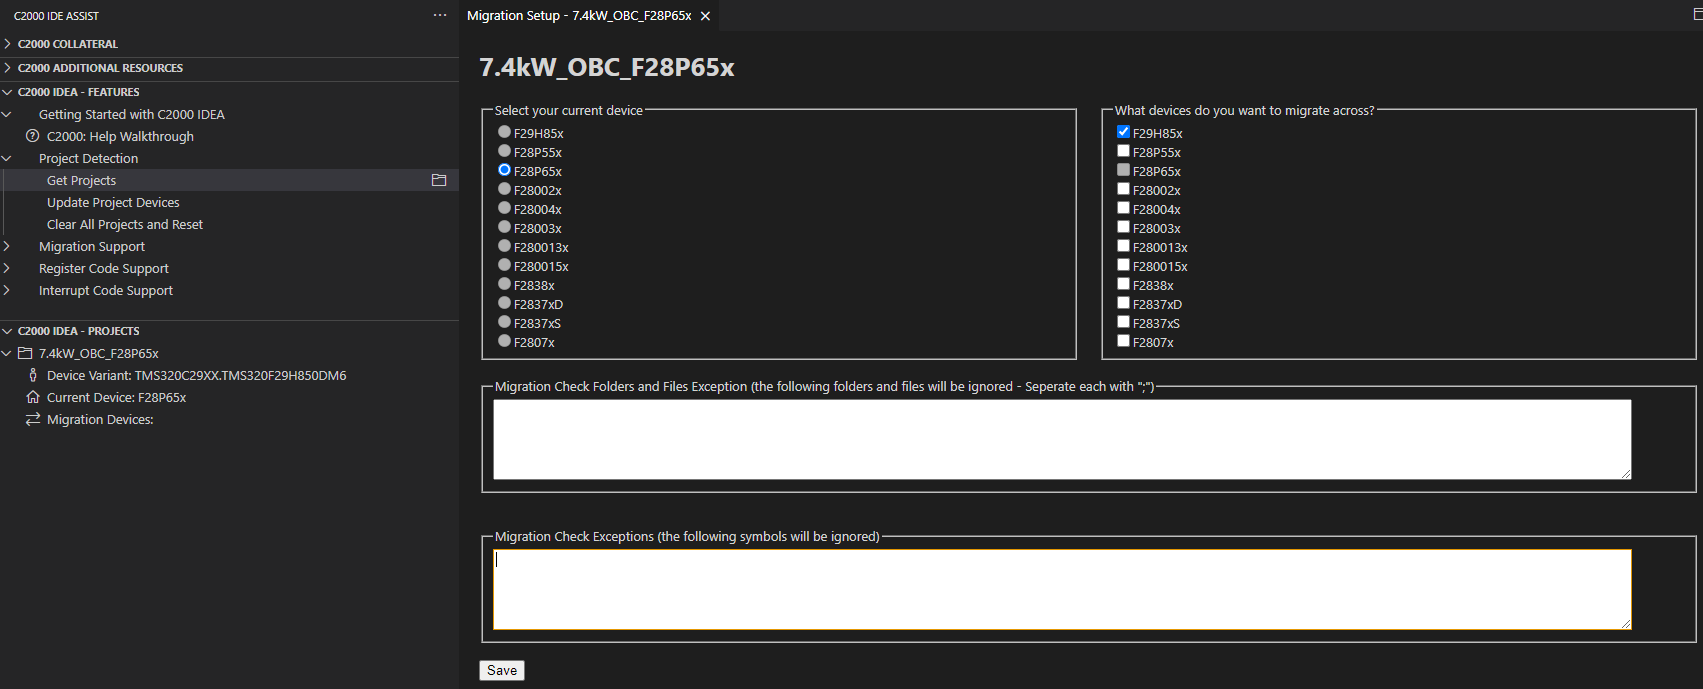
C2000-IDEA tool scans the project files and identify any API occurrences from C2000Ware that have been updated in the F29 SDK. It provides detailed information on these changes and offers quick fix suggestions to resolve them.


For details on CPU Migration, please refer to the application note - Application Software Migration to the C29 CPU.
The clang-tidy tool, embedded in the C29 compiler is designed to assist with this migration. Similar to C2000-IDEA, clang-tidy detects any C28 CPU-specific or C28 compiler-specific code and provides suggestions for modification.
In F28 devices, the interrupt priorities are fixed in the hardware, and interrupt prioritization and nesting is managed in software. This requires modifications to the ISR code to allow only interrupts configured with higher software priority to preempt the current ISR.
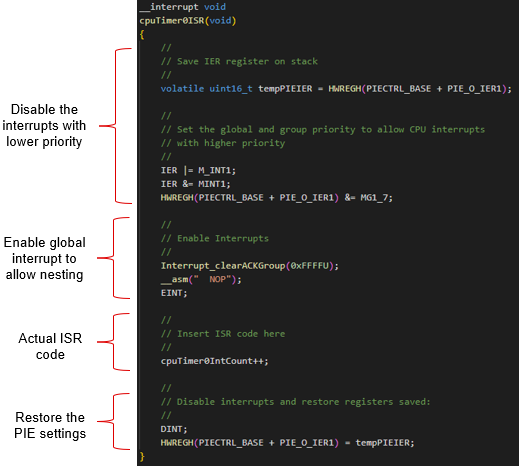
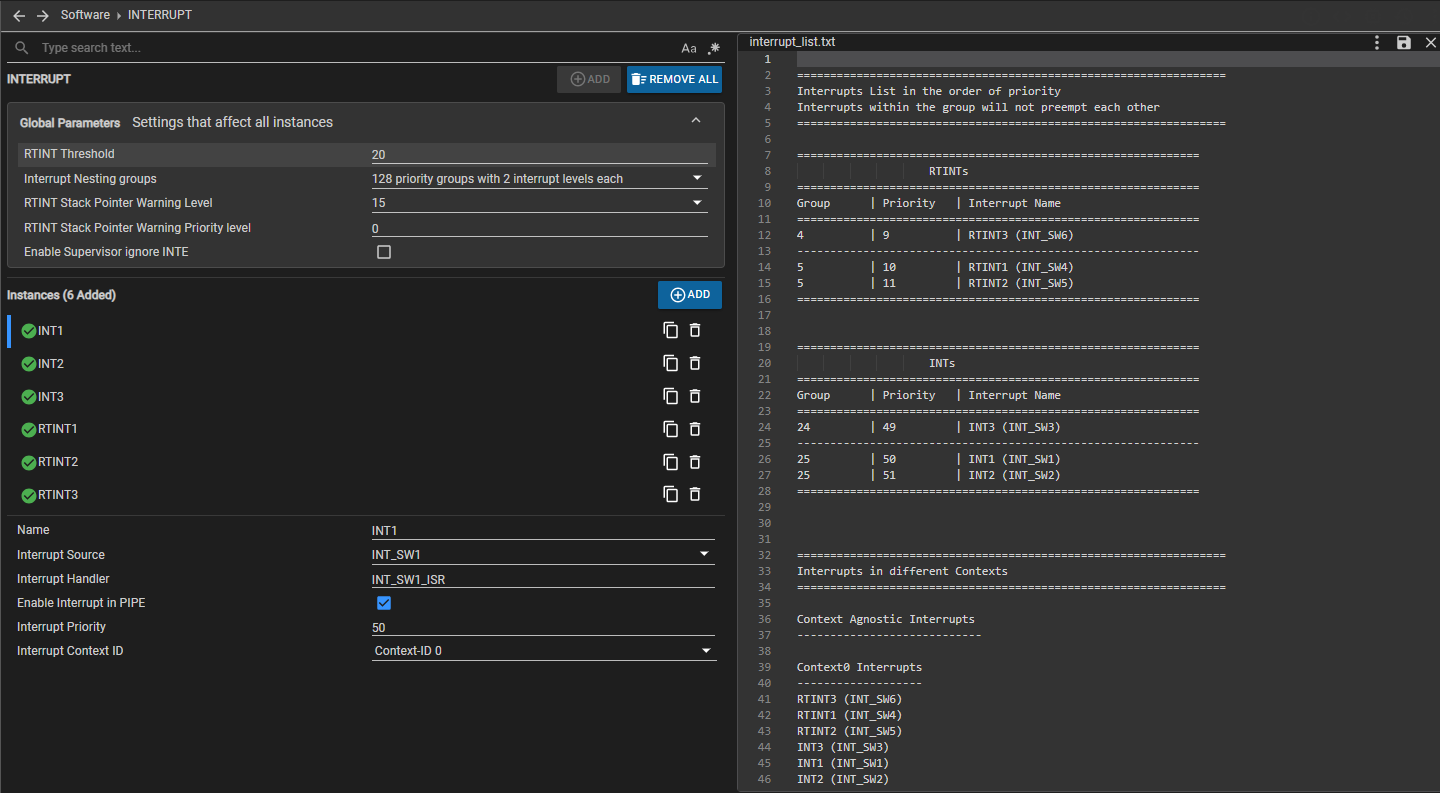
In F29 devices, the interrupt priorities can be configured in hardware using INT_CONFIG.PRI_LEVEL register. The driverlib function Interrupt_setPriority can be used to configure this register. The F29 device also supports features like Real-Time Interrupts (RTINT) with automatic context save and restore and Nesting groups for better control over interrupt nesting. Sysconfig tool supports interrupt configuration with desired priority levels and nesting. For better visualization, the tool generates a table listing all interrupts in order of priority and group. The table is available in a file named interrupt_list.txt.
Since interrupt priorities are now configured in the hardware, there is no longer a need for the startup and cleanup code in the ISR that previously enabled or disabled interrupts.
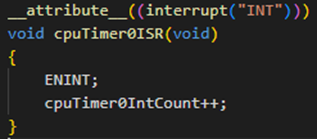
ENINT macro enables all INTs in the CPU. Since RTINTs are not gated by this, there is no need to call ENINT in an RTINT ISR.
Care should be taken to use the correct interrupt attribute based on whether the interrupt is configured as INT or RTINT. This is determined by the RTINT Threshold value. Interrupts configured with priority level lesser than this threshold value are RTINTs, while others are normal INTs. If Sysconfig is used for configuring interrupts, it will auto-generate the ISR prototype with the correct attribute, and the application code does not need to apply the attribute manually.
If interrupt priorities are not explicitly configured and are left as default, the channel number determines the priority. However, the order in which channel numbers are assigned to peripheral interrupts may not match F28 PIE ordering. As such, the default hardware priorities of F28 and F29 interrupts may differ. Therefore, F29 interrupt priorities should be configured according to the specific needs of the application.
More details on interrupt related API migration, refer to the Driverlib Migration Guide
With these changes, you should now have an F29 project equivalent to the original F28 project. Once validated, further optimization may be explored to fully leverage the capabilities of the C29 CPU and other safety and security features in the device.