1.1. Industrial Protocol Package Getting Started Guide
1.1.1. Introduction
The Texas Instruments PRU ICSS Industrial Packages is a single scalable software platform for Industrial Protocols/Drives solution that offers streamlined development across different TI Sitara Processors. The Industrial Protocol packages provide fundamental software for development of various Industrial communication protocols like EtherCAT, Profinet, EthernetIP, Profibus etc. PRU-ICSS Industrial Drives package is designed for the Sitara processor AM437x (with PRU-ICSS IP) to enable customers leverage Industrial Drives (position, current sense & control algorithm) capabilities. The packages also include sample demo application which showcase the ability of the software/hardware to implement those.
This package runs on top of Processor SDK and consists of (depending on the package):
- PRU-ICSS firmware to implement Real-Time Ethernet/fieldbus or Industrial Drives interfaces
- Associated drivers
- Stack adaptation layer
- Evaluation versions of protocol stack library for selected protocols
- Sample applications
1.1.2. Package Installation
Protocol packages installer is a Windows or Linux executable which installs source files, CCS project file scripts, pre-built libraries, documents, tools and other items to the host machine.
1.1.2.1. Processor SDK Patching and Rebuilding
PRU-ICSS Industrial Protocols may require patches to be applied on top of recommended version of Processor SDK to fix certain functional issues. In that case, industrial protocol installer will package those patch files. User need to make sure that these patches are applied properly on Processor SDK and affected LLD’s are rebuilt before building industrial protocol application projects.
1.1.2.2. Setting up the patching tool
Go to the link http://gnuwin32.sourceforge.net/downlinks/patch-bin-zip.php, download and save the patch utility.
Extract the zip file to the Windows PC. Patch file utility (Patch.exe) can be found in bin folder
Note
This is not a TI tool. See http://savannah.gnu.org/projects/patch/ for more details and licensing information
1.1.2.3. Locating the patch files in PRU-ICSS industrial protocol package
After installing the PRU-ICSS Industrial Protocol package, navigate to <INSTALL_DIR>/protocols/pdk_patches/<PROCESSOR_SDK_VERSION> where
INSTALL_DIR          : The folder location where the Industrial protocol package is installed.
PROCESSOR_SDK_VERSION: The recommended version of Processor SDK which is compatible with PRU-ICSS Industrial Protocol package.
Note
To know about the recommended version of Processor SDK package, refer system requirements section in PRU-ICSS Industrial protocol package Release Notes.
Patch folder location from Profinet-slave 1.0.2 release package is shown below for reference

Note
If the pdk_patches folder is not present in the PRU-ICSS industrial protocol package, it means that specified version of Processor SDK does not need any patches to work with PRU-ICSS Industrial protocols.
1.1.2.4. Applying the patch
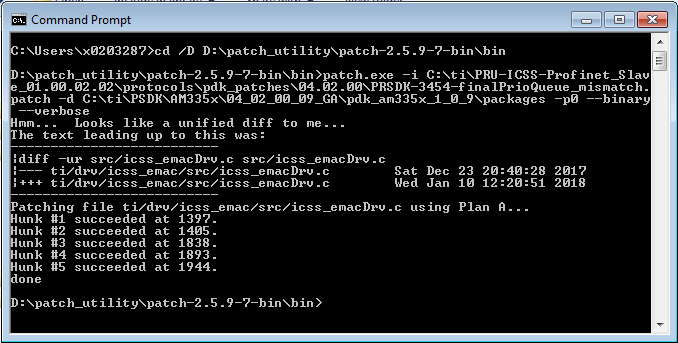
- Launch DOS Command prompt(Start->Run->cmd)
- CD to bin folder
- Execute patch.exe with following syntax in windows environment
patch.exe -i PATCH_FILE_FULL_PATH -d SOURCE_DIR -p<n> --binary --verbose

PATCH_FILE_FULL_PATH:  Full path where PATCH file is kept in PC
SOURCE_DIR          :  The Processor SDK install directory (PDK_INSTALL_PATH)
-p<n>               :  Remove <n> leading slashes from traditional diff paths. The default is 1.
--binary            :  To fix the assertion failure issue documented at http://gnuwin32.sourceforge.net/packages/patch.htm
--verbose           :  To display patch command output
Example: D:\patch_utility\patch-2.5.9-7-bin\bin\patch.exe -i C:\ti\PRU-ICSS-Profinet_Slave_01.00.02.02\protocols\pdk_patches \04.02.00\PRSDK-3454-finalPrioQueue_mismatch.patch -d C:\ti\pdk_am335x_1_0_9\packages -p0 –binary –verbose
1.1.2.5. Rebuilding the Processor SDK LLDs
Refer to Processor SDK RTOS Building the SDK for details on rebuilding Processor SDK LLDs on Windows/Linux.
1.1.3. Running Pre-Built Applications
The following pre-built applications can be used for a quick start with IDK. Release notes will have the information on where to obtain pre-built binaries for each release,
- EtherCAT Slave Application
- Profinet IRT Slave Application
- Profinet RT Slave + MRP Application
- EnDat Diagnostic Application
- Tamagawa Diagnostic Application
- Motor Control Application
These binaries will be available as a separate package(not available with the installer). Loading the binaries(app) with the corresponding SD Card MLO from PDK should enable a quick setup to validate the environment.
1.1.4. Running Application from SD card/QSPI Flash
Refer to this section in Processor SDK RTOS Getting Started Guide for details on running the application from SD card/QSPI Falsh.
1.1.5. Setup CCS for EVM and Processor SDK RTOS
The products and compilers from Processor SDK RTOS should be discoverable in CCS. Users need to ensure that products are discovered correctly by checking “Code Composer Studio -> RTSC -> Products” from “Window -> Preferences” in CCS. Similar for products, make sure compiler(s) is/are discovered correctly by checking “Code Composer Studio -> Build -> Compilers” from “Window -> Preferences”. Refer to this section in How To Guides for more details.
1.1.6. Building and Running Sample Application
The Industrial Protocol package includes sample applications which demonstrate the device capabilities. Unlike Legacy Industrial SDK, the CCS project files are not readily available in the protocol package. Users need to generate this with the help of the Batch file or Shell scripts provided in the protocol installer packages. Refer to specific protocol package user guides Generating Project Files section for detailed instructions.
| Link to Generating Project Files section | ||
|---|---|---|
| PRU-ICSS EtherCAT Slave | PRU-ICSS Profinet Slave | PRU-ICSS EtherNet/IP Slave |
| PRU-ICSS HSR PRP | PRU-ICSS Profibus Slave | PRU-ICSS Industrial Drives |
Follow the steps below after creating the project.
1.1.6.1. Importing and Building Sample Project in CCS
- Launch CCS.
- Click Menu->File->Import
- On new window , Select Code Composer Studio->Existing CCS Eclipse Projects and click Next.
- Select “Select search-directory” and browse to locate the sample
application project, say
[INSTALL-DIR]/<protocols | interfaces | examples>/<protocol name | interface name | example name>/projects - The project will be listed under “Discovered Projects” and Select the required project from the list.
- It is recommended to keep “Copy Projects into workspace” tick box un-checked.
- Click Finish. This will import the project into workspace.
- The imported project will be shown in CCS Project Explorer tab.
- Right Click on Project, Select “Build Project”. This will build the sample project’s .out file.
- See the CCS Console tab for build logs.
- All sample applications have Debug and Release configurations.
- To build for a different configuration, Right click on the project and select Build Configurations ->SetActive ->Debug/Release and build the project once again.
1.1.6.2. Creating Debug Configuration to Integrate CCS GEL and DMSC Firmware Initialization
- File menu-> New-> Target Configuration File.
- Check “Use shared location” to be available to anyone who uses the workspace. Click Finish. A window opens up which is to configure the connection details
- Connection: Choose the host-to-target connection details. For example “Texas Instruments XDS100v2 USB Emulator”
- Device: Select IDK_AM65x for AM65x, IDK_AM572x or PRELIM_IDK_AM571x for AM57x, IDK_AM437X for AM437x
- Click Save.
Refer to this section in How To Guides for more details on creating the debug configuration and DMSC Firmware Initialization.
1.1.6.3. Launching and Debugging application in CCS
Connect JTAG Emulator to EVM in-case of IDK or Connect USB cable to board in-case of ICE
Select View->Target Configurations. Right click on the required configuration in the list and Select Launch Selected Configuration
Right Click on the MCU_PULSAR_Cortex_R5_0 on AM65x or Cortex A15_0 on AM57x or CortexA9 on AM437x listed in Debug view and select Connect. (Click View->Debug to view debug window, if not visible)
Select System Reset under

Select Suspend

Load the GEL file and execute initialization script.
Once the initialization is completed, Select Run->Load ->Load Program. Here browse to the required executable and click OK
After a successful load, the program is expected to be in suspended state and program counter is pointing to main function. If the program is not in suspended state :
- Suspend the application by clicking or Run->Suspend
- Restart the application by clicking
 or Run->Restart
- Suspend the application by clicking
Run the application by selecting Menu->Run->Resume.
Menu->Run->Resume. This will execute the application.
Note
- While launching a debug session for the first time, CCS will ask for the CPU to which the program needs to be loaded. Please select Cortex-A15_0 or CortexA9 (depending on the platform) and continue.
- If TeraTerm does not display an output upon program execution. TeraTerm can be initialized just prior to program execution by performing steps 1-8 and then Disconnect the terminal session using File -> Disconnect Reconnect the terminal session with File -> New Connection
- If there is a valid application in SPI or NOR flash(in their corresponding boot mode), on “System Reset” the application loads right away. This might cause issues on the application you load via JTAG. To avoid this, put a hardware breakpoint at 0x402f_0400(in case of MMSCD boot mode) or 0x30000000(in case of qSPI boot mode) and then do a “System Reset”. You can then continue with Step 4 after this step.
On AM57xx IDKs, doing a system reset will disconnect JTAG connectivity on CCS, connect again and repeat to load the application Once a system reset is done, the CCS console logs will not be printed. To regain this, relaunch the target configuration;
Additional Resources
The Sitara Frequently Asked Questions (FAQ) contains answers to a number of common questions on Sitara Industrial topics. The Sitara FAQ is available at: FAQ_Sitara_Industrial.