
|
Speech Recognizer Project Users Guide
v1.00.00.00
|
|
Speech Recognizer Project Users Guide
v1.00.00.00
|
The MinHMM Library project includes a complete example program that illustrates a menu-driven application that can enroll, update, and delete models, and can recognize speech in a continuous mode. This chapter describes the hardware and software operation of the example.
The example code runs on an MSP432P401R LaunchPad.
The example can use one of two displays. If it uses the 430BOOST-SHARP96 Sharp Memory LCD BoosterPack, then the user interface menus are shown on the display and the two user buttons on the Launchpad are used for navigating the menus and selecting menu actions. If the example uses the BOOSTXL-K350QVG-S1 Kentec QVGA Display BoosterPack, then the user interface menus may be navigated and selected either by touch or using the two Launchpad user buttons. The example code must be built separately for each display type. If the Kentec display is used, two preprocessor variables, KENTEC and KENTEC_TOUCH, must be defined when building the demo application.
If the Kentec display is used then in order to use touch control of the menus a jumper wire must be connected from J2-11 (labeled P3.6) to J2-17 (labeled P5.7) on the bottom of the Launchpad.
Audio input is provided by the microphone and preamplifier on a BOOSTXL_AUDIO Audio BoosterPack. Hardware configuration of the mic power and mic out connections is necessary based on the display used. If the Kentec display is used, two zero-ohm resistors should be installed in R1 and R4 on the Audio BoosterPack and no resistors should be placed in R3 and R5. This is the normal configuration of the Audio BoosterPack. If the Sharp display is used, the two audio BoosterPack resistors must be installed to enable alternate mic power and mic out connections. The zero-ohm resistors should be installed in R3 and R5, and no resistors should be placed in R1 and R4.
The example navigates the menus using the two user buttons on the LaunchPad, or touching the display buttons if the Kentec display is used. Status and results of the currently running operation are shown at the bottom of the LCD display. LED1 on the Launchpad lights when the recognition search engine is running. When a recognized phrase is located during search LED2 lights in a color that indicates how closely the input speech matched the recognized phrase (green - good match, yellow - marginal match, red - poor match), and the recognized name is displayed at the bottom of the LCD. If the Kentec touch display is being used, then the name is displayed in the color that indicates the match. If the Kentec touch display is used, the color of the enrollment menu on-screen buttons reflects the enrollment status of each phrase; green indicates the location has no model and can be enrolled, red indicating the location is used. The color of the update menu on-screen buttons reflects the update status of each phrase; green indicates the location has a model and can be updated, red indicates the location is not used and no update can be performed. The color of an on-screen button changes to orange while audio is being collected.
The example includes a CCS and IAR project to build the application program. It illustrates building the project code, and linking with the included MinHMM, Driverlib and Graphics libraries. Certain settings in the CCS or IAR projects may need to be changed based upon directories where the IDEs have been installed.
To build the example program for CCS, first open CCS. Set the workspace directory to the directory containing the CCS projectspec file. In CCS, select File->Import. From the pop-up Select window expand the C/C++ folder, and select CCS Projects, and click Next. In the Select CCS Projects to Import choose Select search-directory, and Browse to the directory containing the projectspec file. In the Discovered projects window, select the MinHMMDemo project and click Finish. This will load the project into CCS. The project has two configurations, Debug and Release. The Debug configuration provides the capability to debug the application. The Release configuration optimizes the application to run faster.
To build the example application for IAR, open the IAR workspace file in the directory containing the IAR project. This will load the project into IAR. The project has two configurations, Debug and Release. The Debug configuration provides the capability to debug the application. The Release configuration optimizes the application to run faster.
This section describes the operation of the example program.
The menu tree is shown in Demo Menu Tree. The demo starts at the Main Menu. If the Kentec display is used, each of the menu items is within an on-screen button that can be pressed to select the menu item. In addition, for both displays, pressing button S1 cycles through the entries for each menu. Each time it is pressed it cycles to the next entry, highlighting it in reverse video on the Sharp display and in white text on the Kentec display. To select the highlighted item press button S2, or press the desired item on-screen button on the Kentec display.
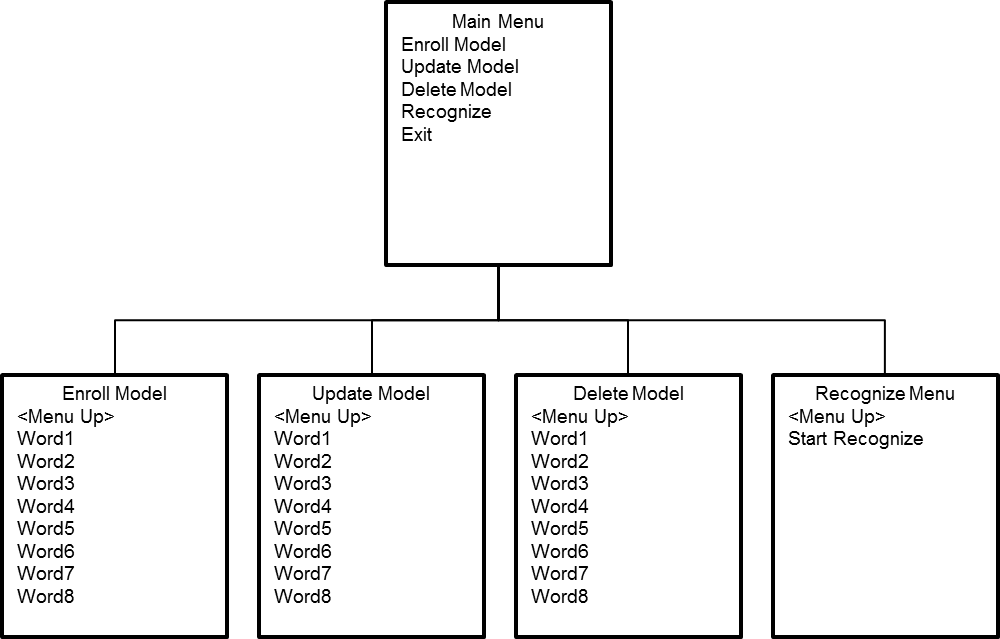
The Main menu contains items to enroll, update, or delete a model, and to run recognition search.
To start enrolling models, navigate to the Enroll Model menu item using S1, and then press S2 to activate the Enroll Menu, or press Enroll Model on the Kentec display. Similar steps can be used to start update, delete a model, or to prepare to run recognition search.
The Enroll menu contains items to enroll models. The example allows up to eight models to be created. (The number of models that can be created can be altered in the demo software). For simplicity the names of the models are "Word1" through "Word8", although any phrase can be enrolled for each one of these models. To enroll a phrase, press S1 to select the name to be used for the phrase, and press S2 to start audio collection and enrollment processing, or on the Kentec display press any green on-screen button to enroll the phrase for that word. An indication that enrolling has started will be at the bottom of the display. Speak the phrase to be enrolled. After a short time, the result of enrollment will be shown at the bottom of the LCD display. If enrollment succeeds, in addition to a success message there will be two numbers displayed. The first number is the duration of the model in 100ths of a second. The second number is a quality measure of the phrase from 1 to 10, with 1 being lowest and 10 being highest quality. If enrollment succeeds, the phrase model is created, and on the Kentec display the on-screen button for the associated name turns red indicating that name now contains a valid model. Enrollment may not succeed for several reasons. For example, the phrase may be too short, or the name may already have been enrolled. In that case the result of enrollment will indicate a failure.
To enroll another phrase, simply repeat the above instructions. The same name can not be enrolled more than once. To re-enroll the phrase assocated with a name, the model created for the name must first be deleted.
Once enrollment has started, to stop enrollment in the middle of the processing press S2. Pressing any on-screen button on the Kentec display during enrollment will also stop enrollment. This will result in a display of "Ended Enroll" and no model will be created.
To return to the Main Menu press S1 to select <Menu Up> and then press S2, or on the Kentec display press the on-screen Menu Up button.
The Update menu contains items to update the phrase models associated with names. To update a model for "Word1" through "Word8", use S1 to select the name to update and then press S2, or on the Kentec display touch the button for any name that is green. This starts audio collection and update processing, and will display an updating message at the bottom of the LCD display. Speak the same phrase that was used for the name during enrollment. After a short time, the result of update will be shown at the bottom of the LCD display. If update succeeds and the phrase model is updated the display will show "Update Success". Update may not succeed for several reasons. For example, the phrase does not match the originally enrolled phrase well enough, or there has been no enrollment associated with the name. In that case the result will indicate a failure.
To update the same name again, S2 or for the Kentec display the on-screen button for the name can again be pressed. To update another enrolled name, simply follow the above instructions to select a different name to update. A name may be updated any number of times.
Once update has started, to stop update in the middle of the processing press S2 or on the Kentec display touch any non-screen button. This will result in a display of "Ended Update" and the model will not be updated.
If update fails consistently, this may be an indication of poor enrollment. This may happen if the initial model contained extraneous audio from a noisy background, or the user pronounces the name much differently from the initial enrollment. In this case, deleting the model associated with the word and re-enrolling it should fix the problem.
To return to the Main Menu press S1 to select <Menu Up> and then press S2, or on the Kentec display press the on-screen Menu Up button.
The Delete menu contains items to delete models. To delete a model for the names "Word1" through "Word8" use S1 to select the name to update and Press S2, or on the Kentec display press the on-screen button for the name. This will delete the model and will display "Deleted Model" at the bottom of the LCD display if delete succeeds. Delete may not succeed if no model exists for the name. In that case the result will indicate a failure.
To delete another name, follow the above instructions to select and delete another name.
To return to the Main Menu press S1 to select <Menu Up> and then press S2, or on the Kentec display press the on-screen Menu Up button.
The Recognize menu provides the means to start and stop speech recognition. To start recognition, press S1 to select the Start Recognize item then press S2, or on the Kentec display press the on-screen Start Recognizer button. Recognition will run continuously until S2 is again pressed, or an on-screen button on the Kentec display is pressed.
To return to the Main Menu press S1 to select <Menu Up> and then press S2, or on the Kentec display press the on-screen Menu Up button.
While recognition is running LED1 will light when the search engine is running. When MinHMM detects a recognition result, it will display the recognition result at the bottom of the LCD, and light LED2 for one second. The closeness of the match of the recognition result to the model is indicated by the color of LED2 (green for a good match, yellow for a moderate match, and red for a poor match). On the Kentec display the result at the bottom of the LCD screen will also use the color scheme. If the match is poor, the result in the Sharp LCD is followed by a question mark.