Quick Start Guide
Introduction
This guide is intended to assist users in the initial setup and demonstration of a MSP432E4 AWS IoT application using the MSP432E4 Plugin for AWS IoT. The guide explains how to configure the boards, compile the software artifacts, program the MSP432E4 device, set up your AWS account and run an AWS application.
Hardware Requirements
Software Requirements
- SimpleLink MSP432E4 SDK 4.10
- A computer running a supported operating system listed in the Release Notes
- At least one of the following IDEs supported by the SimpleLink MSP432E4 SDK:
- FreeRTOSv10.2.1 (Optional)
- If the User wants to use FreeRTOS with the Plugin, the user is expected to download the FreeRTOS sources from www.freertos.org
Installing MSP432E4 Plugin for AWS IoT
- Download and open the MSP432E4 Plugin for AWS IoT Installer (replace x’s with version number):
- Windows: aws_msp432e4_x_xx_xx_xx.exe
- Linux: aws_msp432e4_x_xx_xx_xx.run
- macOS: aws_msp432e4_x_xx_xx_xx.app
- Select an installation directory. This will be referred to as
<AWS_INSTALL_DIR>in the rest of this document. It’s recommended that you install it in your CCS installation directory (defaultC:\tion Windows) so it can be discovered automatically - Click Next > and finish the installation
Hardware Setup
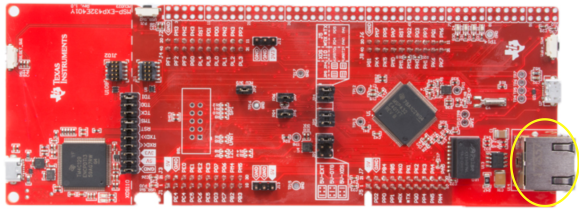
Connect the LaunchPad
Plug the MSP432E4 LaunchPad into a USB port on your PC.
Connect the Ethernet port to your router/AP using an Ethernet cable.
Setting Up a Serial Terminal
Plug the MSP432E4 LaunchPad into a USB port on your PC.
Open a serial session to the appropriate COM port with the following settings:
Baudrate:     115200
Data bits:       8
Stop bits:       1
Parity:       None
Flow Control: None
The output of the examples will be displayed in the terminal.
AWS IoT Developer Setup
In order to run the example applications, it is necessary to complete the following steps:
- Sign in to the AWS IoT Console
- Register a Device in the Thing Registry
- Make sure you choose to download the certificate files, as these will be needed when setting up the examples.
For more details on AWS IoT, please refer to the What Is AWS IoT page.
Building and Running Examples in CCS
Several examples are provided in the Plugin and can be found in the examples/ subdirectory.
These steps refer to the subscribe_publish_sample application, but the same procedure applies to other examples as well.
It is assumed that the SimpleLink MSP432E4 SDK has already been installed in a directory we will refer to as
<SIMPLELINK_MSP432E4_SDK_INSTALL_DIR>. You should install it if you have not already done so, as the MSP432E4 Plugin for AWS IoT depends on the MSP432E4 SDK.Open Code Composer Studio (close and re-open if already running before Plugin or SDK installation).
In CCS, import the
subscribe_publish_sampleexample by first selecting Project > Import CCS Projects…In the Import CCS Projects window, hit the browse button to browse to the location corresponding to
<AWS_INSTALL_DIR>\examples. Select the checkbox next to thesubscribe_publish_sampleexample for tirtos (or freertos) for CCS and hit the Finish button.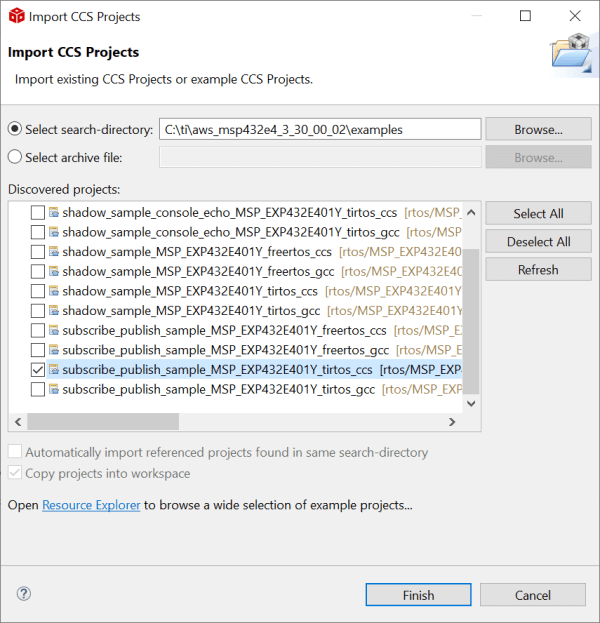
Two projects should appear in the Project Explorer tab in CCS: one for the
subscribe_publish_sampleexample itself (i.e.subscribe_publish_sample_MSP_EXP432E401Y_tirtos_ccs), and the other is a project corresponding to the OS chosen (e.g.tirtos_builds_MSP_EXP432E401Y_release_ccs).The example comes with a README.html file that contains more details specific to the example. Be sure to take a look as it may contain additional instructions.
Update the example to use the proper certificates and AWS account, as specified in the section Example Pre-Build Steps
If you are using FreeRTOS, you need to set the installation directory of FreeRTOS before building:
- In CCS, select Window > Preferences
- Navigate to Code Composer Studio > Build > Variables
- Click Add
- For Variable name, enter
FREERTOS_INSTALL_DIR - For Type, select directory
- For Value, enter the installation directory of FreeRTOS
- Hit OK until you get back to the main window in CCS
Right-click on the
subscribe_publish_sampleproject, and select Build Project to build.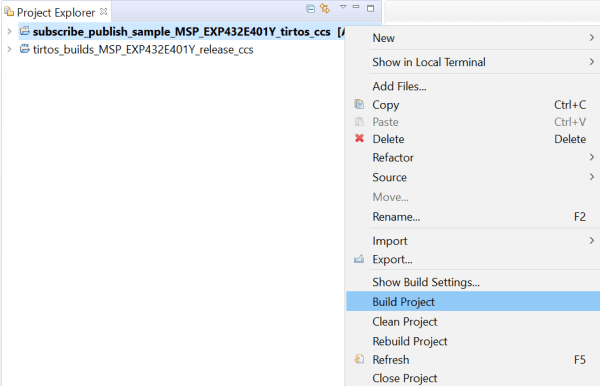
Load and Run the Example
- Plug the LaunchPad into a USB port on your PC.
- Right-click on the
subscribe_publish_sampleproject, and select Debug As > Code Composer Debug Session. - Run the application by pressing F8. The output will appear in your serial terminal session.
Example Output
```
Service Status: DHCPC    : Enabled  :          : 000

Service Status: DHCPC    : Enabled  : Running  : 000

Network Added:
If-1:192.168.1.109

Service Status: DHCPC    : Enabled  : Running  : 017

startSNTP: Current time: Tue Aug  7 19:05:49 2018

AWS IoT SDK Version 3.0.1-

Connecting...

Subscribing...

-->sleep

Subscribe callback

sdkTest/sub     hello from SDK QOS0 : 0

Subscribe callback

sdkTest/sub     hello from SDK QOS1 : 1

-->sleep
```
Building and Running Examples in IAR
Download and Installation
For instructions on downloading and setting up IAR properly for use with the SimpleLink MSP432E4 SDK and its Plugins, please refer to the MSP432E4 SDK’s Quick Start Guide document. As part of the procedure, make sure to configure the custom argument variables for the SDK.
Configuring Custom Argument Variables Specific to the Plugin
Before starting to work with any of the AWS IoT example projects in the Plugin, you need to load a set of environment variables that will be set for your current workspace, in addition to the ones from the SimpleLink SDK.
The custom argvars can be found at
<AWS_INSTALL_DIR>/tools/iar/AWS_MSP432E4_SDK.custom_argvars, if you need to modify the default path argument variables, edit the variables with the correct path.Open the IAR IDE
Choose Tools > Configure Custom Argument Variables
Click Global > Import
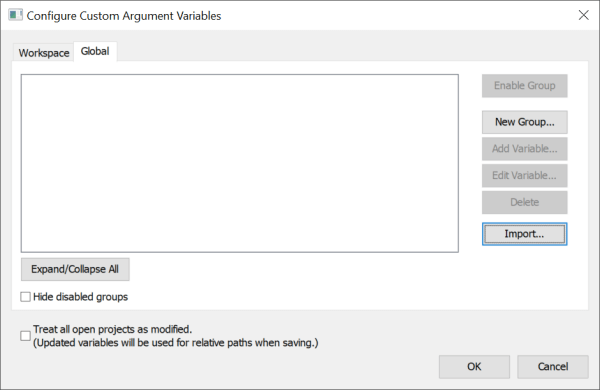
Browse to
<AWS_INSTALL_DIR>/tools/iar. Import the custom argvars from the Plugin.
Importing Your First Project
These steps refer to the subscribe_publish_sample application, but the same procedure applies to other examples as well.
You can choose to open an Example Project by either directly accessing the Example workspace (by double clicking on its *.eww file), or by importing the Example from the Example List in the IDE.
Directly Accessing an Example From the Example Folder
All Code Examples that are shipped with the plugin come with an IAR workspace (*.eww file). Double-Clicking the specific workspace allows you to open the project on disk and build it.
Each example comes with a README.html file. Be sure to take a look in case it has additional instruction specific to the example you wish to run. Update the example to use the proper certificates and AWS account, as specified in the section Example Pre-Build Steps
Importing an Example in the Example List
In the IAR-IDE, select File > Open File… from the menu and open
<AWS_INSTALL_DIR>/tools/iar/Examples.htmlAll the Plugin for AWS IoT example projects that are available in IAR are listed in the html page.
Scroll through the page and click on the project you are interested in. In this guide we choose to work with
subscribe_publish_sampleon TI-RTOS.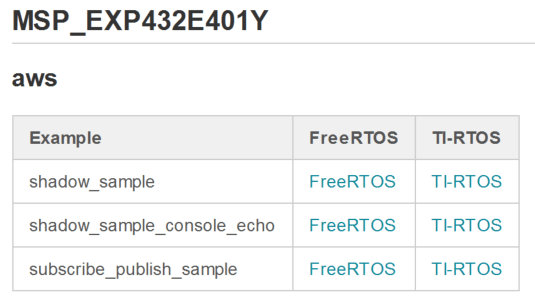
When prompted, click
Yesto save a copy of the project workspace in a specific folder,Nowill save the workspace in a default folder.After clicking
Yes, browse to the location where you want to save this workspace. ClickChoose
Building the Project
- Two projects should appear in the Workspace tab in IAR: one for the
subscribe_publish_sampleexample itself (i.e.subscribe_publish_sample_MSP_EXP432E401Y_tirtos_iar), and the other is a project corresponding to the OS chosen (e.g.tirtos_builds_MSP_EXP432E401Y_release). - The example comes with a README.html file that contains more details specific to the example. Be sure to take a look as it may contain additional instructions.
- Update the example to use the proper certificates and AWS account, as specified in the section Example Pre-Build Steps
- Make/Build the Example Project by first selecting the OS project tab on the Workspace window and select Project > Make. Once done, select the
subscribe_publish_sampletab on the Workspace window and select Project > Make.
Load and Run the Example
- Plug the LaunchPad into a USB port on your PC.
- Select Project > Download and Debug
- Run the application by pressing F5.
- The Example output is displayed in the serial terminal, as shown here.
Building with Makefiles
These steps refer to the subscribe_publish_sample application, but the same procedure applies to other examples as well.
- It is assumed that the SimpleLink MSP432E4 SDK has already been installed in a directory we will refer to as
<SIMPLELINK_MSP432E4_SDK_INSTALL_DIR>. You should install it if you have not already done so, as the MSP432E4 Plugin for AWS IoT depends on the MSP432E4 SDK. - Update the
imports.makfile in the<AWS_INSTALL_DIR>root folder with the appropriate path(s). This file relies on the settings in theimports.makfile of the SimpleLink MSP432E4 SDK, so please ensure you have updated the latter with the appropriate paths as well if you have not done so previously. - Navigate to the directory corresponding to your OS and toolchain of choice. For example,
<SIMPLELINK_MSP432E4_SDK_INSTALL_DIR>/kernel/tirtos/builds/MSP_EXP432E401Y/release/ccsfor tirtos and TI (CCS) toolchain. - Run ‘make’ to build the OS. If you develop on a Windows machine and do not have the ‘make’ utility, you can alternatively run ‘gmake’ from your TI XDCTOOLS installation (e.g.
C:\ti\xdctools_x_xx_xx_xx_core\gmake.exe). Normally XDCTOOLS are installed along with the MSP432E4 SDK, but if you need to download it, it is available here. - Navigate to the example folder:
<AWS_INSTALL_DIR>/examples/rtos/MSP_EXP432E401Y/aws/subscribe_publish_sample - Read the README.html file of the example, and follow any additional instructions specific to the example if present.
- Update the example to use the proper certificates and AWS account, as specified in the section Example Pre-Build Steps
- Navigate to the example folder specific to your OS and toolchain
<AWS_INSTALL_DIR>/examples/rtos/MSP_EXP432E401Y/aws/subscribe_publish_sample/tirtos/ccs - To build, run ‘make’ to generate
subscribe_publish_sample.out - You can load and debug the generated
subscribe_publish_sample.outin CCS (or IAR) - The Example output is displayed in the serial terminal, as shown here.
Example Pre-Build Steps
Before building a specific application, you must complete the following steps in order to successfully connect to AWS (these steps refer to the subscribe_publish_sample application, but the same procedure applies to other examples as well):
Update the AWS Configuration File
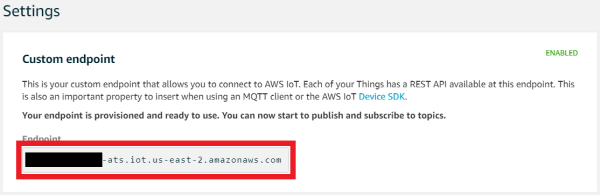
Before you set up the AWS configuration file, you’ll need to retrieve your AWS IoT’s custom endpoint URL.
Navigate to your AWS IoT dashboard and click Settings on the sidebar. Your custom endpoint will be posted at the top of this page. Copy this value and save it somewhere safe, you’ll need it in the next step.
- In a text editor, open the
aws_iot_config.hfile, found in thesubscribe_publish_sampleproject. - Update the value of the macro “AWS_IOT_MQTT_HOST” with your AWS IoT’s custom endpoint URL. It will have a format similar to the following:
<random-string>-ats.iot.us-east-2.amazonaws.com - Update the value of the macro “AWS_IOT_MQTT_CLIENT_ID” to a unique name for your device
- Update the value of the macro “AWS_IOT_MY_THING_NAME” with the name of the thing you created during the steps for AWS IoT Developer Setup.
- The certificate file variables “AWS_IOT_ROOT_CA_FILENAME”, “AWS_IOT_CERTIFICATE_FILENAME”, and “AWS_IOT_PRIVATE_KEY_FILENAME” can be updated to specify the location to where the files should be written in flash on the device. You can use the default values, if desired.
Update the Example to Load the Certificates
The certificate files used by the examples need to be obtained from the AWS IoT Console. If you have not already done so, follow the steps for AWS IoT Developer Setup to create and download the certificates for your device.
Open the file
certs.c, found in thesubscribe_publish_sampleproject.Search for “USER STEP” and update the CA root certificate string, the client certificate string, and the client (private) key string. These should be extracted from certificate (.pem) files downloaded from AWS. Each line of the certificate must be updated to end with the character sequence
\r\n. A typical string would be similar to the following (example) format. Be sure to update the array using the contents of your actual root CA:unsigned char root_ca_pem[] = "-----BEGIN CERTIFICATE-----\r\n" "ABCD1234hxS39SFVT43STY#fdsiEIOFiu2=y!8cZxzXMh+12wDCy21h+8vJsDh4\r\n" <...> "rzcuMZt6oPq6YJMtP3kSaik+bWyzRkdMOPGVL4TiPLAuyAZP1NXl\r\n"; "-----END CERTIFICATE-----";