Developing a Bluetooth Mesh Application
This section will provide guidance and indications on where and how to start implementing a TI Bluetooth Mesh application.
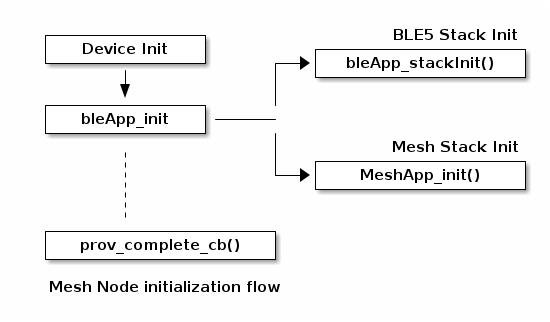
TI Bluetooth Mesh Application Architecture
The simple_mesh_node application is split up into two main parts, shown below:
BLE App : Responsible for managing the TI BLE5 Stack
Mesh App: Responsible for managing the Zephyr Mesh stack solution and application
The simple_mesh_node example application supports the use of various Generic
Client/Server models as well as Vendor model support, all configurable using the
SysConfig tool. For more information, please refer to the simple_mesh_node
example README as well as BLE Mesh SysConfig Features.
The example is located in:
<SDK_INSTALL_DIR>\examples\rtos\CC26X2R1_LAUNCHXL\ble5stack\simple_mesh_node
The default application supports a network-processor implementation, where a user can implement a Bluetooth mesh application on a PC as a host using our Python mesh_app_python eRPC client. This enables the user to customize a mesh application using the eRPC client while keeping the Bluetooth mesh stack on our wireless System-on-Chip (SOC). In SysConfig, this is set by selecting the “Network Processor Mode” checkbox. For more information on this, please refer to TI Bluetooth Mesh Host PC Tool.
TI’s simple_mesh_node application also supports over the air firmware updates
using our OAD module. Typically, a mesh node can be configured to be a
Mesh Only node. With OAD, a mesh node can concurrently operate as both a BLE
peripheral and a Mesh node. In SysConfig, a few options are available under
Mesh Application. However, it is recommended to first navigate to the
simple_mesh_node_oad_onchip or simple_mesh_node_oad_offchip
example(s) in the SDK before modifying this parameter. For more information,
refer to TI Bluetooth Mesh and OAD.
In addition, the simple_mesh_node example supports a Mesh and Peripheral
configuration. Here, a mesh node can behave both as a Mesh Node and as a BLE
perhipheral device. This configuration is not to be confused with configuring a
mesh node as a Proxy device. In this configuration, the mesh node and the BLE
peripheral are two separate entities operating in parallel.
Bluetooth Mesh Node Setup
A Bluetooth Mesh device goes through the following stages before being added to a mesh network.
The unprovisioned mesh device sends unprovisioned device beacons.
A mesh provisioning client begins the provisioning process, which includes an invitation to the network, securing the connection using a specific network key, and assigning the device an address within the network.
Once the device is provisioned to the network, the device is configured by a configuration client. Here, network and application keys are added and the node can subscribe/publish to the mesh network.
Configuring a Bluetooth Mesh Node to a Mesh Network
A Bluetooth Mesh device must be configured by a configuration client. The configuration client allows mesh nodes to publish/subscribe to addresses in the mesh network. However, there are some initial steps required before the end node can successfully send messages to the network.
The configuration client discovers the node’s composition data.
The user can then find a particular model and bind the application key to it. This way, the end node can authenticate the data sent using the model.
The user can then subscribe to particular model addresses to receive data sent over the mesh network.
Note
The Mesh Stack handles the configuration steps using the Configuration Server model, as defined in Bluetooth Mesh specifications Section 4.4.1)
Sending and Receiving Bluetooth Mesh Messages
The following diagram shows the software flow when a user chooses to send “LED on/off” messages to a defined GROUP_ADDR using the two-button menu displayed over UART (see please refer to the simple_mesh_node example README for details). Here, a vendor model is used.
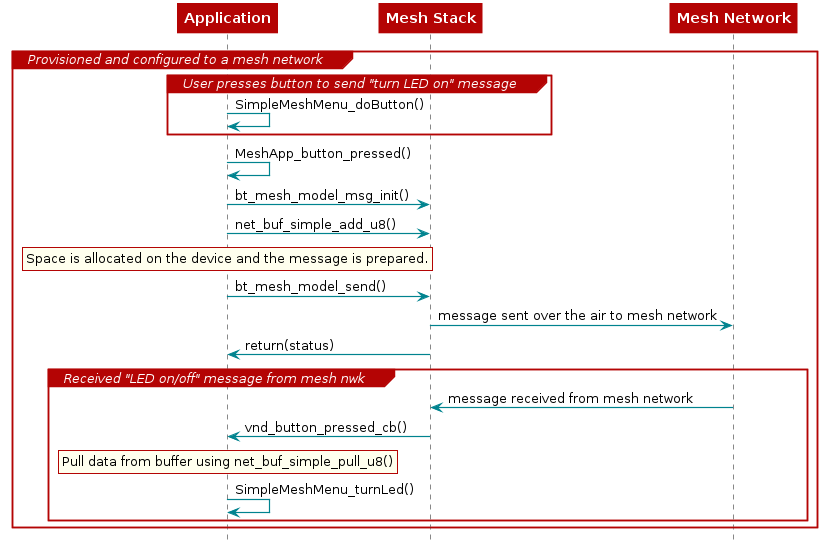
Figure 138. Sending and Receiving Bluetooth Mesh Messages.
Extended Advertising Support in Bluetooth Mesh
The TI Bluetooth Mesh stack introduces a proprietary feature which allows nodes to send large packet payloads over a proprietary vendor command. Bluetooth 5 Advertising Extensions are leveraged to enable mesh nodes to send data packets of up to 226 bytes without the need for segmentation.
When “Use Extended Advertising” is selected in SysConfig (refer to BLE Mesh SysConfig Features for more details), communication within the mesh network will use extended advertisements to send/receive data. To maintain interoperability with Bluetooth SIG defined mesh provisioners, provisioning is done over legacy advertisements, as defined in the Bluetooth Mesh specifications. Once the node is provisioned to the network, messages will be sent using extended advertisements (as opposed to legacy advertisements).
The key benefit to enabling this feature, as mentioned above, is to allow nodes to send large, unsegmented packets within the mesh network. This reduces end-to-end latency for messages as larger packets no longer need to be segmented and re-assembled.
Warning
The Extended Advertising feature is NOT defined by the Bluetooth SIG in the Bluetooth Mesh specifications. This feature is proprietary and leverages vendor specific commands. This feature cannot be dynamically enabled/disabled at run-time and must be enabled at build-time by selecting the appropriate box in SysConfig.
Design Considerations and Limitations
Packet Size
The Bluetooth Mesh specifications (Section 3.5.2.1) defines a maximum unsegmented payload of up to 15 bytes . It also defines a maximum segmented payload of up to 12 bytes, with a maximum of 32 segments (Section 3.7.3).
With a managed-flooding style network, larger packets will crowd the network and likely reduce the efficieny of the network. For this reason, Bluetooth mesh was not designed for high throughput applications and is best suited for systems that require small amounts of data to be sent over the air. Packet segmentation is defined in the spec (see above), and can be used to send more data over the air.
Power Consumption
All mesh nodes, with the exception of the LPN, are designed to be always on to receive messages broadcasted over the air (at any time). As the radio is always being utilized, this will cause the device to consume more power.
The Bluetooth Mesh specifications defines the Low Power Node, which is used in conjunction with a Friend node, enables the device to sleep and wake up periodically to receive messages. This results in lower power consumption.
Network Range
Mesh networks are known for their robustness, but also for their ability to provide longer range over multiple hops. The Bluetooth Mesh specifications defines Relay nodes for this purpose, to effectively increase the range of a network. As stated previously, a Bluetooth Mesh network uses a managed flooding approach with each message having a time to live (TTL). Depending on the designed network topology, care must be taken to ensure that there are not too many Relay nodes crowded together and they are spaced out. This avoids flooding the network with duplicate, unnecessary traffic.
This can also be combated by appropriately setting the TTL for each message, where applicable.