Secure Commissioning
The TI 15.4 secure commissioning provides the user with a security manager example for both Collector and Sensor applications. These examples leverage the crypto drivers in the CC13x2 or CC26x2 platform to demonstrate use cases such as secure key exchange, device authentication, and key generation.
Secure Commissioning Example Applications
TI 15.4-Stack Provides two examples featuring secure commissioning. These examples are Collector_sm, and Sensor_sm which can be found in the same directory as all other TI 15.4-Stack out of the box examples. These example application provide the same basic functionality as the Collector and Sensor applications described in the section Example Applications but with the added functionality of securely commissioning devices to the network.
For more information on how to run the Collector_sm and Sensor_sm example applications please see the README included with the applications source code.
Secure Commissioning Features
| Feature | Type | Description |
| Key Types | Device Key: |
|
| Network Key: |
|
|
| Encryption and Decryption Layer | MAC Layer: | |
| Key Storage | MAC Layer: |
|
| Encryption and Decryption Target | Payload: |
|
| Key Exchange | ECDH P-256: |
|
| Key Derivation Algorithm | AES-CMAC and TRNG are used for Device Key derivation |
|
| Device Authentication | Just Allows: |
|
| Default Code: |
|
|
| Passkey: |
|
|
| Key refreshment | Device Key Refreshment: |
|
TI 15.4 Secure Commissioning Architecture
The device commissioning process is encapsulated within the Secure Manager module. This process includes key exchange, device authentication, and key generation. The overall architecture of the TI 15.4 Secure Commissioning feature is shown in the diagram below.
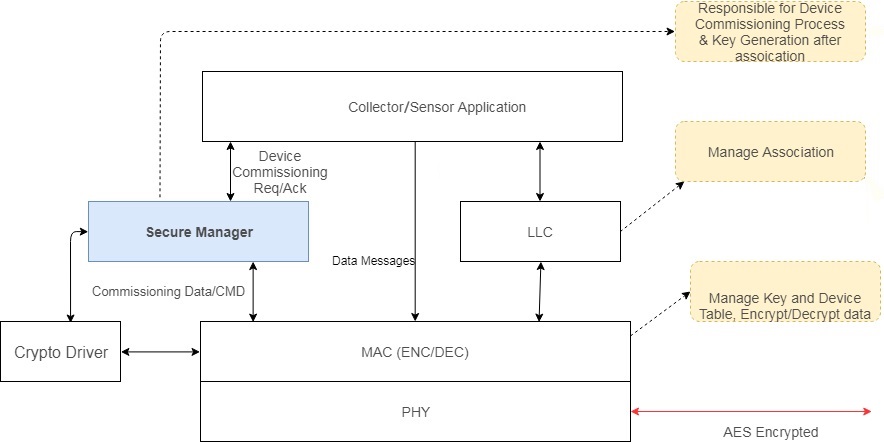
Figure 40. Secure Commissioning Architecture
Secure Commissioning Network Joining
As shown below, the device commissioning process is started after a device has performed MAC level association, and the process is initiated by the Collector after checking if the device supports secure commissioning. If the device’s security feature is not enabled or association ends with a failure, the Collector will disassociate the device from the network. After completion of the device commissioning, the Secure Manager sends the result back to the application. If the commissioning is successful, the application updates the key information associated with the corresponding device. If it fails, then the application(Collector or Sensor, whichever one detects the failure) starts the disassociation process. In the case that the commissioning fails, the device information will be added to the Blacklist, which can be reviewed during the association process to reject or limit the number of the association request from device side. If a device fails to pair the maximum number of times, then the device is rejected forever until the record is erased.
Association and Device Commissioning may be performed on a link which is either encrypted or not encrypted. If it is required to be encrypted, the default network key will be used.
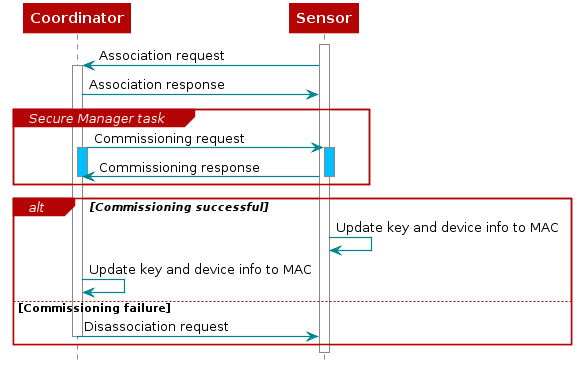
Figure 41. Secure network join
Device Commissioning
The Secure Manager in the Collector initiates the device commissioning process by sending the request to the Sensor device. Then, the Sensor device responds to the request by sending the authentication method it supports. If the method is supported, the Collector sends a confirmation to the Sensor device. The Sensor will then proceed to set the passkey based on the agreed upon method, and send a passkey set confirmation message to the Collector which will proceed to do the same. If the method is not supported, the Collector aborts the process. The Collector sends a confirmation with accept or reject. If it is rejected, then the Collector informs the application the result, so that the application starts the disassociation process.
Once the authentication method has been accepted, each side generates its own ECDH Public Key (PK) and Private Key (SK). The Collector sends PKc (Collector’s Public Key) to the Sensor device, then the Sensor device sends PKs (Sensor’s Public Key) to the Collector. Then, each side generates the shared secret (Diffie-Hellman Key) using their own Private Key along with the other device’s Public Key.
Then, the authentication process is initiated followed by the key generation process. The newly generated key will be used to encrypt/decrypt data between the two devices.
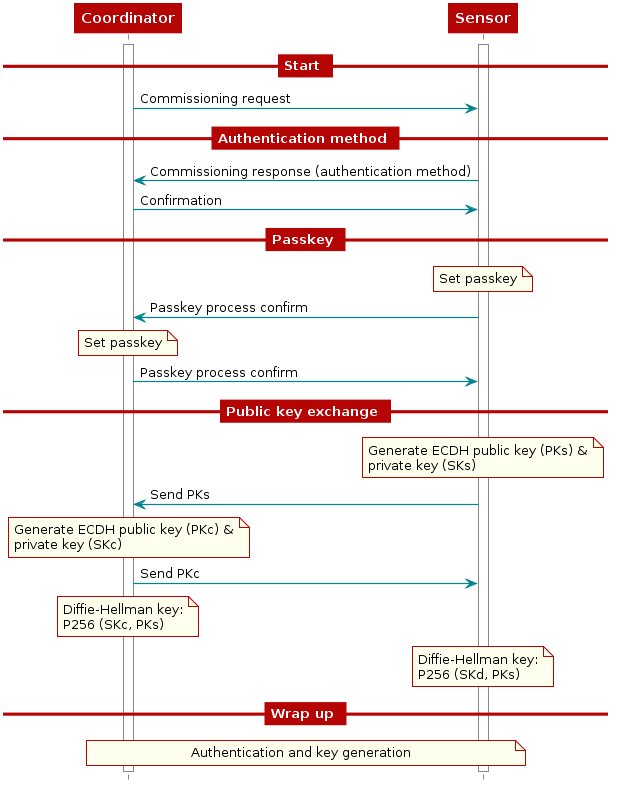
Figure 42. Device commissioning overview
Crypto Functions
There are 3 main crypto functions which are described below:
- F1 is used to generate the code values used during the authentication process.
- F2 is used to generate derived keying material for the device key and keys for the commitment function F3.
- F3 is used to generate check values for device key.
Authentication
The Authentication process is initiated by first agreeing between the Collector and Sensor on which authentication will be used. This agreement is done during the commissioning process when the Sensor responds to the Collector’s commissioning request by specifying which authentication methods it supports. If the Collector supports at least one of the methods, then it sends a confirmation to the Sensor with the authentication method chosen. Then the authentication process is started.
Authentication methods:
- Just Allowed: PSK = 0x0
- Default Code: PSK = 6 digits decimal pre-defined code (20-bit)
- Passkey: PSK = 6 digits decimal user input (20-bit). Max value: 999999 = 0xF423F
The passkey value must be identical on both Collector and Sensor and will be the basis of the mutual authentication of the two devices. The authentication sequence is repeated 6 times. Each side commits to each 4-bit of the passkey, using a long nonce (128-bit), and sending the hash of the nonce, the 4-bit of the passkey, and both public keys to the other party. The parties then take turns revealing their commitments until the entire passkey has been mutually disclosed. The first party to reveal a commitment for a given 4-bit of the passkey effectively reveals that 4-bit of the passkey in the process, but the other party then has to reveal the corresponding commitment to show the same bit value for that 4-bit of the passkey, or else the first party will then abort the process, after which no more 4-bit of the passkey are revealed.
For each iteration i of the authentication sequence:
- PSKci = the
i’th least significant 4 bits of PSKc - PSKsi = the
i’th least significant 4 bits of PSKs - Nci and Nsi = 128-bit nonce regenerated each iteration
For example, given that PSKc = 0x123456, then PSKc0 = 0x6, PSKc1 = 0x5, etc.
The “gradual disclosure” prevents leakage of more than 4-bit of in-guessed passkey information in the case of an MITM attack. A MITM attacker with only partial knowledge of the passkey will only receive one incorrectly-guessed 4-bit chunk of the passkey before the process fails. Hence, a MITM attacker who engages first one side, then the other will only gain an advantage of at most two 4-bit chunks over a simple brute-force guesser. The process can be repeated at each bit of the passkey (total 24 times) but 4-bit is chosen to reduce the authentication process time. If required, the user can easily modify the authentication process to use 1-bit of the passkey instead of 4-bits.
The 128-bit nonce is included in the commitment hash to make it difficult to brute force even after the process has failed. The public Diffie-Hellman values are included to tie the passkey authentication to the original ECDH key exchange, to prevent a MITM attacker from substituting the public keys on both sides of the ECDH exchange with its own key.
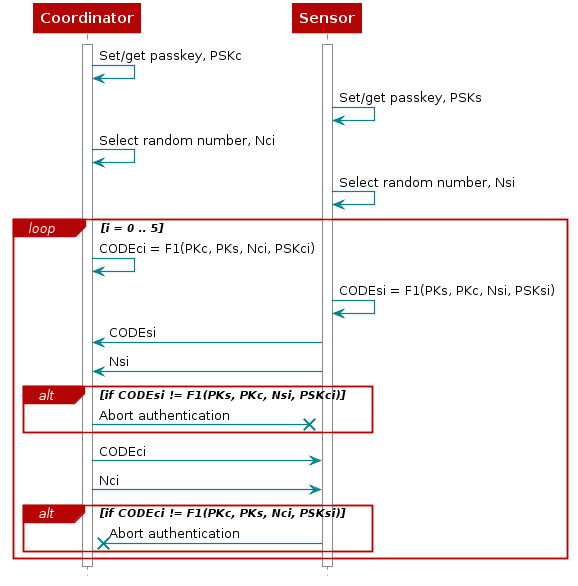
Figure 43. Authentication process
Key Generation
Once the authentication process has been completed, the next step is to confirm that both devices have successfully completed the key exchange and to generate the device key.
Each side computes the Confirmation Key and the Device Key using the previously exchanged values (Collector’s IEEE address, Sensor’s IEEE address and Authentication Method) and the shared secret. Each side then computes a new confirmation value using the previously exchanged values and the newly derived confirmation key. The Sensor device then transmits its confirmation value, which is checked by the Collector. If this check fails, it indicates that the Sensor device has not confirmed the pairing, and the protocol shall be aborted by the Collector. The Collector then transmits its confirmation value, which is checked by the Sensor device. A failure indicates that the Sensor device has not confirmed the pairing and the process shall be aborted.

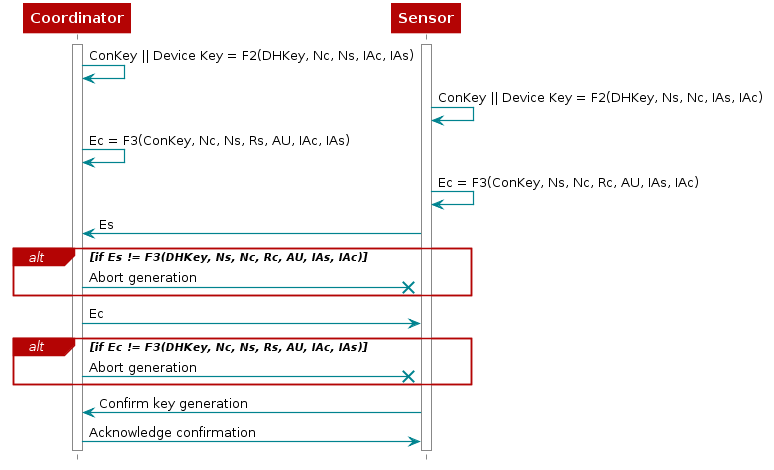
Figure 44. Key generation
Device Key Refreshment
For key refreshment, the Collector runs a timer for key refreshment. When the timer is expired, “SM_KEYREFRESH_TIMEOUT” event is generated. Then the Collector initiates a key refreshment for one of the Sensor devices in the network. The key refreshment uses the same state machine for commissioning but starts from key generation by skipping the ECDH key exchange and Authentication, thus key refreshment cannot be performed while a commissioning is in progress, and vice versa. The timeout is define by “SM_KEYREFRESH_TIMEOUT”. The key refreshment process, like the regular commissioning process, uses the network key. Note that the way to trigger the key refreshment is an example. It can be triggered by other ways such as the number of data transfer, local trigger by user, or remote trigger. User can apply a different method based on the product needs.
The diagram below provides a high level overview of the process, key refreshment uses the same state machine used for commissioning, but starting from the key generation state.
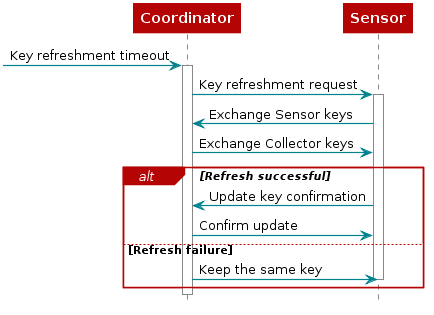
Figure 45. Device key refreshment
Secure Manager APIs
APIs
Secure Manger (SM) runs based on states, so it shall be continuously called
from Collector_process() in collector.c for the Collector device, and
Sensor_process() in sensor.c for Sensor devices. SM is responsible for
managing its state to complete device commissioning and key generation. SM
does not pass the key and device information to the MAC layer directly. The
application is responsible to pass the key and device information to the MAC
which is already implemented as part of the Collector_sm and Sensor_sm
examples.
| API | Parameters | Description |
|---|---|---|
| SM_init() | sem | Initializes the SM module and updates the security manager callback structure. Collector: Called in Collector_init() in collector.c Sensor Device: Called in Sensor_init() in sensor.c |
| SM_Process() | Start the security manager event handler Collector: Called in Collector_process() in collector.c Sensor Device: Called in Sensor_process() in sensor.c |
|
| SM_startCMProcess() | *devInfo, *sec, fhEnabled, rxOnIdle, devType, authMethods | Collector: This API shall be called after a device association is done. Where: assocIndCb() in cllc.c Sensor Device: This API shall be called when “Smgs_cmdIds_CommissionStart” is received. If device association is not completed (assocCnfCb() in jdllc.c), it shall be rejected. This function shall set the SM state to SMSTATE_START FHEnabled= true or false => Whether to use extended or short addressing when making mac data requests RxOnIdle = true or false => Whether the receiver is on when idling, only for Sensor devices. DeviceType = SM_type_coordinator or SM_type_device => Set based on application, the Collector shall choose the Collector device type, which the Sensor shall choose device. Desired Authentication method by SM process initiator: Bitmask of values from SMMsgs_authMethod_t. |
| SM_startKeyRefreshProcess() | *pDevInfo, *pSec, fhEnabled, rxOnIdle | Collector: This API shall be called after a key refresh timeout to start the key refreshment process. Where: allDevice_keyRefresh() in sm_ti154.c. Sensor: This API shall be called to start the key refreshment process. Where: dataIndCb() in sensor.c. This function shall set the SM state to SM_states_key_gen FHEnabled= true or false => Whether to use extended or short addressing when making mac data requests RxOnIdle = true or false => Whether the receiver is on when idling, only for Sensor devices. |
| SM_registerCallback() | *pSMCallbacks | Register callback functions which needs to be called before SM_startCMProcess() is called Collector: Called in Collector_init() in collector.c Sensor Device: Called in Sensor_init() in sensor.c |
| (*SM_failCMProcessFp_t) | Callback Function pointer. This function shall be invoked when the commissioning process is failed. Input: pointer of ApiMac_deviceDescriptor_t. Output: ApiMac_deviceDescriptor_t. Collector or Sensor needs to start disassociation process. | |
| (*SM_successCMProcessFp_t) | Callback Function pointer. This function shall be invoked when the commissioning process is succeed. Input: pointer of ApiMac_deviceDescriptor_t and ApiMac_keyDescriptor_t. Output: ApiMac_deviceDescriptor_t and ApiMac_keyDescriptor_t. Collector or Sensor needs to pass the information to MAC. | |
| SM_getSrcDeviceSecurityInfo() | extAddress, shortAddress, *pSec |
Collector: This API shall be called to populate the security field for message transmission. Where: sendMsg() in collector.c Sensor: This API shall be called to populate the security field for message transmission. Where: Sensor_sendMsg() in sensor.c |
| SM_removeEntryFromSeedKeyTable() | *extAddress | Remove a SeedKey Entry from the SeedKeyTable Collector: Called after disassociation in cllcDisassocIndCb() in collector.c Sensor: Called after disassociation in jdllcDisassocIndCb() and jdllcDisassocCnfCb() in sensor.c |
| SM_processCommData() | *pDataInd | Parse incoming data that has been sent to the application for the security manager. Collector: Called after disassociation in dataIndCB() in collector.c Sensor: Called after disassociation in jdllcDisassocIndCb() and dataIndCB() in sensor.c |
| updateSeedKeyFromNV() | *pDevInfo, *pDevKeyInfo | Add SeedKey Entry to the SeedKeyTable from NV (Sensor only) Sensor Device: Called in Sensor_process() in sensor.c |
| addDeviceKey() | *pSeedKeyEntry, *deviceKey, newkey | Add a new device key to key table newKey = true if new key is being added, false if key update Both: Called in SM_states_finish_success state of SM process Sensor Device: Called in Sensor_process() in sensor.c |
| getEntryFromSeedKeyTable() | extAddress, shortAddress | Get a SeedKey Entry pointer from the SeedKeyTable Both: Called in SM_states_finish_success state of SM process, SM_startKeyRefreshProcess(), and SM_getSrcDeviceSecurityInfo() Sensor Device: Called in Sensor_process() in sensor.c |
Data Format and Commands
Data Format: MsgID (uint8_t) + CM_ID (uint16_t) + DataSize (uint8_t) + Data (N bytes)
- DataSize does not include MsgID and CM_ID
- Message ID:
- Smgs_cmdIds_CommissionStart = 14
- Smgs_cmdIds_CommissionMsg = 15
- CM_ID + Data
- SMMsgs_cmdIds_processRequest (0xCF01) + Device Info
- SMMsgs_cmdIds_processResponse (0xCF02) + authentication method
- SMMsgs_cmdIds_processMethodConfirm (0xCF05) + Selected Method
- SMMsgs_cmdIds_processPasskeyConfirm (0xCF06) + No Data
- SMMsgs_cmdIds_processPublicKey (0xCF07) + Public Key
- SMMsgs_cmdIds_processInfo128SecurityVal (0xCF08) + data (128bit)
- SMMsgs_cmdIds_processInfo128Code (0xCF09) + data (128bit)
- SMMsgs_cmdIds_processInfo128Nonce (0xCF10) + data (128bit)
- SMMsgs_cmdIds_processSuccess (0xCF20) + No Data
- SMMsgs_cmdIds_processFail (0xCF21) + Error Code (+ local supported authentication methods if SMMsgs_errorCode_unsupportedAuthMethod error)
- SMMsgs_cmdIds_KeyRefreshRequest (0xCF30) + No Data
- SMMsgs_noMsg (0xFFFF) (dummy message used to check whether a message is expected or not)
- Authentication Method (uint8_t)
- Just Allowed: 0x04
- Passkey: 0x01
- Default Code: 0x02
- Error Code (uint8_t)
- Authentication method is not supported by target device SMMsgs_errorCode_unsupportedAuthMethod = 0x12,
- Authentication input does not match SMMsgs_errorCode_noMatchAuthVal = 0x13,
- Key confirmation value does not match SMMsgs_errorCode_noMatchKeyConfirm = 0x14,
- Unexpected commissioning message received SMMsgs_errorCode_unexpectedMsg = 0x1A,
- Commissioning process timeout SMMsgs_errorCode_timeout = 0x1B,
Secure Manager State Machine
The diagram below shows the secure manager states change flow based on the interactions between Collector and Sensor.
- ENTRY
- Collector: After a device association is complete, the Collector initiates the device commissioning process by calling SM_startCMProcess(), where the state is set to START.
- Sensor: When receiving the device commissioning start message, calls SM_startCMProcess() if the device association is finished.
- START (Collector only)
- Send following message to the Sensor.
- Message ID: Smgs_cmdIds_CommissionStart
- CM ID: CM_ProcessRequest
- Data: Device Info
- AUTH_METHOD
- Collector: requests the authentication methods the device supports
- Sensor: sends the authentication methods the device supports
- PASSKEY
- Collector: sets the passkey and sends a passkey process confirmation message
- Sensor: sets the passkey and sends a passkey process confirmation message
- KEY_EXCHANGE
- Collector & Sensor: generates its own ECDH key pair and exchange public key with each other.
- AUTHENTICATION
- Collector & Sensor: perform Authentication Process.
- KEY_GEN
- Collector & Sensor: perform Key Generation Process.
- Collector: If key value is confirmed, sends Cm_ProcessSuccess message to the Sensor, then move to FINISH_SUCCESS
- Sensor: When receiving Cm_ProcessSuccess message, then move to FINISH_SUCCESS
- FINISH_SUCCESS
- Collector & Sensor: call the callback function (*SM_successCMProcessFp_t)
- FINISH_FAIL
- Collector & Sensor: Call the callback function (*SM_failCMProcessFp_t)
- How to get to FINISH_FAIL:
- Collector & Sensor: At each state, a failure shall cause the state to go to FINISH_FAIL
- Possible failures:
- Collector does not support authentication method chosen by Sensor
- Code or nonce mismatch during the authentication state
- Security value mismatch during the key generation state
- Unexpected message received during SM process
- Timeout
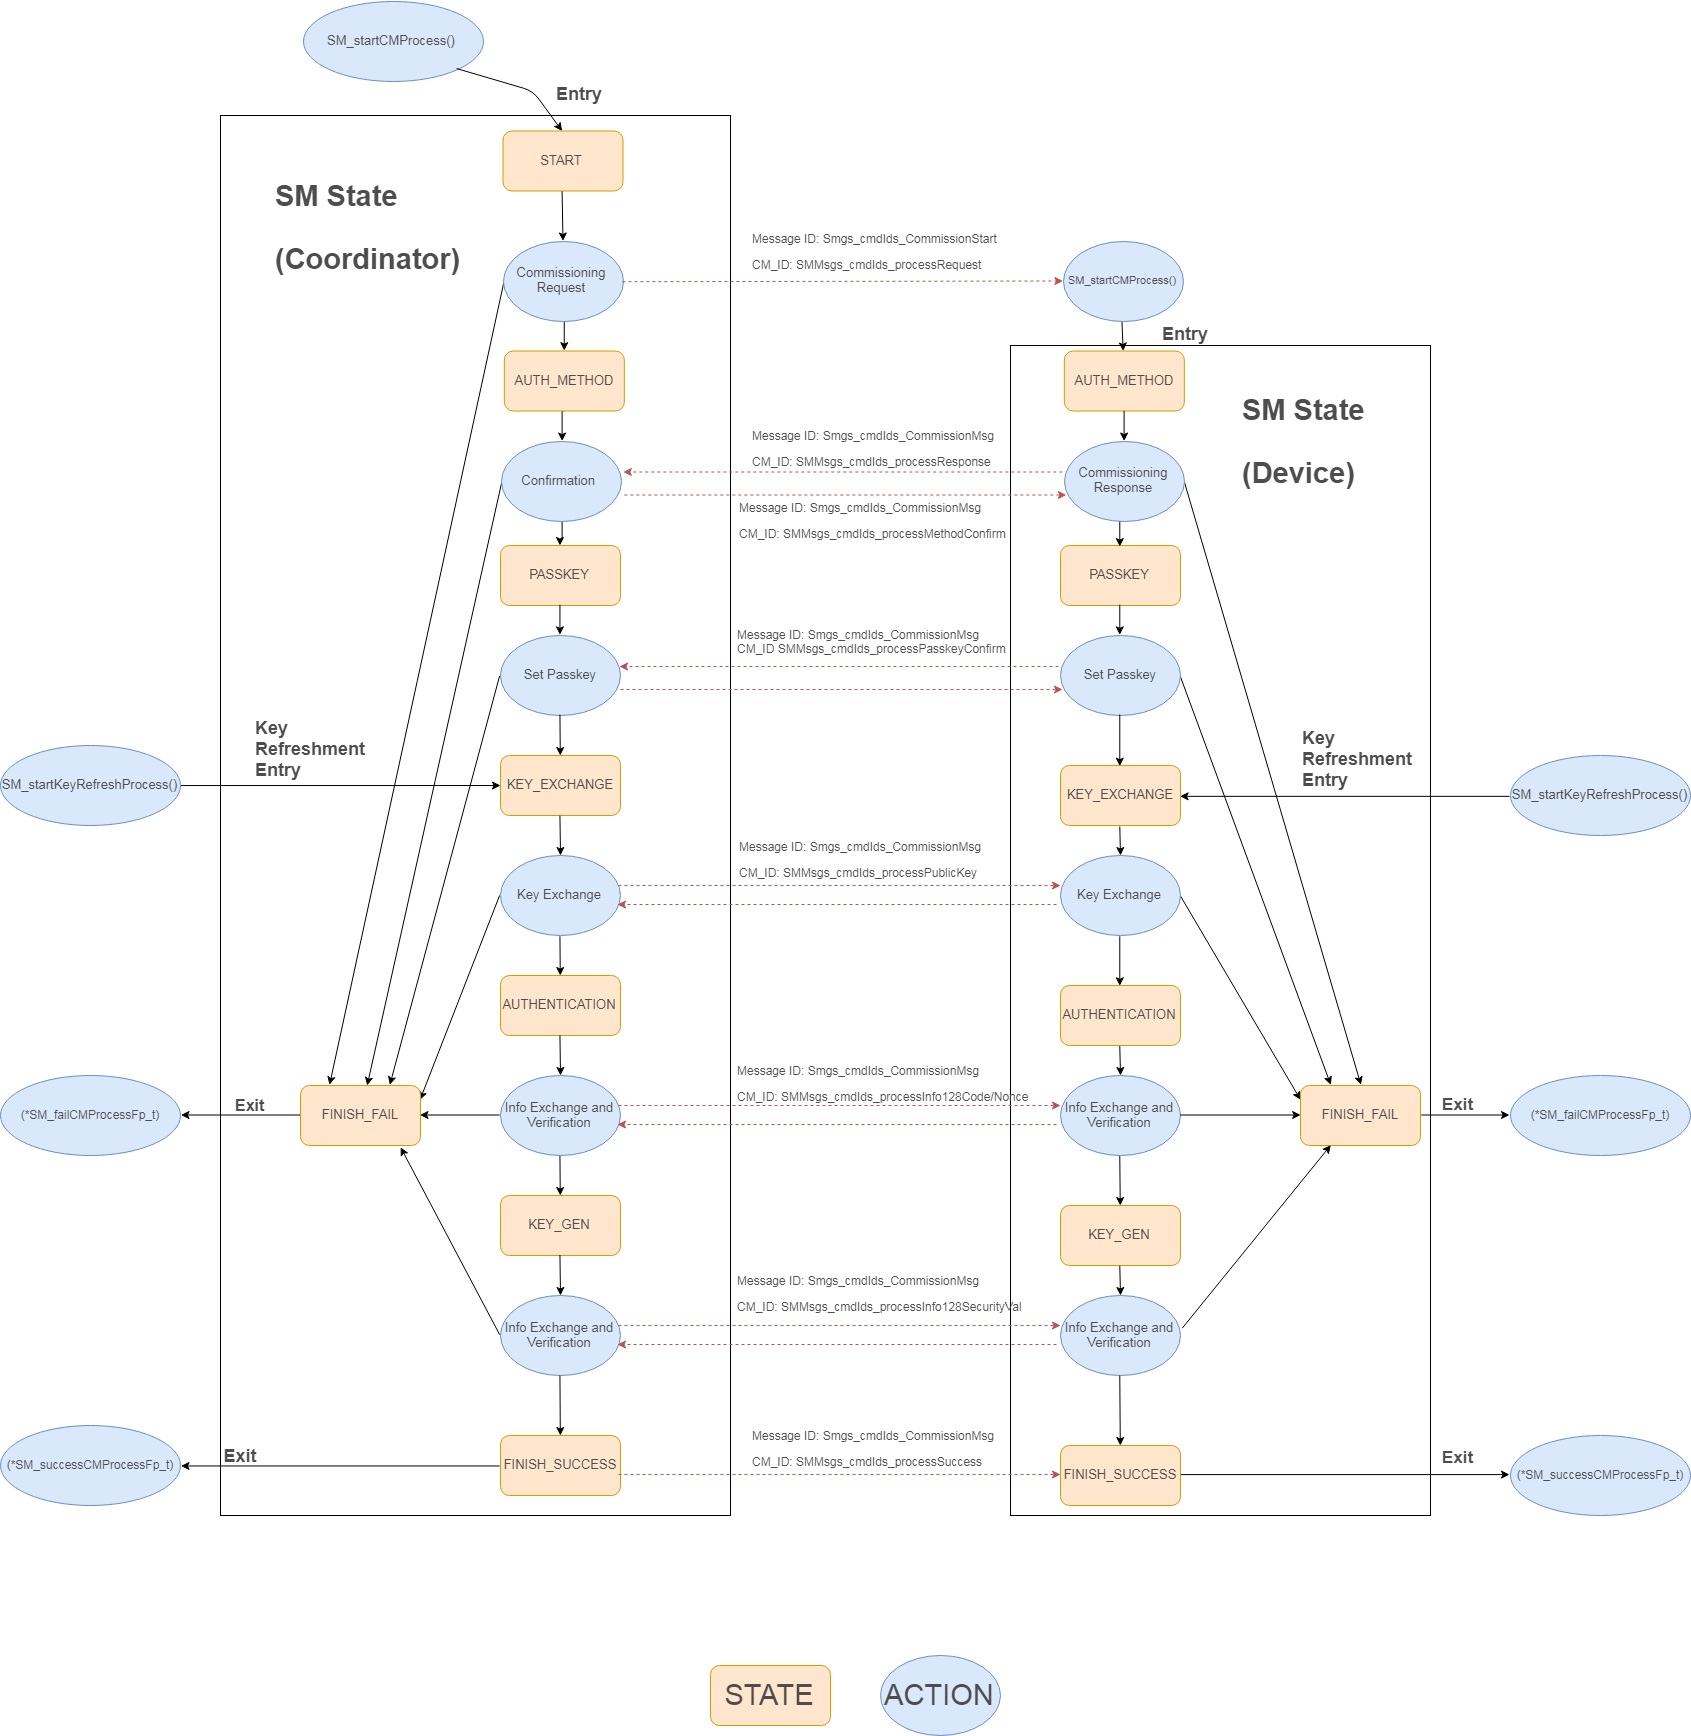
Figure 46. Secure Manager State Machine
Key Usage Diagram
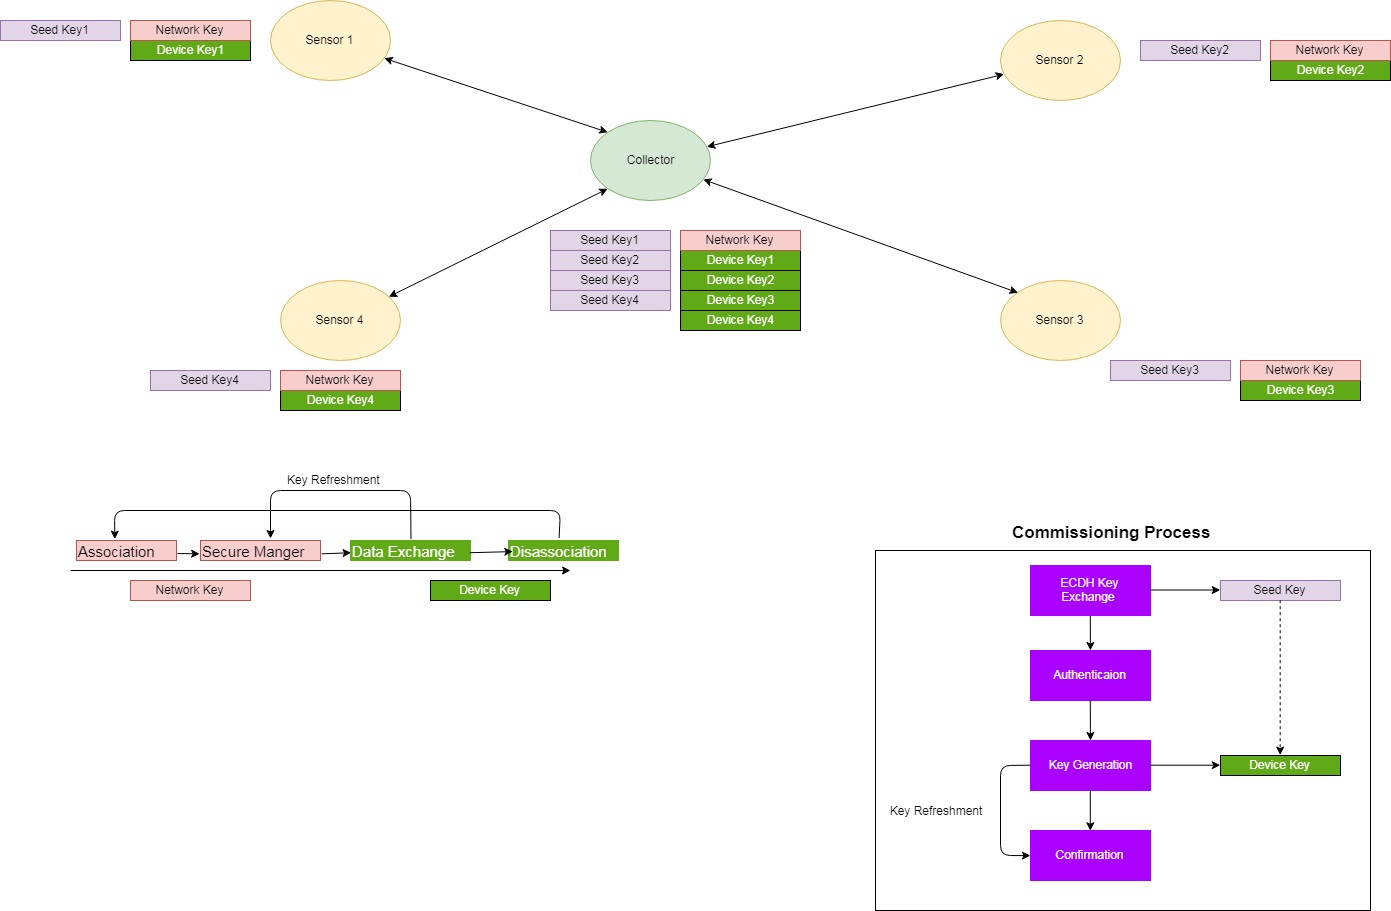
Figure 47. Key Usage
Known Limitations due to Storing Keys in RAM
As shown in the diagram above, the Collector needs to keep two unique keys per device (Seed Key and Device Key). Due to limited NV space, all of the keys cannot be stored in NV Memory. The NV storage only keeps the Sensor information, not device key information. When using Secure commissioning to secure an end product application, it is recommended to store all device keys to internal flash or external flash.
Attention
Please Note that the keys may need to be encrypted if an external flash space is used for key storage.
Due to this limitation it is expected that the device key information in RAM will be lost after power cycle or reset. To improve the out of box experience when using secure commissioning, the Collector implements a key recovery mechanism after reset or power cycle.
Key Recovery Process
Collector side:
After reset, the Collector checks if there are any devices in the associated device list. If the device list contains associated devices, then the list in RAM “Cllc_associatedDevList[ ]” is populated with the devices and they are all marked as “key information needs to be recovered”. The key recovery process will be initiated by the event COLLECTOR_START_EVT.
Once the recovery has been initiated by the COLLECTOR_START_EVT, the Collector will proceed to trigger a commissioning for all the pre-existing devices in the network to re-establish a secure connection with each one of them.The key recovery process checks the commissioning progress and terminates the recovery when all of the devices have been successfully commissioned (key information is recovered).
Note
During the key recovery process, the Collector will block new association requests.
Sensor side:
The key recovery is mainly driven by the Collector. Therefore for a Sensor device, this process just consists of going through commissioning again.
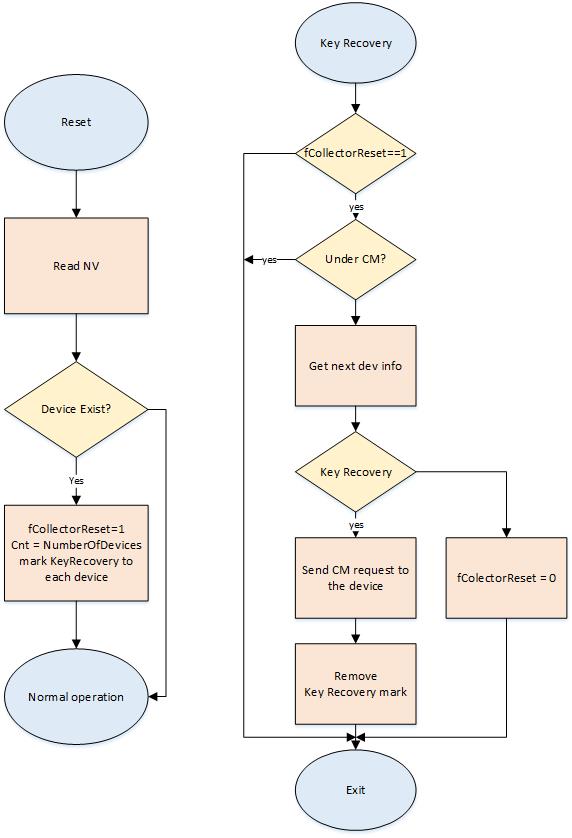
Figure 48. Key Recovery Process