SysConfig Migration
If you have an existing CC13x2 or CC26x2 software project and you want to start developing with SysConfig, follow the steps below. This guide assumes you have a stack project from the SimpleLink CC13x2 or CC26x2 2.40 SDK or newer. If this is not the case, please look at the Stack Porting Guides to see how to update to SimpleLink CC13x2 or CC26x2 2.40 SDK.
Note
If you are starting development with a fresh project, you don’t need to migrate from non-SysConfig to SysConfig-enabled project. In SimpleLink CC13x2 / 26x2 SDK v. 2.40 and later, SysConfig-enabled projects are found in the syscfg_preview folder.
1. Add a .syscfg File to Your Project
In this guide, we will start with a TI 15.4-Stack project, then apply necessary changes to start using SysConfig.
You can use the standalone SysConfig tool to make this file. Please see the SysConfig Standalone Installer Download Page.
- Choose the “Start a new Design” option. Choose your device, part and package.
For the
productpath, add the following for your SDK:{SDK_INSTALL_DIR}\.metadata\product.json. - Add an RF stack according to your existing project (TI 15.4-Stack). Add any TI Drivers configuration that your project requires. If applicable, add one or more Radio Configuration. You can find guidelines for configuring each of these in the Get started with SysConfig chapter.
- Save the file and add it to your project.
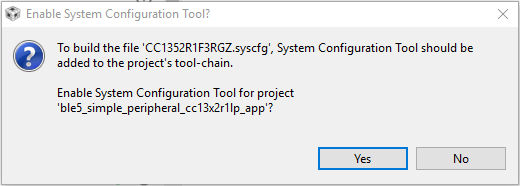
If you are using CCS, you can add the file by dragging it into your CCS workspace. When you add the file, the following dialog box will appear and allow you to add SysConfig to your project:
If you are using IAR, follow the steps in Using SysConfig with IAR Workbench before you
add the .syscfg file. The steps for adding the file are as follows:
- Include the .syscfg file you want to use in the project (right click on the project → Add Files → Navigate to the .syscfg file and add it).
- Create a custom build step: Right click on project → Options → Custom Build → Populate the following:
| Option | Populate with the following: |
| File Name Extensions | .syscfg |
| Command Line | $SYSCONFIG_ROOT$/nw/nw.exe $SYSCONFIG_ROOT$/dist/cli.js -o $PROJ_DIR$ -s “$ COM_TI_SIMPLELINK_CC13X2_26X2_SDK_INSTALL_DIR$/.metadata/product.json” –compiler iar $FILE_PATH$ |
| Output files (one per line) | SysConfig_Generated_Files.ipcf |
| Run this tool before all other tools | Checked |
2. Add SysConfig Options
If you are using CCS, open the Project Properties and do the following:
- In System Configuration Tool → Basic Options → Name of the board file
(-b, –board), set it to
/ti/boards/.meta/<BOARD_NAME>. (E.g., if you are using a CC1312R LaunchPad, set the name to/ti/boards/.meta/CC1312R1_LAUNCHXL). It is not necessary to set the name of the device. - In System Configuration Tool → Basic Options → Root system config
meta data file in a product or SDK (-s, –product), add
${COM_TI_SIMPLELINK_CC13X2_26X2_SDK_INSTALL_DIR}/.metadata/product.json.
3. Remove Board Files From Your Project
These are not needed as the board configuration is done in SysConfig. E.g. if
you are using a CC1352R LaunchPad, delete the Board.h,
CC1352R1_LAUNCHXL.h, and CC1352R1_LAUNCHXL.c from the project. If your
project contains board files ending with *_fxns.c or *.cmd, don’t
delete them.
You can see how to configure your board files and TI driver instances with
SysConfig in Configure The Board Files with SysConfig. If you’re not exactly sure what
peripherals are on your board and you have a TI development board, you can check
the .syscfg file from an existing syscfg project for your board. E.g.
if you’re using a CC26X2R LaunchPad board, you can check the .syscfg file
in one of the projects in ${COM_TI_SIMPLELINK_CC13X2_26X2_SDK_INSTALL_DIR}
/examples/rtos/CC26X2R1_LAUNCHXL.
4. Migrate Configuration Header File
config.h contains build configuration settings. The values of these defines
depend on the saved SysConfig GUI settings. SysConfig should already come with
the standard defaults for both TI-Driver and 15.4-Stack configurations. Once all
values have been defined inside of SysConfig, be sure to delete
Application/subg/config.h from the main project
directory. When you have eventually built the project with SysConfig enabled,
you will find the SysConfig-built version of config.h in the output
sysconfig folder of the project. Below is a list of the correspondence between
SysConfig configurable name and config.h define names.
| Submodule | Configuration | Definition |
|---|---|---|
| Frequency Band | Sub-1 GHz Frequency & Modulation (Phy ID) | CONFIG_PHY_ID |
| Frequency Band | Channel Page | CONFIG_CHANNEL_PAGE |
| Mode of Operation | Mac Beacon Order | CONFIG_MAC_BEACON_ORDER |
| Mode of Operation | Mac Super Frame Order | CONFIG_MAC_SUPERFRAME_ORDER |
| Network | Net Name | CONFIG_FH_NETNAME |
| Network | FH Channel Mask | CONFIG_FH_CHANNEL_MASK |
| Network | FH Async Channel Mask | FH_ASYNC_CHANNEL_MASK |
| Network | FH Coordinator Short Address | CONFIG_COORD_SHORT_ADDR |
| Network | Max Devices | CONFIG_MAX_DEVICES |
| Network | Channel Mask | CONFIG_CHANNEL_MASK |
| Network | Pan ID | CONFIG_PAN_ID |
| Power | Transmit Power (dBm) | CONFIG_TRANSMIT_POWER |
| Application | Security | CONFIG_SECURE |
| Application | PSK (LSB -> MSB) | KEY_TABLE_DEFAULT_KEY |
| Application | Scan Duration (ms) | CONFIG_SCAN_DURATION |
| Application | Tracking Time Delay | TRACKING_DELAY_TIME |
| Application | Polling Interval (ms) | CONFIG_POLLING_INTERVAL |
| Application | Reporting Interval (ms) | CONFIG_REPORTING_INTERVAL |
| MAC | Min BackOff Exponent | CONFIG_MIN_BE |
| MAC | Max BackOff Exponent | CONFIG_MAX_BE |
| MAC | Max CSMCA BackOffs | CONFIG_MAC_MAX_CSMA_BACKOFFS |
| MAC | Max Retries | CONFIG_MAX_RETRIES |
| MAC | Number of Non-Sleepy FH Neighbors | FH_NUM_NON_SLEEPY_HOPPING_NEIGHBORS |
| MAC | Number of Non-Sleepy Fixed Neighbors | FH_NUM_NON_SLEEPY_FIXED_CHANNEL_NEIGHBORS |
| MAC | Broadcast Interval (ms) | FH_BROADCAST_INTERVAL |
| MAC | Dwell Time | CONFIG_DWELL_TIME |
| Test Mode | Certification Test Mode | CERTIFICATION_TEST_MODE |
| Test Mode | Power Test Profile | POWER_TEST_PROFILE |
Note
Currently, manually changing the CCS/IAR project creation files (projectspec/ewp, etc.) could have unseen side effects. An easier path may be to import one of the 15.4-Stack SysConfig examples and migrate your application accordingly.