3.7. IPC for AM62x
The AM62x processors have Cortex-M4F and Cortex-R5F subsystems in addition to a Quad core Cortex-A53 subsystem. Please refer to the AM62x Technical Reference Manual for details.
This article is geared toward AM62x users that are running Linux on the Cortex A53 cores. The goal is to help users understand how to establish IPC communication with the M4F and R5F cores.
There are many facets to this task: building, loading, debugging, memory sharing, etc. This article intends to take incremental steps toward understanding all of those pieces.
3.7.1. Software Dependencies to Get Started
Prerequisites
- Processor SDK Linux for AM62x AM62x-SDK-Download-page.
- Processor SDK MCU+ for AM62x
Note
Please be sure that you have the same version number for both Processor SDK RTOS and Linux.
Please refer to the MCU+SDK documentation, section “Developer Guides” -> “Understanding inter-processor communication (IPC)” for M4F IPC architecture and builds.
3.7.2. Typical Boot Flow on AM62x for ARM Linux users
AM62x SOC’s have multiple processor cores - Cortex-A53, Cortex-R5F and Cortex-M4F ARM cores. The A53 typically runs a HLOS like Linux/Android. The M4F and R5F remote cores run No-OS or RTOS (FreeRTOS etc). In normal operation, the boot loader (U-Boot/SPL) boots and loads the A53 with the HLOS. The A53 then boots the M4F core.
The R5F firmware runs device manager software (SciServer) along with a demo IPC application.
Unlike M4F firmware, The R5F firmware is integrated as part of tispl.bin binary and is started early in the boot process by u-boot R5 SPL right after DDR initialization.
3.7.3. Getting Started with IPC Linux Examples
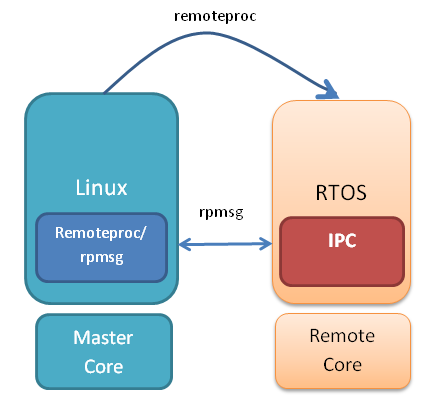
The figure below illustrates how the Remoteproc/RPMsg driver from the ARM Linux kernel communicates with the IPC driver on a remote processor (e.g. M4F) running RTOS.
In order to setup IPC on remote cores, we provide some pre-built examples in the SDK package that can be run from ARM Linux.
The remoteproc driver is hard-coded to look for specific files when loading the M4F core. Here are the files it looks for on an AM62x device:
+------------------+-----------------+--------------------+----------------------+
| Core Name        | RemoteProc Name | Description        | Firmware File Name   |
+==================+=================+====================+======================+
| M4F              | 5000000.m4f     | M4F core           | am62-mcu-m4f0_0-fw   |
+------------------+-----------------+--------------------+----------------------+
| R5F              | 78000000.r5f    | R5F core           | am62-main-r5f0_0-fw  |
+------------------+-----------------+--------------------+----------------------+
Generally on a target file system the above files are soft linked to the intended executable FW files:
root@am62xx-evm:/opt/ltp# ls -l /lib/firmware
lrwxrwxrwx 1 root root      72 Sep 25  2022 am62-mcu-m4f0_0-fw -> /lib/firmware/pdk-ipc/ipc_echo_baremetal_test_mcu2_0_release_strip.xer5f
lrwxrwxrwx 1 root root      72 Sep 25  2022 am62-main-r5f0_0-fw -> /lib/firmware/pdk-ipc/ipc_echo_testb_mcu1_0_release_strip.xer5f
However, unlike M4F remoteproc driver which boots the M4F, the R5F remoteproc driver doesn’t boot the R5F instead it late attaches to already running R5F firmware binary which is started early in the boot process as mentinoed in previous section.
For updating R5F firmware binary, tispl.bin needs to be recompiled with the new firmware binary as mentioned below :
- Go to linux installer and replace the existing R5F firmware binary with the new one
host# cp <path_to_new_fw_binary>/ipc_echo_testb_freertos_mcu1_0_release.xer5f <path_to_linux_installer>/board-support/prebuilt-images/ipc_echo_testb_mcu1_0_release_strip.xer5f
- Recompile u-boot to regenerate tispl.bin using the top level makefile.
host# make u-boot
Please refer to Top-Level Makefile for more details on Top Level makefile.
- Replace the updated tispl.bin containing new R5F firmware binary in the boot partition of sdcard and reboot
host# sudo cp board-support/u-boot_build/a53/tispl.bin /media/$USER/boot
3.7.4. Booting Remote Cores from Linux console/User space
To reload a remote core with new executables, please follow the below steps.
First, identify the remotproc node associated with the remote core:
root@am62xx-evm:~# head /sys/class/remoteproc/remoteproc*/name
==> /sys/class/remoteproc/remoteproc0/name <==
5000000.m4fss

==> /sys/class/remoteproc/remoteproc1/name <==
78000000.r5f

==> /sys/class/remoteproc/remoteproc2/name <==
30074000.pru

==> /sys/class/remoteproc/remoteproc3/name <==
30078000.pru
Then, use the sysfs interface to stop the remote core. For example, to stop the M4F
root@am62xx-evm:~# echo stop > /sys/class/remoteproc/remoteproc0/state
[  440.832317] remoteproc remoteproc0: stopped remote processor 5000000.m4fss
If needed, update the firmware symbolic link to point to a new firmware:
root@am62xx-evm:/lib/firmware# ln -sf /lib/firmware/pdk-ipc/ipc_echo_baremetal_test_mcu2_0_release_strip.xer5f am62-mcu-m4f0_0-fw
Finally, use the sysfs interface to start the remote core:
root@am62xx-evm:~# echo start > /sys/class/remoteproc/remoteproc0/state
[  450.930070] remoteproc remoteproc0: powering up 5000000.m4fss
[  450.936112] remoteproc remoteproc0: Booting fw image am62-mcu-m4f0_0-fw, size 78960
[  450.960447]  remoteproc0#vdev0buffer: assigned reserved memory node m4f-dma-memory@9cb00000
[  450.969408] virtio_rpmsg_bus virtio0: rpmsg host is online
[  450.975089] virtio_rpmsg_bus virtio0: creating channel ti.ipc4.ping-pong addr 0xd
[  450.975850]  remoteproc0#vdev0buffer: registered virtio0 (type 7)
[  450.982840] virtio_rpmsg_bus virtio0: creating channel rpmsg_chrdev addr 0xe
[  450.988824] remoteproc remoteproc0: remote processor 5000000.m4fss is now up
3.7.5. DMA memory Carveouts
System memory is carved out for each remote processor core for IPC and for the remote processor’s code/data section needs. The default memory carveouts (DMA pools) are shown below.
See the devicetree bindings documentation for more details: Documentation/devicetree/bindings/remoteproc/ti,k3-r5f-rproc.yaml
+------------------+--------------------+---------+----------------------------+
| Memory Section   | Physical Address   | Size    | Description                |
+==================+====================+=========+============================+
| M4F Pool         | 0x9cb00000         | 1MB     | IPC (Virtio/Vring buffers) |
+------------------+--------------------+---------+----------------------------+
| M4F Pool         | 0x9cc00000         | 14MB    | M4F externel code/data mem |
+------------------+--------------------+---------+----------------------------+
| R5F Pool         | 0x9da00000         | 1MB     | IPC (Virtio/Vring buffers) |
+------------------+--------------------+---------+----------------------------+
| R5F Pool         | 0x9db00000         | 12MB    | R5F externel code/data mem |
+------------------+--------------------+---------+----------------------------+

root@am62xx-evm:~# dmesg | grep Reserved
[    0.000000] Reserved memory: created DMA memory pool at 0x000000009c800000, size 3 MiB
[    0.000000] Reserved memory: created DMA memory pool at 0x000000009cb00000, size 1 MiB
[    0.000000] Reserved memory: created DMA memory pool at 0x000000009cc00000, size 14 MiB
[    0.000000] Reserved memory: created DMA memory pool at 0x000000009da00000, size 1 MiB
[    0.000000] Reserved memory: created DMA memory pool at 0x000000009db00000, size 12 MiB
[    0.000000] cma: Reserved 512 MiB at 0x00000000dd000000
Note
The reserved memory sizes listed above are provided as a reference only and subject to change between releases. For latest memory reservations, please refer to the kernel device tree repository : ‘https://git.ti.com/cgit/ti-linux-kernel/ti-linux-kernel/tree/arch/arm64/boot/dts/ti/k3-am62x-sk-common.dtsi?h=ti-linux-5.10.y’
By default the first 1MB of each pool is used for the Virtio and Vring buffers used to communicate with the remote processor core. The remaining carveout is used for the remote core external memory (program code, data, etc).
Note
The resource table entity (which describes the system resources needed by the remote processor) needs to be at the beginning of the remote processor external memory section.
For details on how to adjust the sizes and locations of the remote core pool carveouts, please see section Changing the Memory Map.
3.7.6. Changing the Memory Map
The address and size of the DMA memory carveouts needs to match with the MCU M4F and R5F external memory section sizes in their respective linker mapfiles.
arch/arm64/boot/dts/ti/k3-am62x-sk-common.dtsi
reserved-memory {
                #address-cells = <2>;
                #size-cells = <2>;
                ranges;

                mcu_m4fss_dma_memory_region: m4f-dma-memory@9cb00000 {
                        compatible = "shared-dma-pool";
                        reg = <0x00 0x9cb00000 0x00 0x100000>;
                        no-map;
                };

                mcu_m4fss_memory_region: m4f-memory@9cc00000 {
                        compatible = "shared-dma-pool";
                        reg = <0x00 0x9cc00000 0x00 0xe00000>;
                        no-map;
                };

                wkup_r5fss0_core0_dma_memory_region: r5f-dma-memory@9da00000 {
                        compatible = "shared-dma-pool";
                        reg = <0x00 0x9da00000 0x00 0x00100000>;
                        no-map;
                };

                wkup_r5fss0_core0_memory_region: r5f-memory@9db00000 {
                        compatible = "shared-dma-pool";
                        reg = <0x00 0x9db00000 0x00 0x00c00000>;
                        no-map;
                };
};
Warning
Be careful not to overlap carveouts!
Note
The DT fragments are provided as a reference and subject to change between releases. For latest memory reservations, please refer to the kernel device tree repository : ‘https://git.ti.com/cgit/ti-linux-kernel/ti-linux-kernel/tree/arch/arm64/boot/dts/ti/k3-am62x-sk-common.dtsi?h=ti-linux-5.10.y’
3.7.7. RPMsg Char Driver
The below picture depicts the kernel driver components and the user space device model for using RPMsg Char driver for communicating with the remote processor.
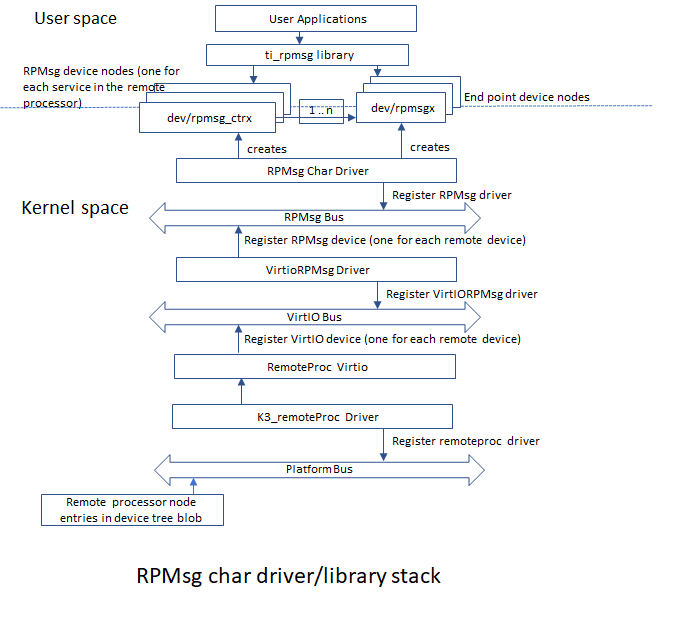
The RPMsg char driver exposes RPMsg endpoints to user-space processes. Multiple user-space applications can use one RPMsg device uniquely by requesting different interactions with the remote service. The RPMsg char driver supports the creation of multiple endpoints for each probed RPMsg char device, enabling the use of the same device for different instances.
RPMsg devices
Each created endpoint device shows up as a single character device in /dev.
The RPMsg bus sits on top of the VirtIO bus. Each virtio name service announcement message creates a new RPMsg device, which is supposed to bind to a RPMsg driver. RPMsg devices are created dynamically:
The remote processor announces the existence of a remote RPMsg service by sending a name service announcement message containing the name of the service (i.e. name of the device), source and destination addresses. The message is handled by the RPMsg bus, which dynamically creates and registers an RPMsg device which represents the remote service. As soon as a relevant RPMsg driver is registered, it is immediately probed by the bus and the two sides can start exchanging messages.
The control interface
The RPMsg char driver provides control interface (in the form of a character device under /dev/rpmsg_ctrlX) allowing user-space to export an endpoint interface for each exposed endpoint. The control interface provides a dedicated ioctl to create an endpoint device.
3.7.8. ti-rpmsg-char library
The ti-rpmsg-char package is located at the ti-rpmsg-char git repo <https://git.ti.com/cgit/rpmsg/ti-rpmsg-char>.
A thin userspace rpmsg char library is provided. The library abstracts the rpmsg char driver usage from userspace. This library provides an easy means to identify and open rpmsg character devices created by the kernel rpmsg-char driver.
This library support TI K3 family of devices (i.e AM65x, AM64x, AM62x, J721E, and J7200 SoCs).
The library provides 4 basic APIs wrapping all the rpmsg char driver calls. Please check documentation in ‘include/ti_rpmsg_char.h’ for details..
- rpmsg_char_init()
- This function checks that the needed kernel drivers (remoteproc. rpmsg, virtio) are installed and accessible from the user space. Further it also checks the SoC device supports the requested remote processor.
- rpmsg_char_exit()
- This function finalizes and performs all the de-initialization and any cleanup on the library. This is the last function that needs to be invoked after all usage is done as part of the application’s cleanup. This only need to be invoked once in an application, there is no reference counting. The function also needs to be invoked in any application’s signal handlers to perform the necessary cleanup of stale rpmsg endpoint devices.
- rpmsg_char_open()
- Function to create and access a rpmsg endpoint device for a given rpmsg device.
- rpmsg_char_close()
- Function to close and delete a previously created local endpoint
All remote proc ids are defined in rproc_id.h
The below table lists the device enumerations as defined in the rpmsg_char_library. The validity of the enumerations wrt AM62x is also specified.
+------------------+--------------------+---------+-----------------------------------+
| Enumeration ID   | Device Name        | Valid   | Description                       |
+==================+====================+=========+===================================+
| M4F_MCU0_0       | 5000000.m4f        | Yes     | M4F core in MCU Domain            |
+------------------+--------------------+---------+-----------------------------------+
| R5F_WKUP0_0      | 78000000.r5f       | Yes     | R5F core in Wakeup Domain         |
+------------------+--------------------+---------+-----------------------------------+
3.7.9. RPMsg examples:
RPMsg user space example
Note
These steps were tested on Ubuntu 18.04. Later versions of Ubuntu may need different steps
Note
rpmsg_char_simple comes prepackaged in prebuilt wic image (tisdk-default-image-am62xx-evm.wic.xz) that comes with the release and below example can be directly run (Step 6) if using this prebuilt wic image
Access source code in the git repo here <https://git.ti.com/cgit/rpmsg/ti-rpmsg-char>. rproc_id is defined at include/rproc_id.h <https://git.ti.com/cgit/rpmsg/ti-rpmsg-char/tree/include/rproc_id.h>.
Build the Linux Userspace example for Linux RPMsg by following the steps in the top-level README:
- Download the git repo
- Install GNU autoconf, GNU automake, GNU libtool, and v8 compiler as per the README
- Perform the Build Steps as per the README
Linux RPMsg can be tested with prebuilt binaries that are packaged in the “tisdk-default-image-am62xx-evm” filesystem:
- Copy the Linux RPMsg Userspace application from <ti-rpmsg-char_repo>/examples/rpmsg_char_simple into the board’s Linux filesystem.
- Ensure that the remote core symbolic link points to the desired binary file in /lib/firmware/pdk-ipc/. Update the symbolic link if needed. Reference section Booting Remote Cores from Linux console/User space for more information.
- Run the example on the board:
Usage: rpmsg_char_simple [-r <rproc_id>] [-n <num_msgs>] [-d <rpmsg_dev_name] [-p <remote_endpt]
                Defaults: rproc_id: 0 num_msgs: 100 rpmsg_dev_name: NULL remote_endpt: 14

# M4F<->A53_0 IPC
root@am62xx-evm:~# rpmsg_char_simple -r 9 -n 10
Created endpt device rpmsg-char-9-989, fd = 3 port = 1024
Exchanging 10 messages with rpmsg device ti.ipc4.ping-pong on rproc id 9 ...

Sending message #0: hello there 0!
Receiving message #0: hello there 0!
Sending message #1: hello there 1!
Receiving message #1: hello there 1!
Sending message #2: hello there 2!
Receiving message #2: hello there 2!
Sending message #3: hello there 3!
Receiving message #3: hello there 3!
Sending message #4: hello there 4!
Receiving message #4: hello there 4!
Sending message #5: hello there 5!
Receiving message #5: hello there 5!
Sending message #6: hello there 6!
Receiving message #6: hello there 6!
Sending message #7: hello there 7!
Receiving message #7: hello there 7!
Sending message #8: hello there 8!
Receiving message #8: hello there 8!
Sending message #9: hello there 9!
Receiving message #9: hello there 9!

Communicated 10 messages successfully on rpmsg-char-9-989

# R5f<->A53_0 IPC
root@am62xx-evm:~# rpmsg_char_simple -r 15 -n 10
Created endpt device rpmsg-char-15-1506, fd = 3 port = 1024
Exchanging 10 messages with rpmsg device ti.ipc4.ping-pong on rproc id 15 ...

Sending message #0: hello there 0!
Receiving message #0: hello there 0!
Sending message #1: hello there 1!
Receiving message #1: hello there 1!
Sending message #2: hello there 2!
Receiving message #2: hello there 2!
Sending message #3: hello there 3!
Receiving message #3: hello there 3!
Sending message #4: hello there 4!
Receiving message #4: hello there 4!
Sending message #5: hello there 5!
Receiving message #5: hello there 5!
Sending message #6: hello there 6!
Receiving message #6: hello there 6!
Sending message #7: hello there 7!
Receiving message #7: hello there 7!
Sending message #8: hello there 8!
Receiving message #8: hello there 8!
Sending message #9: hello there 9!
Receiving message #9: hello there 9!

Communicated 10 messages successfully on rpmsg-char-15-1506

TEST STATUS: PASSED
root@am62xx-evm:~#
RPMsg kernel space example
The kernel space example is in the Linux Processor SDK under samples/rpmsg/rpmsg_client_sample.c
- Build the kernel module rpmsg_client_sample:
Note
rpmsg_client_sample comes prepackaged in prebuilt wic image (tisdk-default-image-am62xx-evm.wic.xz) that comes with the release and below example can be directly run (Step 5) if using this prebuilt wic image
- Set up the kernel config to build the rpmsg client sample. Use menuconfig to verify Kernel hacking > Sample kernel code > Build rpmsg client sample is M:
$ export PATH=<sdk path>/linux-devkit/sysroots/x86_64-arago-linux/usr/bin:$PATH
$ make ARCH=arm64 CROSS_COMPILE=aarch64-none-linux-gnu- distclean
$ make ARCH=arm64 CROSS_COMPILE=aarch64-none-linux-gnu- tisdk_am62xx-evm_defconfig
$ make ARCH=arm64 CROSS_COMPILE=aarch64-none-linux-gnu- menuconfig
- Make the kernel and modules. Multithreading with –j is optional:
$ make ARCH=arm64 CROSS_COMPILE=aarch64-none-linux-gnu- -j8
Linux RPMsg can be tested with prebuilt binaries that are packaged in the “tisdk-default-image-am62xx-evm” filesystem:
- Copy the Linux RPMsg kernel driver from <Linux_SDK>/board-support/linux-x.x.x/samples/rpmsg/rpmsg_client_sample.ko into the board’s Linux filesystem.
- Ensure that the remote core symbolic link points to the desired binary file in /lib/firmware/pdk-ipc/. Update the symbolic link if needed. Reference section Booting Remote Cores from Linux console/User space for more information.
- Run the example on the board:
root@am62xx-evm:~# modprobe rpmsg_client_sample count=10
[18124.495957] rpmsg_client_sample virtio0.ti.ipc4.ping-pong.-1.13: new channel: 0x400 -> 0xd!
[18124.504422] rpmsg_client_sample virtio0.ti.ipc4.ping-pong.-1.13: incoming msg 1 (src: 0xd)
[18124.505183] rpmsg_client_sample virtio1.ti.ipc4.ping-pong.-1.13: new channel: 0x400 -> 0xd!
[18124.512811] rpmsg_client_sample virtio0.ti.ipc4.ping-pong.-1.13: incoming msg 2 (src: 0xd)
[18124.529509] rpmsg_client_sample virtio0.ti.ipc4.ping-pong.-1.13: incoming msg 3 (src: 0xd)
[18124.537888] rpmsg_client_sample virtio0.ti.ipc4.ping-pong.-1.13: incoming msg 4 (src: 0xd)
[18124.547779] rpmsg_client_sample virtio0.ti.ipc4.ping-pong.-1.13: incoming msg 5 (src: 0xd)
[18124.556072] rpmsg_client_sample virtio1.ti.ipc4.ping-pong.-1.13: incoming msg 1 (src: 0xd)
[18124.564376] rpmsg_client_sample virtio0.ti.ipc4.ping-pong.-1.13: incoming msg 6 (src: 0xd)
[18124.572689] rpmsg_client_sample virtio1.ti.ipc4.ping-pong.-1.13: incoming msg 2 (src: 0xd)
[18124.580989] rpmsg_client_sample virtio0.ti.ipc4.ping-pong.-1.13: incoming msg 7 (src: 0xd)
[18124.589273] rpmsg_client_sample virtio1.ti.ipc4.ping-pong.-1.13: incoming msg 3 (src: 0xd)
[18124.597566] rpmsg_client_sample virtio0.ti.ipc4.ping-pong.-1.13: incoming msg 8 (src: 0xd)
[18124.605844] rpmsg_client_sample virtio1.ti.ipc4.ping-pong.-1.13: incoming msg 4 (src: 0xd)
[18124.614134] rpmsg_client_sample virtio0.ti.ipc4.ping-pong.-1.13: incoming msg 9 (src: 0xd)
[18124.622557] rpmsg_client_sample virtio1.ti.ipc4.ping-pong.-1.13: incoming msg 5 (src: 0xd)
[18124.630865] rpmsg_client_sample virtio0.ti.ipc4.ping-pong.-1.13: incoming msg 10 (src: 0xd)
[18124.639227] rpmsg_client_sample virtio0.ti.ipc4.ping-pong.-1.13: goodbye!
[18124.646048] rpmsg_client_sample virtio1.ti.ipc4.ping-pong.-1.13: incoming msg 6 (src: 0xd)
[18124.654540] rpmsg_client_sample virtio1.ti.ipc4.ping-pong.-1.13: incoming msg 7 (src: 0xd)
[18124.662915] rpmsg_client_sample virtio1.ti.ipc4.ping-pong.-1.13: incoming msg 8 (src: 0xd)
[18124.671265] rpmsg_client_sample virtio1.ti.ipc4.ping-pong.-1.13: incoming msg 9 (src: 0xd)
[18124.679645] rpmsg_client_sample virtio1.ti.ipc4.ping-pong.-1.13: incoming msg 10