1.3. Flashing Instruction
1.3.1. SD Card Creation
In order to flash the AM62X board’s eMMC the fist time, a SD card containing the required bootloaders will have to be used to boot into uboot and use fastboot.
1.3.1.1. Partitioning the SD card
The SD card has to be partitioned using fdisk and the layout should look like as follow:
Disk /dev/sda: 30,2 GiB, 32227983360 bytes, 62945280 sectors
Disk model: Storage Device
Units: sectors of 1 * 512 = 512 bytes
Sector size (logical/physical): 512 bytes / 512 bytes
I/O size (minimum/optimal): 512 bytes / 512 bytes
Disklabel type: dos
Disk identifier: 0x36c2ba10

Device     Boot  Start      End  Sectors   Size Id Type
/dev/sda1  *      2048   272919   270872 132,3M  c W95 FAT32 (LBA)
1.3.1.2. Formatting the SD card partitions
Once partitioned, the boot partition has to be formatted with a FAT filesystem.
Assuming the SD card is /dev/sda:
mkfs.vfat /dev/sda1
1.3.1.3. Copying the required bootloaders
Once the SD card has been partitioned and formatted, copy the required binaries onto the newly formatted SD partition, either the pre-built ones located
in your Android source folder in vendor/ti/am62x/bootloader or the ones you generated following the build instructions step in the next section.
These binaries are also present in the pre-built binaries tarball on the SDK download page.
tiboot3.bin tispl.bin u-boot.img
1.3.2. eMMC flashing
1.3.2.1. Flashing instructions
Once the build is complete, follow the steps below to flash the images to eMMC. Use the SD card created in previous step to get started.
Procedure is same whether the pre-built images from SDK download page is used or the images are built from source.
- Change the Boot Mode DIP switches to SD card boot mode.
Boot mode DIP Switch:
SW1: 11000010 SW2: 01000000
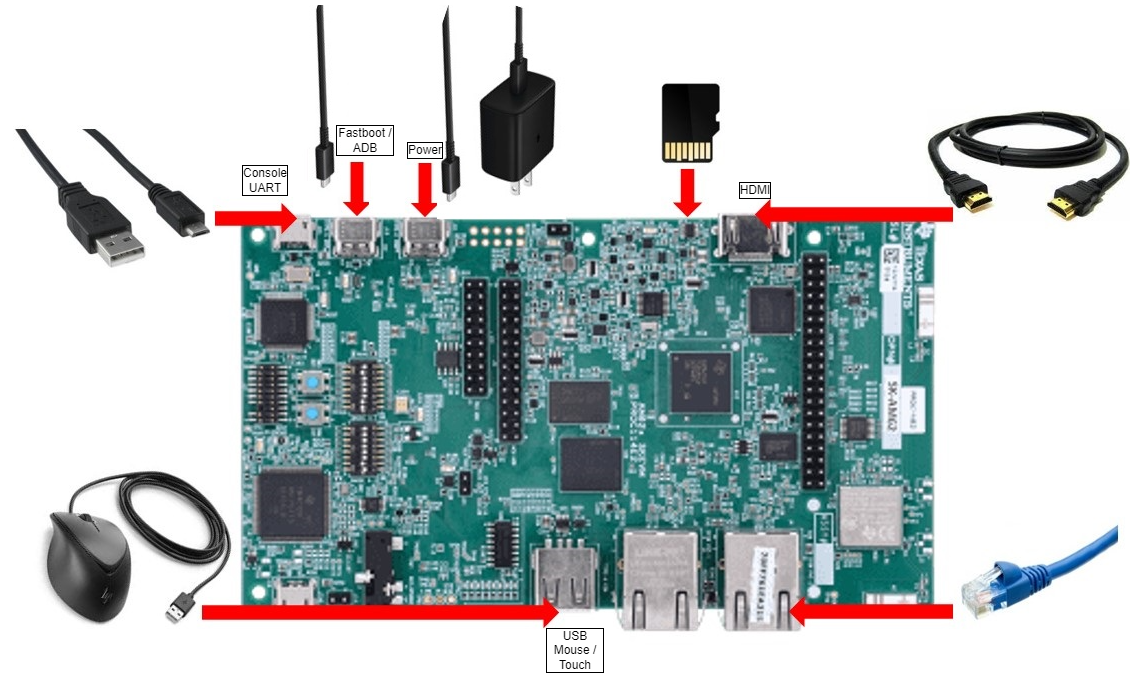
- Ensure the device is plugged in with USB Host and Debug UART/Serial Debug
3. Boot the board with tiboot3.bin, u-boot.img, tispl.bin files in boot partition of SD card.
- Open a terminal debugger to view console output from the device:
sudo picocom -b 115200 -r -l /dev/ttyUSB0
5. Stop at u-boot console (interrupt the autoboot countdown) and do below commands to setup Android partition table
env default -f -a
run set_android_boot
Note
If you build with TARGET_AVB_ENABLE=true or flash User Images you need to do this command in uboot console:
setenv force_avb "1"
- Power cycle the board one more time and stop at u-boot console again.
7. Enable fastboot mode on the device through the terminal debugger by executing below command. Before running this command make sure USB-C cable is connected from the host PC to the EVM.
=> fastboot 0
- From the host PC run the
flashall.shscript to start flashing the bianries to eMMC
# If you are using binaries built locally
cd out/target/product/am62x
sudo ./flashall.sh

(OR)

# If you are using pre-built binaries from SDK download page
cd AM62x_08.03.00_emmc
sudo ./flashall.sh
- Once the flashing is complete, power off the board and remove the SD card.
- Change Boot mode DIP switches to boot from eMMC user partitions and power cycle the board:
Boot mode DIP Switch:
SW1: 11000010 SW2: 00000000
- Board should boot the Android images now.
Note
For successful Android boot, HDMI display and an input device needs to be connected to the board before powering on the board.
Input device can be a mouse or HDMI display that has a USB touch. Input USB device connects to Type-A connector on the board.
1.3.3. Flashing the kernel
In order to flash a new kernel, the new boot image should be flashed.
adb reboot bootloader
< Wait for bootloader reboot >

cd <PATH/TO/BOOT/IMAGE>
fastboot flash boot boot.img
fastboot reboot
The board should boot with the new kernel build.