
|
|
|
MSPM0G1X0X_G3X0X Driver Library
1.00.01.03
|
The Texas Instruments MSPM0 Driver Library (DriverLib) is a set of fully functional APIs used to configure, control, and manipulate the hardware peripherals of the MSPM0 platform.
In addition to being able to control all MSPM0 peripherals, DriverLib also gives the user the ability to use common Arm peripherals such as the Interrupt Controller (NVIC) and SysTick.
DriverLib for MSPM0 Series has been tested and compiled under a variety of different toolchains.
| Toolchain |
|---|
| Texas Instruments Code Composer Studio 12.x |
| IAR Embedded Workbench for Arm 9.32.x |
| GNU C Compiler 9.2.1 (gcc) |
| Keil uVision 5.36 |
The DriverLib is meant to provide a software layer to the programmer in order to facilitate higher level of programming compared to direct register accesses.
Nearly every aspect of a MSPM0 device can be configured and driven using the DriverLib APIs. By using the high level software APIs provided by DriverLib, users can create powerful and intuitive code which is highly portable between devices.
Writing code in DriverLib will make user code more legible and easier to share among a group.
For example, examine the following code snippets which implement a very simple function to initialize a pin with SPI1_CLK functionality.
Register level:
IOMUX->SECCFG.PINCM[25] = 0x00040083;
Register level with MSPM0 header files:
IOMUX->SECCFG.PINCM[IOMUX_PINCM26] =
    IOMUX_PINCM26_PF_SPI1_SCLK | IOMUX_PINCM_PC_CONNECTED | IOMUX_PINCM_INENA_ENABLE;
MSPM0 DriverLib:
DL_GPIO_initPeripheralInputFunction(
    IOMUX_PINCM26, IOMUX_PINCM26_PF_SPI1_SCLK);
As observed, the DriverLib API is more readable, sensible, and easy to program for a software engineer. And not only that, but the generated code will be exactly the same. In most cases, DriverLib will generate code which is just as memory-efficient as writing register level code.
DriverLib is not meant to provide a layer of intelligence on the level of a user application. It is meant to be an aid to the programmer to be part of the larger solution- not the solution itself.
For example, interrupt handlers are also not included with the DriverLib APIs. APIs to manage/enable/disable interrupts are included, however the actual authoring of the interrupt service routine is left up to the programmer.
For reference, a typical interrupt handler that takes advantage of DriverLib APIs can be seen in the following code snippet:
void GROUP1_IRQHandler(void)
{
    switch (DL_Interrupt_getPendingGroup(DL_INTERRUPT_GROUP_1)) {
        case DL_INTERRUPT_GROUP1_IIDX_GPIOB:
            if (DL_GPIO_readPins(GPIOB, DL_GPIO_PIN_21)) {
                DL_GPIO_clearPins(GPIOA, DL_GPIO_PIN_0);
            }
            else {
                DL_GPIO_setPins(GPIOA, DL_GPIO_PIN_0);
            }
            break;
    }
}
Each DriverLib module will, for the most part, only interact and configure the module that it is designed for. Any cross-module interaction is left up to the user.
For example, a UART DriverLib initialization function is not able to configure the baudrate automatically at 9600bps since it has no visibility over the system frequency.
DriverLib is released with full source code and as a pre-compiled library for CCS, IAR and Keil.
<MSPM0 SDK>\source\ti\driverlib.<MSPM0 SDK>\source\ti\driverlib\m0p are specific to different MSPM0 families.<MSPM0 SDK>\source\ti\driverlib\lib.Getting started using DriverLib for MSPM0 Series is very simple regardless of the chosen development environment.
Empty "skeleton" projects for CCS using TI Arm Clang and GCC, IAR and Keil are provided in the examples directory of the MSPM0 SDK.
The code examples included in the SDK use a pre-built DriverLib library which can be used to develop an application but doesn’t allow direct changes to DriverLib source.
The following steps explain how to add DriverLib source to an existing project.
Follow the next steps when using an existing project with prebuilt library, otherwise go to step 2.
1a. On the project you want to add the DriverLib source to, go to project's Properties → Build → Arm Linker → File Search Path locate driverlib.a in Include library file or command file as input and select it.

1b. With driverlib.a selected, click the Delete button

1c. Click Apply and Close
Copy or Link the DriverLib source.
Copying allows modifications without affecting the original SDK source. This option is useful if you want a self-contained project.
Linking allows modifications directly to the original SDK source. Use this option to change the SDK code base, so that it's shared accross multiple projects.
The following steps shows how to copy the source. Jump to Step 4 to link the source.
2a. Locate the DriverLib source in the installation folder <MSPM0_SDK_INSTALL_DIR>/source/ti/driverlib

2b. Copy the folder
2c. Locate the CCS folder with the current project. The picture below shows a shortcut by right-clicking on the example, selecting Show in Local Terminal → System Explorer:

2d. Go inside the folder and paste the driverlib folder

2e. Right-click on the driverlib/lib folder and select Exclude from Build to exclude it from the project

2f. Go to Step 4 since linking is not required when copying the source files
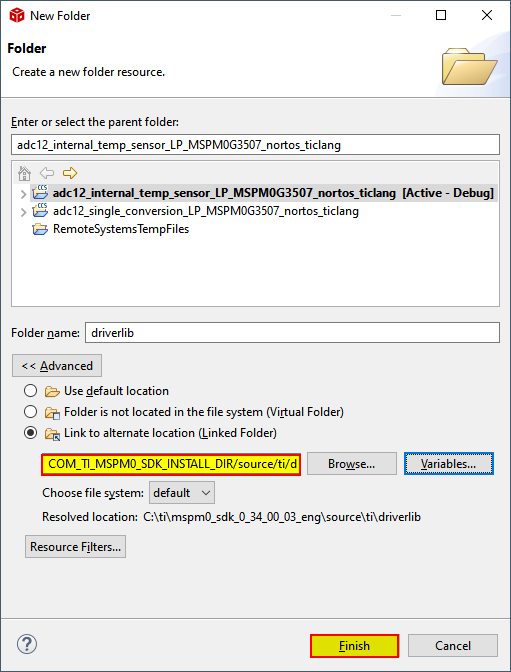
Follow the next steps to link the DriverLib source folder:
3a. Right click on the project root folder and click on New > Folder

3b. Click on “**Link to alternate location (Linked Folder)**” and then on “**Variables**”

3c. Select COM_TI_MSPM0_SDK_INSTALL_DIR and then click on “**Extend**”

3d. Select source > ti > driverlib, then click OK

3e. Note that the linked path will be relative to the SDK installation. Click Finish
3f. Right-click on the driverlib/lib folder and select Exclude from Build to exclude the lib folder from the project


Follow the next step when using an existing project with prebuilt library, otherwise go to step 2.
1a. On the project you want to add the DriverLib source to, go to project's Options, then Linker → Extra Options and delete the line with driverlib.a

Add the DriverLib source to the project.
The files can be added directly from SDK or copied into the project folder.
<MSPM0_SDK_INSTALL_DIR>/source/ti/driverlib into your project and add the copied files.Using files directly from SDK allows modifications directly to the original SDK source. Use this option to change the SDK code base, so that it's shared across multiple projects. To use this option, add the files directly from <MSPM0_SDK_INSTALL_DIR>/source/ti/driverlib.
Files can be organized into groups by selecting Project → Add group, and the files can be added either by selecting Project → Add files or by drag-and-dropping them into the workspace.


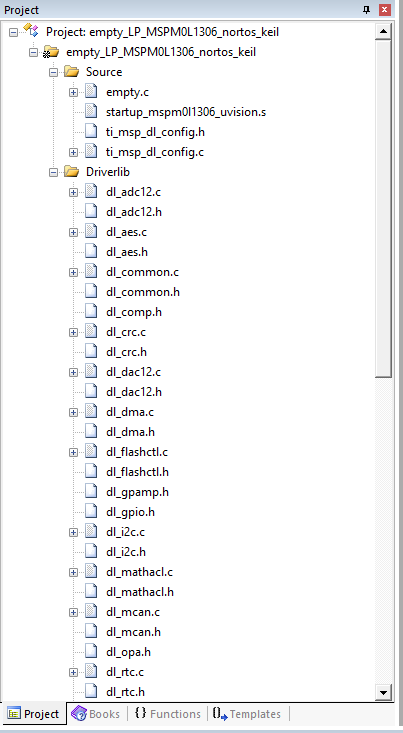
Follow the next step when using an existing project with prebuilt library, otherwise go to step 2.
1a. On the project you want to add the DriverLib source to, go to the Project window, expand the DriverLib folder and delete driverlib.a

Add the DriverLib source to the project.
2a. Right-click the DriverLib folder and select "Add existing Files to Group "DriverLib"

2b. Go to the driverLib source folder at <MSPM0_SDK_INSTALL_DIR>/source/ti/driverlib and add all files, including those in sub-folders, except for lib