|
AM64x MCU+ SDK
08.04.00
|


|
|
AM64x MCU+ SDK
08.04.00
|
|
The MCU+SDK primarily supported GP (General Purpose) as the main device type. MCU+SDK will now support HS-FS (High Security - Field Securable) in the SDK as the main device type with time-limited support for GP. This document aims to list out the differences between the two device types and aid the users to develop on HS-FS device type.
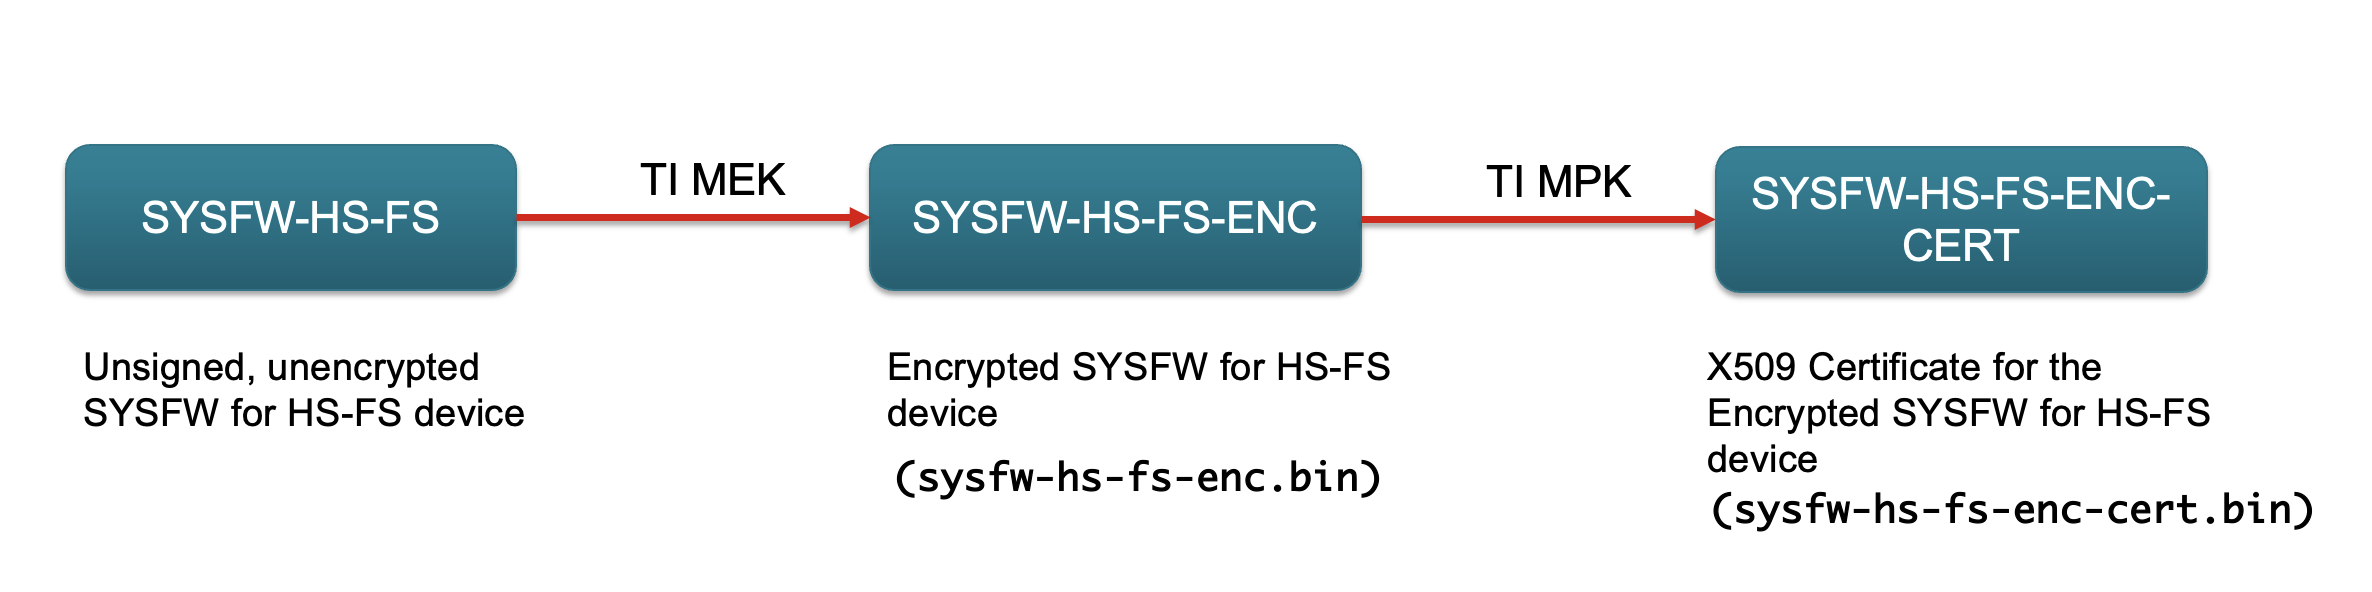
One of the major differences between GP and HS-FS is System Firmware (SYSFW). In both devices, SYSFW is always signed with an asymmetric key (RSA/ECC) and wrapped in the resulting x509 certificate. In case of GP, the key used for signing is not verified by ROM, so usually a degenerate key is used. In case of HS-FS device, SYSFW will be encrypted with TI encryption key (TI MEK) and signed with TI asymmetric key (TI MPK). The SDK will contain the encrypted and signed binary.
In case of example applications other than SBL (hello_world, dpl_demo etc...) the same application image file (*.appimage) can be booted by SBL on HS-FS / GP device, nothing special to be done for HS-FS since there is no extra signing needed.
Note: Appimages would eventually need signing by x509Certificate in HS-FS. This change is yet to be implemented. Once this is done, the appimages would have different extensions for HS-FS image. *.appimage would now become *.appimage.hs_fs
In case of SBL applications (sbl_sd, sbl_ospi, sbl_null etc...) since SDK follows combined boot flow, SYSFW is packaged along with the sbl final image (*.tiimage). Since the SYSFW is different between GP and HS-FS, the sbl final image also will change. This is taken care through an additional keyword in the file extension, **'hs_fs'**. The *.tiimage would now become *.hs_fs.tiimage For example in the case of sbl_ospi, with release build profile, the final image in the case of GP device type would be
sbl_ospi.release.tiimage (Same as before)In case of HS-FS device type, it would be
sbl_ospi.release.hs_fs.tiimageHS-FS images will be built when you build SBLs for GP device itself, so no extra build options are required to be passed.
Since most of the differences in HS-FS is related to image signing, once the SBL and application image is correctly built, rest of the flow is the same as GP for application boot. Take care that the right images are used. For example, to use SBL NULL for you application boot, flash the sbl_null.release.hs_fs.tiimage image. Same goes for other SBLs.
*.hs_fs.tiimage and application images *.appimage.hs_fs extension while flashing.This section refers to the flow where users do not use any SBL, instead uses CCS + GELs and load_dmsc.js to initialize SoC, load the DMSC M3 and manually load user application to desired core. Most of this is possible in HS-FS with the notable difference:
To discuss the solution, let's revisit the old CCS + GELs flow from user perspective on GP device:
While this seems simple enough, in the load_dmsc.js script there are quite a lot of things happening. It connects to the M3 core, runs the GELs, loads and runs the SYSFW and then proceeds to run the set_boardcfg application from R5. Once that is done, script finishes execution and user can now connect to any core and load application image.
In case of HS-FS device, the flow is almost the same:
But now the load_dmsc.js would do something else. Since it can't connect to M3, it connects to R5. Now it runs an application (sciclient_ccs_init) similar to the sciclient_set_boardcfg application. The sciclient_set_boardcfg application just sets the boardcfg, but the new sciclient_ccs_init application will additionally load M3 with SYSFW and set the boardcfg.
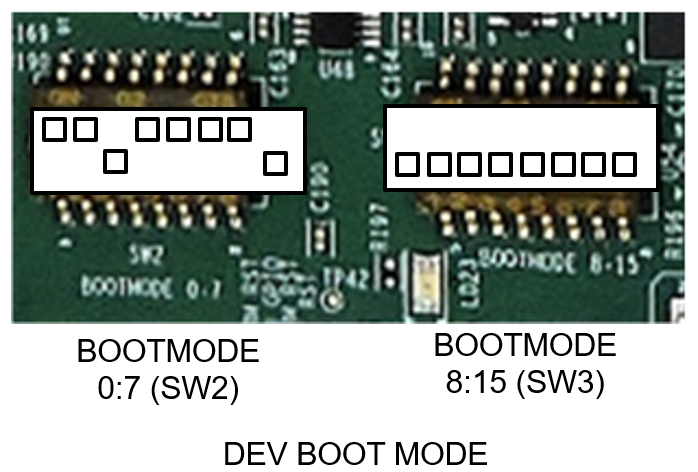
The major difference here is the strict adherence of the boot mode to DEV-BOOT mode. This is necessary to be able to connect to the R5 and load the sciclient_ccs_init application. The DEV BOOT mode looks like below:
To reiterate, to do application boot using CCS and GELs in HS-FS device
In the SBL based flow, the SBL image will contain the SYSFW in the appropriate format and the ROM will load the SBL and SYSFW. In this scenario, the above mentioned sysfw-hs-fs-enc.bin and sysfw-hs-fs-enc-cert.bin binaries would be used in the image creation. In case of CCS based flow, the loading is done in a different way using an R5 application. Here we have to use a binary concatenation of the certificate and the encrypted image and generate a hex header out of it. This hex header is then included by the R5 application and then loaded. This is already done and the header file is kept at the same location as other SYSFW binaries - sysfw_hs_fs_signed.h
Since HS-FS devices has some the secure services, the firewall configurations are somewhat different compared to the fully open and non-secure GP devices. For example some of the SoC memory regions are firewalled in HS-FS devices. This includes the MSRAM, which cores or DMA engines might need to access. To tackle this, all the SBLs in the SDK opens the MSRAM firewalls right after SYSFW boot notification comes up. If you write your own bootloader, you should also do this. The API Bootloader_socOpenFirewalls can be used for this. For example usage, please check the source of any SBL.
| Entity | GP | HS-FS |
|---|---|---|
| SYSFW image | Plain (sysfw.bin) | Signed and encrypted with TI Key (sysfw-hs-fs-enc.bin, sysfw-hs-fs-enc-cert.bin) |
| Application image name | *.appimage | *.appimage.hs_fs (eventually) |
| SBL image name | *.tiimage | *.hs_fs.tiimage |
| CCS + GEL flow bootmode | NO-BOOT recommended, any bootmode functional | DEV-BOOT mode mandatory |
| CCS + GEL flow js script | load_dmsc.js | load_dmsc_hs_fs.js |
| Firewall Configurations | Firewalls Open | Some regions are firewalled |
SBL images and non-SBL example application images use different signing scripts. This is due to the difference in the x509 certificate format expected by ROM and SYSFW. These differences and scripting is already part of SDK makefiles, but in case if the user has their own build system and wants to integrate these steps into it, please go through this section. The signing scripts used are python3 based.
SYSFW is not signed with SDK signing scripts. Pre-encrypted SYSFW binaries with x509 certificate binary generated as a result of signing with the TI keys is part of the SDK.
To create the x509 certificate header-ed SBL image, the script used is rom_image_gen.py. This is located in ${SDK_ROOT}/tools/boot/signing. The usage of the script will be printed if you run it with -h option like so:
The script is usually run after the sbl binary is created using an objcopy utility. That is a *.bin file. In GP, we sign the binary using a degenerate key. We also pass the GP SYSFW binary and the boardcfg binary to the signing script. Here is an example of how it's done in GP for say sbl_ospi.
In the options mentioned here, the values used for SYSFW load address (--sysfw-loadaddr) and BoardCfg load address (--bcfg-loadaddr) are fixed for an SoC, so no need to change. For SBL load address, we generally keep the top part of the MSRAM reserved for loading the SBL in the SDK. So we give the start of MSRAM, 0x70000000. If your SBL needs to be loaded elsewhere, this value can be changed. Notice how just the SYSFW binary is passed in case of GP. This is an unsigned, unencrypted binary.
In case of HS-FS device, we use the same signing script, but there is a small difference in the usage.
You can see that we are involving the x509 certificate for the HS-FS SYSFW binary in the image creation. This is the major difference in the SBL image creation of HS-FS devices. You would observe that the other parameters are pretty much the same between both cases.
Signing for the application image is new in HS-FS compared to GP. For the signing of application images we use a different script. This is because authentication of application images are done by SYSFW and it expects a different x509 certificate format. For signing application images, the script used in appimage_x509_cert_gen.py located at ${SDK_ROOT}/tools/boot/signing/. The usage of the script will be printed if you run it with -h option like so:
Usage of the signing script in HS-FS is fairly simple compared to the SBL signing script. Here is a typical usage for hello_world example:
Note that the key used for signing is rom degenerate.
 1.8.20