|
AM263x MCU+ SDK
08.03.01
|


|
|
AM263x MCU+ SDK
08.03.01
|
|
With Real time debug, global variables can be added to expression window in CCS and read/written during continuous run of the program. It is enabled by UART connection between CCS and SOC. The connection is built by debug program in the listed files.
Even though there are four files listed here, there are only two functions required in application program. One is "SerialCmd_init()" called in initialization and the other is "SerialCmd_read()" called in background loop of BareMetal or low priority task of RTOS. This section focus on how to create the UART connection and how to launch real time debug in CCS.
It is recommended to check the following CCS driver file if the CCS version is older than 11.1. The configuration of Cortex_R5 should be similar to below figure. If any line is missing, it is necessary to add the line showing in Figure. As for content of the lines, COM Port and Baud Rate need to be updated in target configuration file, which is included in the next step.
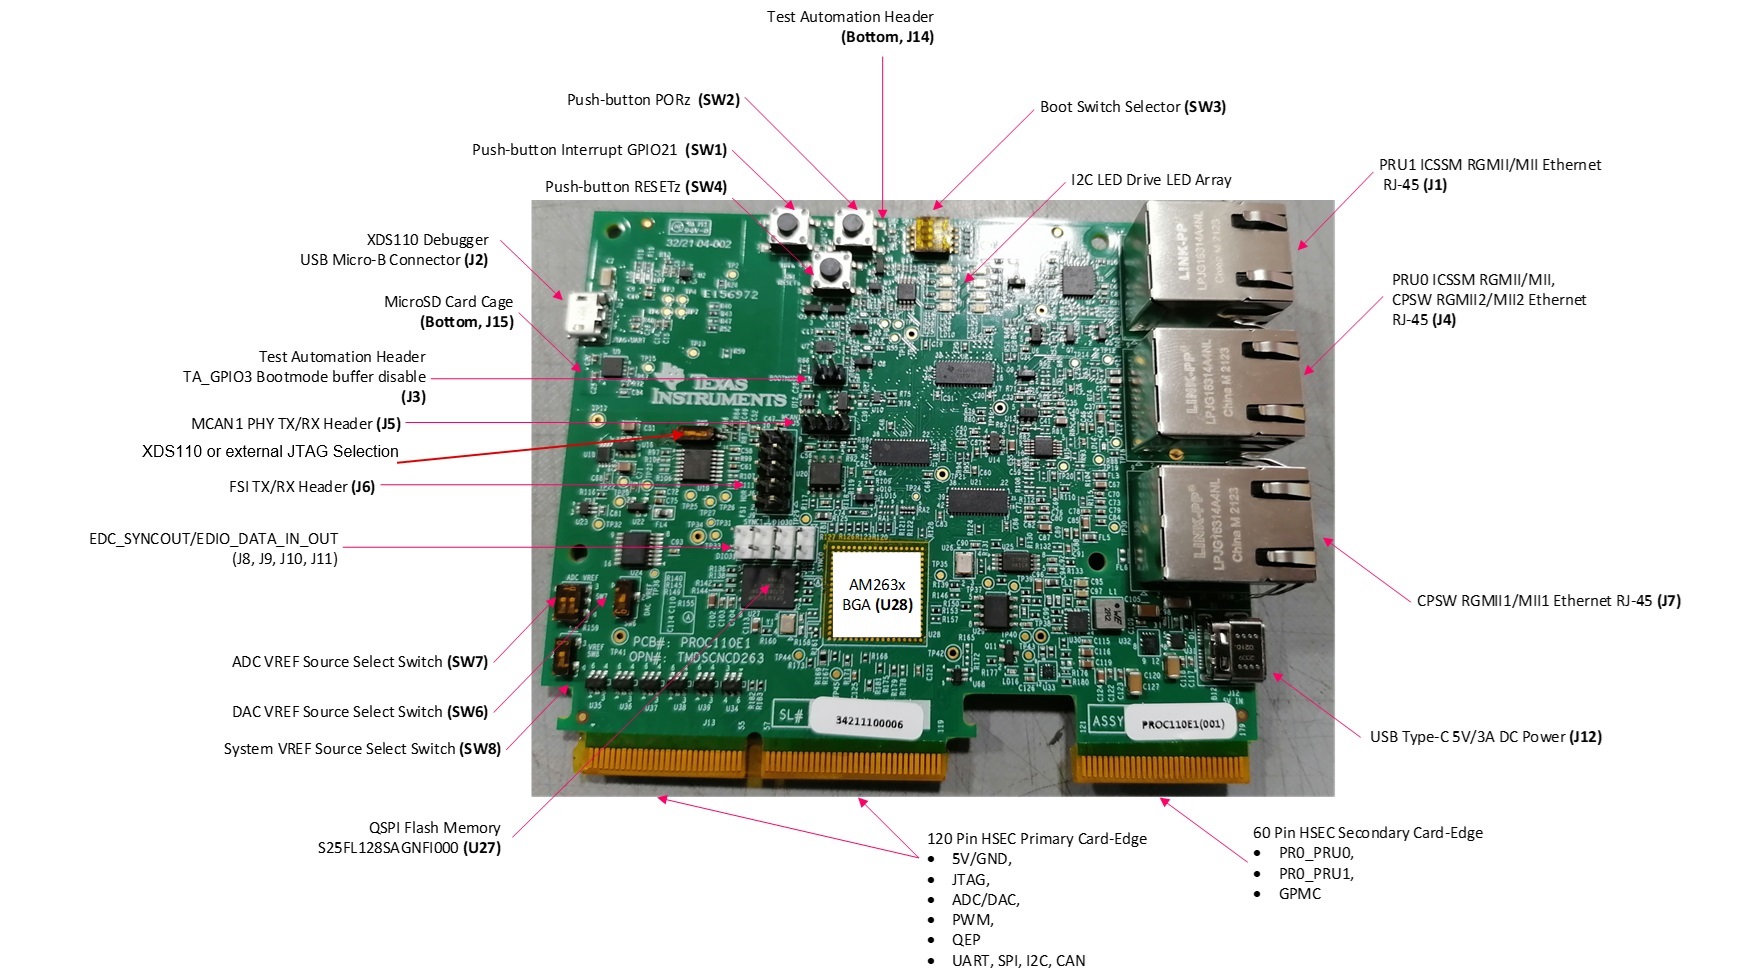
For a control card in below Figure, it offers both JTAG and UART ports in one USB port. Details on hardware connection can be found in AM263x Control Card User's Guide. It is necessary to create a target configuration file for the debug ports. A step-to-step guide is given below. A target configuration file is created and then configured with both JTAG and UART. The UART COM Port in target configuration should match PC Device Manager COM Port for JTAG probe Application/User UART. The Baud Rate in target configuration should be consistent with SoC UART Baud Rate configured in next step.


There are multiple ways to use UART0 as a debug interface. They are Debug Log and Serial Command Monitor. Debug Log is a built-in tool located at Driver Porting Layer of SDK. Like Serial Cmd Monitor, its function must be located out of interrupt callback. It is a handy tool enabling string input and output. But, input and output go through UART console only. There is no built-in GUI like Expression Window and Graph in CCS. It is recommended to disable UART0 in Debug Log SysCfg as shown below and configure UART0 instance for Serial Command Monitor. As the name of UART instance in Sysconfig "CONFIG_UART_CONSOLE", matches the instance name in "Serial_Cmd_HAL.c", it not necessary to modify the two functions required by initialization and background loop. They can be simply inserted into any application.


After building the program, debug window should be opened with the target configuration file created above. If the created target configuration file is not already opened, it can be located by following figure and looking into "User Defined" folder of the "Target Configuration" window.

The created target configuration file should be under folder named as "User Defined". After right click on the file, a menu shows up and there is a option "Launch Selected Configuration" as shown below.

Then, debug window shows up. The steps to connect target, load image and run via JTAG can be found in many CCS tutorials. The processor must be running continuously before connecting to UART. As the UART connection is based on continuous operation of the program, UART connection will be broken and CCS will be frozen by Break-point, Suspend, Terminate or any other events stopping the Serial Command Monitor program from running. Sometimes, it is just a habit to use those features when they are available. It is recommended to disconnect target via JTAG as shown below while using UART connection.

When the processor is running, UART connection can be established by simply select the UART connection → Run → Load → Load Symbols as shown below.

Expression window can be opened from View -> Expressions. Global variables can be added by clicking on "Add button". Continuous refresh can be enabled for the value to get continuously updated in CCS.

 1.8.20