Getting Started
Installation
Install Wireshark 3.0.x stable release.
- Download Wireshark installer from: https://www.wireshark.org/#download
- Install Wireshark to default location (Depending on platform this will be either
C:\Program Files (x86)\WiresharkorC:\Program Files\Wireshark).
Note
It is important that Wireshark 3.0.x version is used. Older Wireshark versions may not be compatible.
Install TI Uniflash Flash programming tool used to program the capture devices. This tool can be downloaded from: https://processors.wiki.ti.com/index.php/Category:CCS_UniFlash
Install SmartRF Packet Sniffer 2 to default location.
Note
Wireshark (step 1) should be installed before SmartRF Packet Sniffer 2. The SmartRF Packet Sniffer 2 installer will copy dissector plugins to Wireshark if Wireshark is installed on the default installation path.
- Click ‘OK’ when the installer prompts to copy dissector plugins to Wireshark installation.
- Click ‘OK’ when the installer prompts to copy WBMS dissectors to personal plugin folder.
Hardware Setup
Required Hardware
The packet sniffer firmware supports the following hardware:
For IEEE 802.15.4ge/Wi-SUN - sub 1 GHz (15.4 Stack), RF proprietary and EasyLink protocols:
- CC1312R LaunchPad (LAUNCHXL-CC1312R1 with chip revision E/2.1) or,
- CC1352R LaunchPad (LAUNCHXL-CC1352R1 with chip revision E/2.1) or,
- CC1352P LaunchPad (LAUNCHXL-CC1352P1 or LAUNCHXL-CC1352P-2 with chip revision E/2.1) or,
- CC1310 LaunchPad (LAUNCHXL-CC1310 with chip revision B/2.1 or later) or,
- CC1350 LaunchPad (LAUNCHXL-CC1350 with chip revision B/2.1 or later).
For IEEE 802.15.4 - 2.4 GHz:
- CC1352R LaunchPad (LAUNCHXL-CC1352R1 with chip revision E/2.1) or,
- CC1352P LaunchPad (LAUNCHXL-CC1352P1 or LAUNCHXL-CC1352P-2 with chip revision E/2.1) or,
- CC2650 LaunchPad (LAUNCHXL-CC2650 with chip revision C/2.2 or later) or,
- CC2652R1 LaunchPad (LAUNCHXL-CC26X2R1 chip revision E/2.1).
- CC2652RB LaunchPad (LAUNCHXL-CC26X2RB chip revision E/2.1).
For Bluetooth Low Energy:
- CC1352R LaunchPad (LAUNCHXL-CC1352R1 with chip revision E/2.1) or,
- CC1352P LaunchPad (LAUNCHXL-CC1352P1 or LAUNCHXL-CC1352P-2 with chip revision E/2.1) or,
- CC2652R1 LaunchPad (LAUNCHXL-CC26X2R1 chip revision E/2.1).
- CC2652RB LaunchPad (LAUNCHXL-CC26X2RB chip revision E/2.1).
For wBMS:
- CC2652R1 LaunchPad (LAUNCHXL-CC26X2R1 chip revision E/2.1).
Setup
The LaunchPad board must be programmed with packet sniffer firmware before it can be used as sniffer device. There is one firmware image for each hardware board located under <install_path>\sniffer_fw\bin (The default installation path is C:\Program Files (x86)\Texas Instruments\SmartRF Tools\SmartRF Packet Sniffer 2).
An overview of the different sniffer firmware images and what they support can be found in the Packet Sniffer Firmware section.
Perform the following steps to program the LaunchPad board with Sniffer firmware:
Connect the LaunchPad board to the PC with a USB cable.
Start Uniflash. See Fig. 1.
The connected device should now be shown under ‘Detected Devices’. Click Start.
Note
If the device is not shown under ‘Detected Devices’ choose your device type from the list under ‘New Configuration’. Then click Start.
Browse to correct flash image under
<install_path>\SmartRF Packet Sniffer 2\sniffer_fw\bin.Click Load Image.
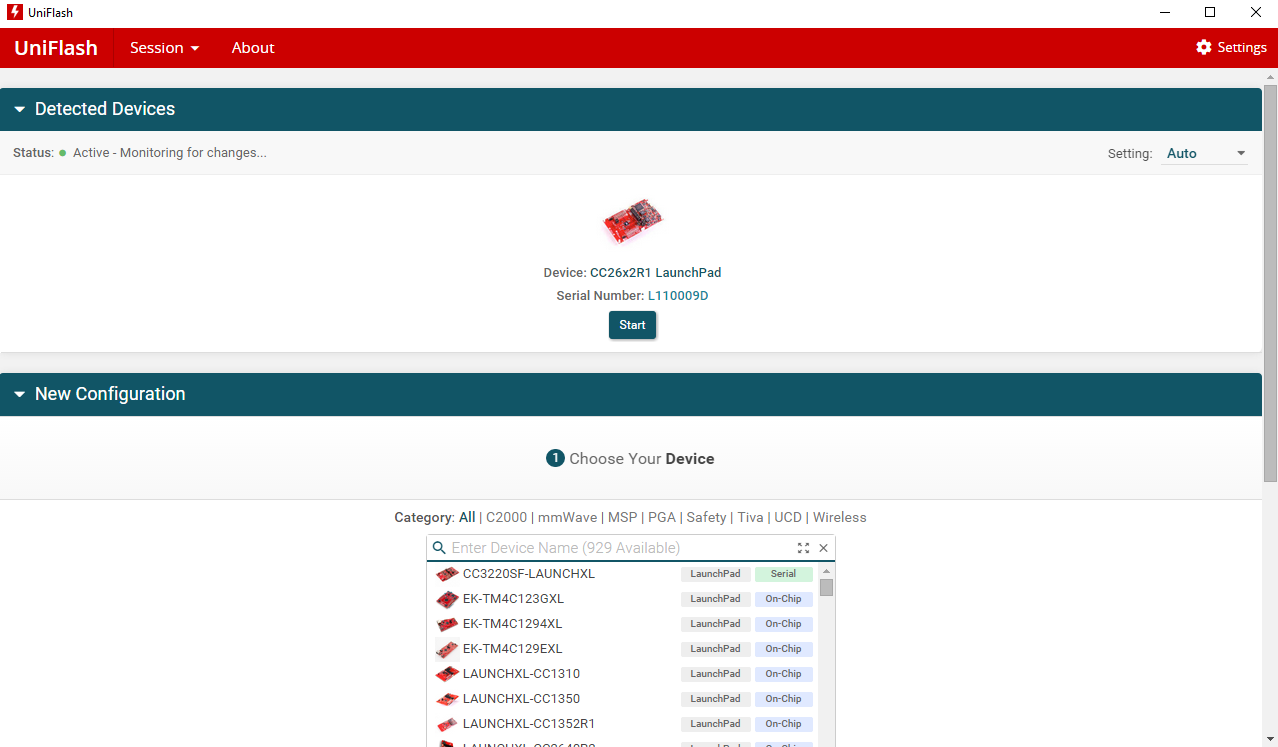
Fig. 1 Uniflash flash programmer
Software Setup
SmartRF Sniffer Agent Setup
The SmartRF Sniffer Agent can transfer data to Wireshark in the following ways:
- Pipe (recommended): Data is sent to Wireshark on the local machine (Vista/Windows 7 or higher only).
- Socket (stand-alone mode): Data is sent to the Microsoft Loopback Adapter with Wireshark running on the local machine.
- Socket (remote mode): Data is sent to Wireshark on another machine or the local machine using the network adapter.
- File: Data is sent to a PCAP file that can later be opened in Wireshark.
The following guide demonstrates how to use pipe for data transfer with Windows 7 or Windows 10. For more details consult the SmartRF Sniffer Agent readme file located in <install_path>\sniffer_agent.
Start SmartRF Sniffer Agent.
Select Options -> Data Out. Check ‘Use Pipe’, and click OK as shown in Fig. 2.
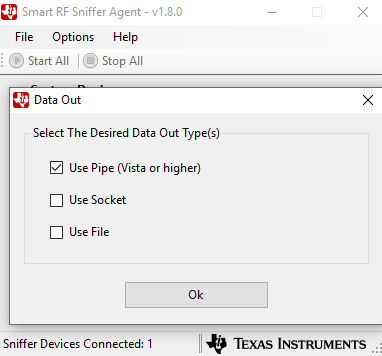
Fig. 2 Use Pipe
Press the Device Configuration button. Select a sniffer device. Then click the Configuration button and select protocol, PHY setting and frequency band as shown in Fig. 3. Select channel or frequency (The frequency input is enabled only for the Generic settings). Then press Ok.
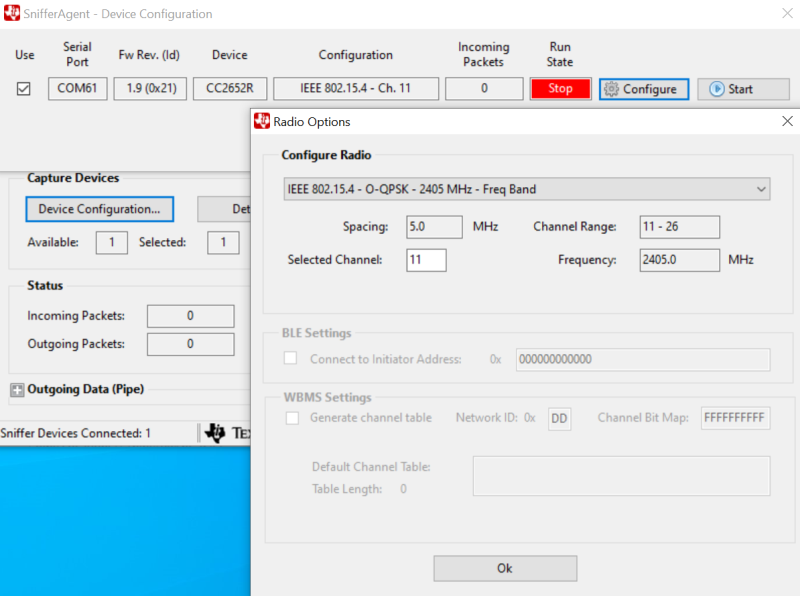
Fig. 3 Device Configuration
- For BLE protocol see also the section Configuration for Bluetooth Low Energy.
- For WBMS protocol see also the section Configuration for Wireless BMS (WBMS) protocol.
Press Start All. The incoming data indicator becomes green and the outgoing data indicator becomes blue. The program icon is blue.
Create a new Wireshark desktop shortcut. Then modify the Target setting of the new shortcut: Add
-i\\.\pipe\tiwspc_data -kto the end as shown in Fig. 4.Example target entry:
C:\<path>\wireshark.exe" -i\\.\pipe\tiwspc_data -k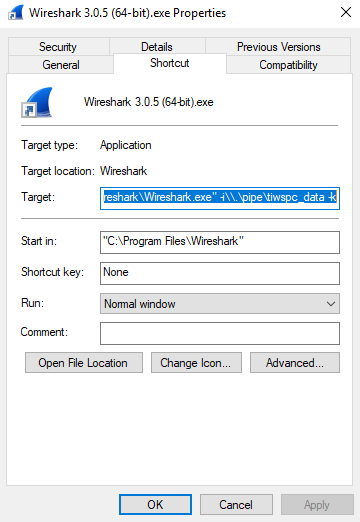
Fig. 4 Shortcut Properties
Run Wireshark from the new shortcut.
Wireshark now shows the captured data and the Sniffer Agent icon turns green. The Sniffer Agent encapsulates all packets in UDP/IP and the packets sent to UDP port 17760 indicate TI RPI (Radio Packet Info) packets.
Configuration for Bluetooth Low Energy
For BLE, the advertising channel (37, 38 or 39) must be selected.
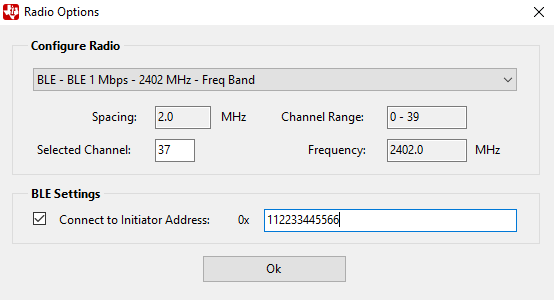
Fig. 5 BLE Configuration
The capture device can be configured to follow a data connection between a specific Bluetooth Low Energy Master (Initiator) and Slave device. In the ‘Radio Options’ dialog and under ‘BLE Settings’, click the checkbox next to ‘Connect to Initiator Address’ and write the address of the Initiator (Master) device. If this option is not selected, the capture device will start to follow the first data connection that appears on the selected advertising channel.
Decryption of encrypted data is not supported. The BLE sniffer will not update the connection parameters if a connection parameter update request (or similar requests) is sent over an encrypted connection. As a consequence, the sniffer will either disconnect or loose packets.
Configuration for Wireless BMS (WBMS) protocol
For WBMS, channel 37 must be selected. This is also the only available channel in the GUI. The sniffer will start listen at the three configuration channels, 37, 38 and 39 in sequence. In this mode the sniffer will listen for scan and pairing packets. From the received configuration packets it will determine network parameters and the time to switch to connected mode and start listening on data channels. Therefore, the sniffer must be started before the network devices in order to determine correct network parameters and be able to follow data traffic later.
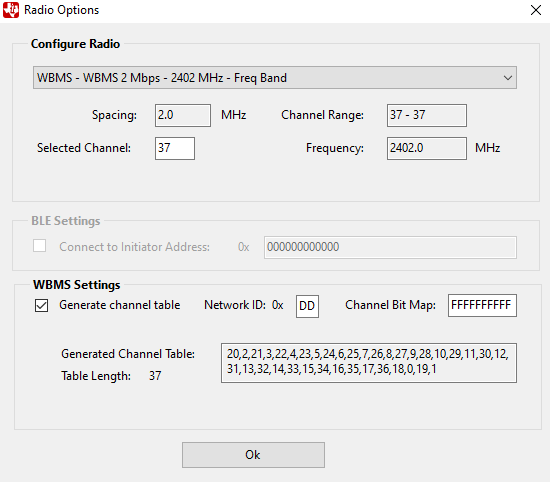
Fig. 6 WBMS Configuration
- If security is enabled in the WBMS network, the packet sniffer will not be able to determine the channel hopping table from received packets because this information is encrypted. In order to generate the correct channel table check the checkbox ‘Generate channel table’ and enter the Channel Bit Map and the Network ID to be used in the network. The Channel Bit Map determines the deny list of channels from 0-39, where a 1 means the channel is enabled and a 0 that the channel is disabled. After changing either the Channel Bit Map or the Network Id values, press Enter and the Sniffer Agent will generate the correct channel table. The generated channel table will be used for the channel hopping pattern when the network is in connected state.
- If security is not enabled, or the default channel table will be used, the checkbox ‘Generate channel table’ can be left unchecked.
Wireshark Dissector Setup
1. Open Wireshark and verify that the plugins are installed. Go to Help->About Wireshark and click the Plugins tab. The dissector plugin files
- ti802154ge-x(86/64)-2x.dll,
- tirpi-x(86/64)-2x.dll and
- ti-ble-packet-info-x(86/64)-2x.dll
shall all be listed as shown in Fig. 7.
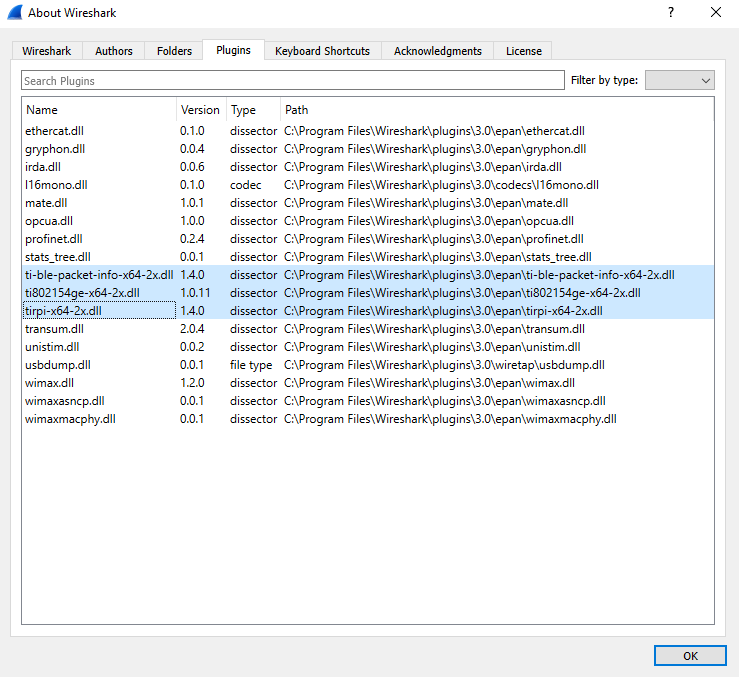
Fig. 7 Wireshark Plugins
Note
If the three TI dissector plugins (ti802154ge-x(86/64)-2x.dll, tirpi-x(86/64)-2x.dll and ti-ble-packet-info-(x86/64)-2x.dll) are not shown , try one of the following:
- verify that Wireshark are installed at default location and then run the SmartRF Packet Sniffer 2 installer again, or
- copy the plugin files manually from SmartRF Packet Sniffer 2 install location (
<install_dir>\wireshark\plugins\3.0.x) to Wireshark plugins folder (<wireshark_install_dir>\plugins\3.0\epan). Use the x86 version of plugins if you have a 32 bits installation of Wireshark or the x64 if you have a 64 bits version of Wireshark installed.
TI IEEE 802.15.4ge dissector
If you are using IEEE 802.15.4ge at sub-1 GHz frequency the TI IEEE 802.15.4ge dissector will be used. The following section describe how to configure the dissector for decrypting encrypted SimpleLink 15.4 data packets.
Decrypting SimpleLink 15.4 Data Packets using Security Key
SimpleLink 15.4 data packets can be decrypted using a ‘Decryption key’ (this key is often hardcoded in the firmware).
To add the decryption key:
- In Wireshark, go to Edit->Preferences.
- On the left hand column, expand the Protocols section and search for “TI 802.15.4GE”.
- Add the Decryption Key in the format:
12:34:56:78:9A:BC:DE:F0:00:00:00:00:00:00:00:00
(this is the default decryption key that comes with the Simplelink 15.4 examples).
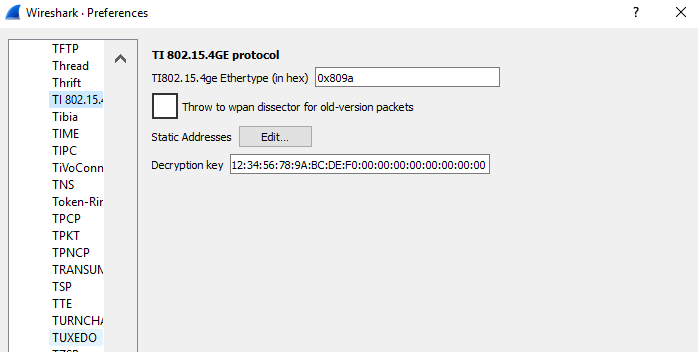
Fig. 8 Decryption key
In addition to setting this decryption key, you need to do one of the following in order to successfully decrypt SimpleLink 15.4 packets from a device:
- Capture the device’s association in Wireshark (this will capture and store the device’s Extended Address which is needed for decryption), or
- Enter the device’s short address, PAN ID and IEEE Address in Static Addresses:
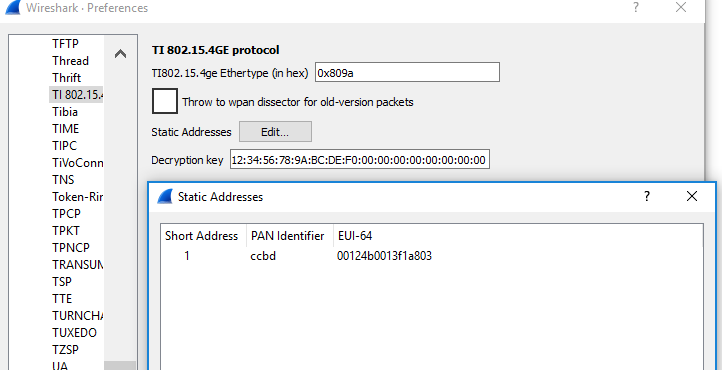
Fig. 9 Static address configuration
IEEE 802.15.4 dissector
If you are using IEEE 802.15.4 at 2.4 GHz frequency the built-in IEEE 802.15.4 dissector in Wireshark will be used.
To configure the built-in IEEE 802.15.4 dissector navigate to Edit ->Preference in Wireshark. The expand Protocols and select IEEE 802.15.4. Make sure that TI CC24xx FCS format is left unchecked. If you use secured packets, add a decryption key and static address pairings (for pairing short address and PAN-ID with long addresses for decryption)
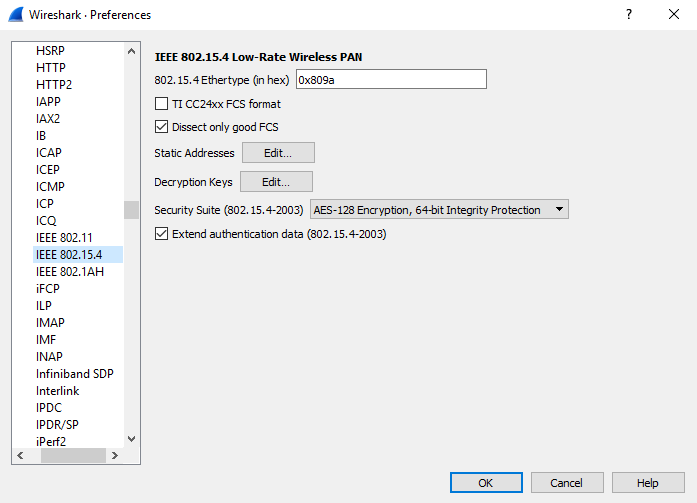
Fig. 10 IEEE 802.15.4 dissector
Bluetooth Low Energy dissector
For Bluetooth Low Energy the built-in Bluetooth LE dissector in Wireshark will be used. No configuration is required for this dissector.
WBMS dissector
For WBMS protocol a LUA script dissector located in the personal plugin folder will be used. No configuration is required for this dissector.
Wireshark Usage
Wireshark Packet Display
Fig. 11 below shows the packet display in Wireshark. In this case a ZigBee data packet is displayed. Each packet sent from the SmartRF Sniffer Agent to Wireshark is encapsulated in a UDP/IP packet. The UDP/IP packet info can be ignored. The IEEE 802.15.4 packet is encapsulated in TI Radio Packet Info which displays meta information about each packet:
- Interface type and ID the packet was captured from
- Frequency
- Channel (depending on protocol)
- PHY description
- Signal Strength of the packet (RSSI value in dBm)
- Frame Check (CRC) status
The packet information can be expanded to see more information on each layer.
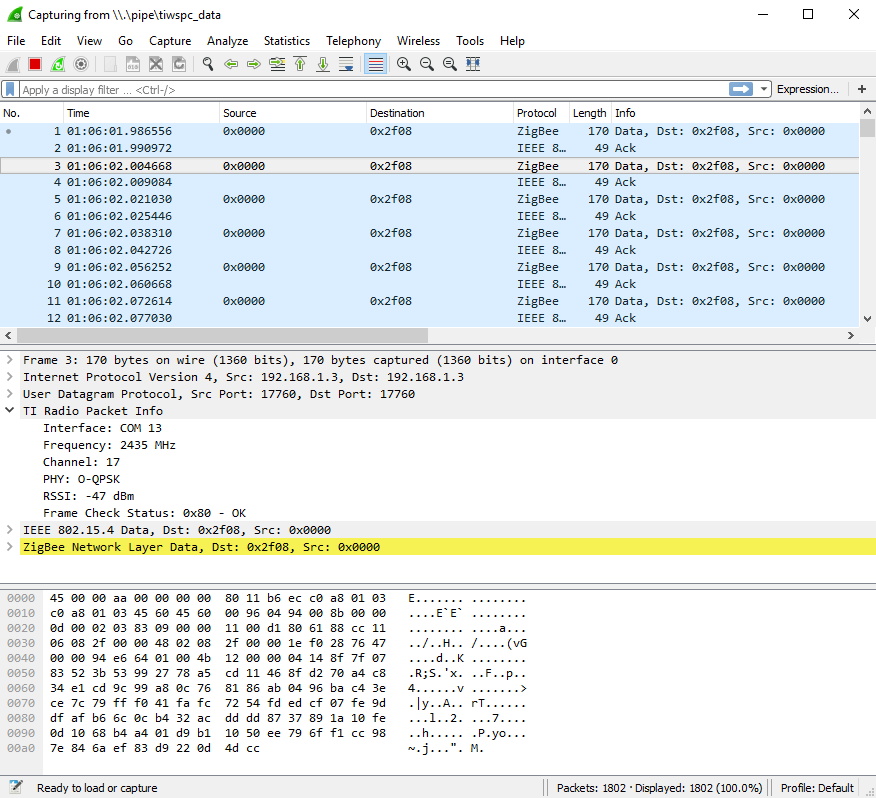
Fig. 11 Wireshark Packet Display
Packet Filter
In Wireshark you can filter the packet display on a certain packet attribute.
- Right click on the selected packet attribute.
- Choose Apply as Filter, and then Selected as shown in Fig. 12.
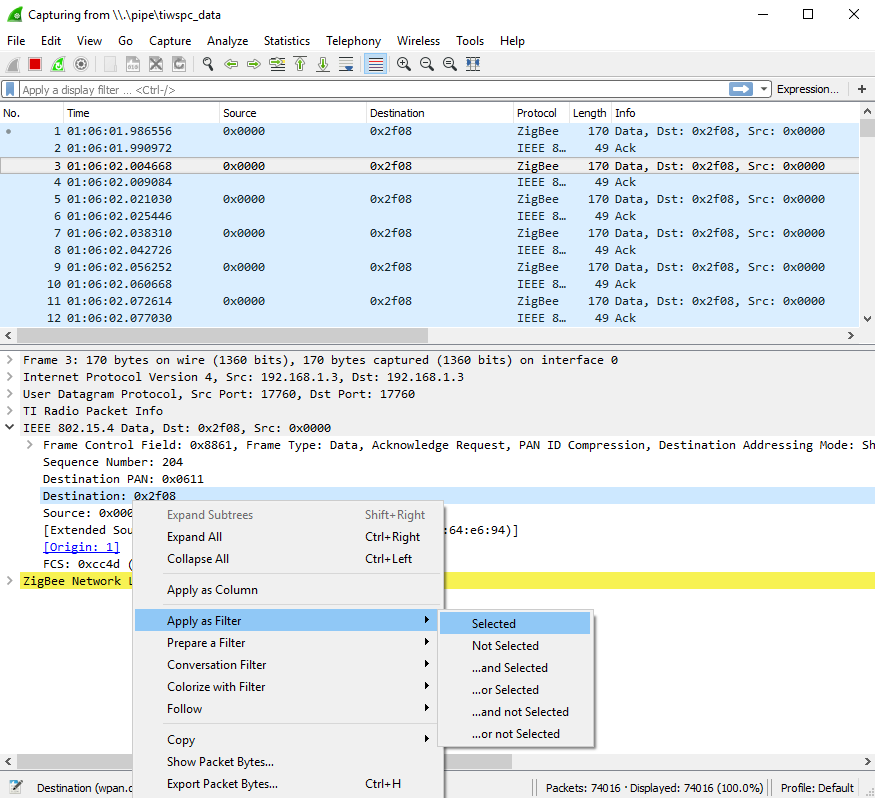
Fig. 12 Packet Filter Selection
You can also edit the filter text box above the packet display as shown in Fig. 13.
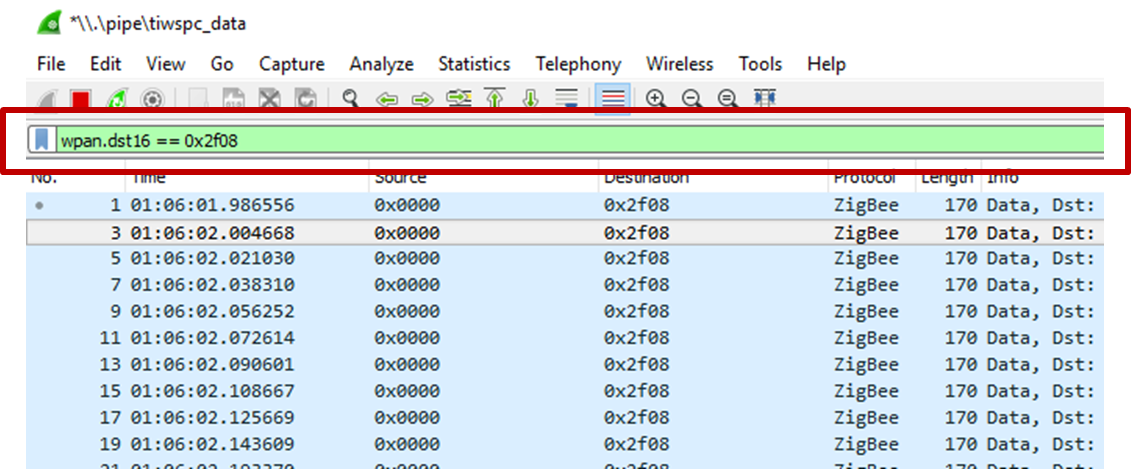
Fig. 13 Filter Textbox
The attribute name of any field in a packet and the description of the attribute can be seen at the bottom of the screen below the raw packet data viewer as shown in Fig. 14.

Fig. 14 Get Attribute Name
Troubleshooting
SmartRF Sniffer Agent Troubleshooting
- If SmartRF Sniffer Agent does not detect any sniffer devices, make sure the connected sniffer hardware is programmed with one of sniffer firmware images and connected to the PC with a USB cable.
- If a Data Buffer Overflow occurs the SmartRF Sniffer Agent program cannot get data fast enough from the device. Try any or all of the following: Reduce CPU load, network traffic and disk load from other programs on the host PC, or reduce the number of capture devices.
- If Wireshark reports corrupted memory or throws an assertion and exists this is a Wireshark issue. The SmartRF Sniffer Agent can deliver more messages in short period of time than Wireshark can handle. Try to reduce the number of sniffer devices to reduce the data flow to Wireshark. Alternatively, configure the SmartRF Sniffer Agent packet limit option for the selected data output method. When this limit is reached, SmartRF Sniffer Agent automatically stops the data capture.
Wireshark Dissector Troubleshooting
- If Wireshark shows the error in Fig. 15 during startup, the 64-bits plugin is installed but you use 32-bits Wireshark. Repeat the instructions in the section ‘Wireshark Dissector Setup’.
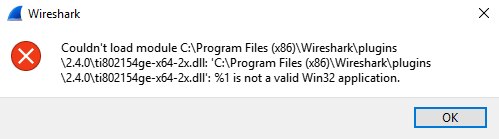
Fig. 15 Wireshark Plugin Error
- If there are errors when Wireshark is opened, for example an error similar to shown in Fig. 16, this may indicate that the installed plugins is for an incompatible version of Wireshark. Check Wireshark version under Help -> About Wireshark and verify that the version number is correct. The dissector plugins are not backwards compatible.
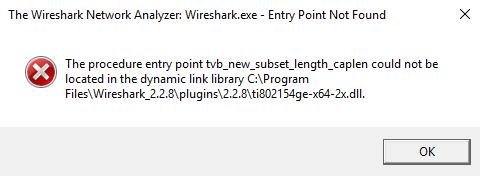
Fig. 16 Wireshark Startup Error