Ethernet Firmware is integrated part of vision_apps and enabled by default. This stack is TI RTOS based application for configuration of Ethernet switch and is expected to be hosted on Cortex R5F in Main Domain.
The switch software uses PDK Enet and other drivers for respective IP configuration. The software stack contains remote configuration server, resource management library, switch resident protocols, proxy layers to handle local and remote API calls and demonstration applications (EthFw Demos).
Below are some top-level features demonstarted in EthFw:
- Basic L2 switching
- Send/receive packets over TCP/UDP
- TCP iperf performance testing
- Support for remote cores (Linux, QNX)
- Time-synchronisation using gPTP
Hardware Setup
The below are required to run EthFw
- J7ES/J7AHP EVM
- GESI daughter card (needed for J7ES)
- QPENET (i.e. QSGMII) daughter card (needed for J7ES/J7AHP)
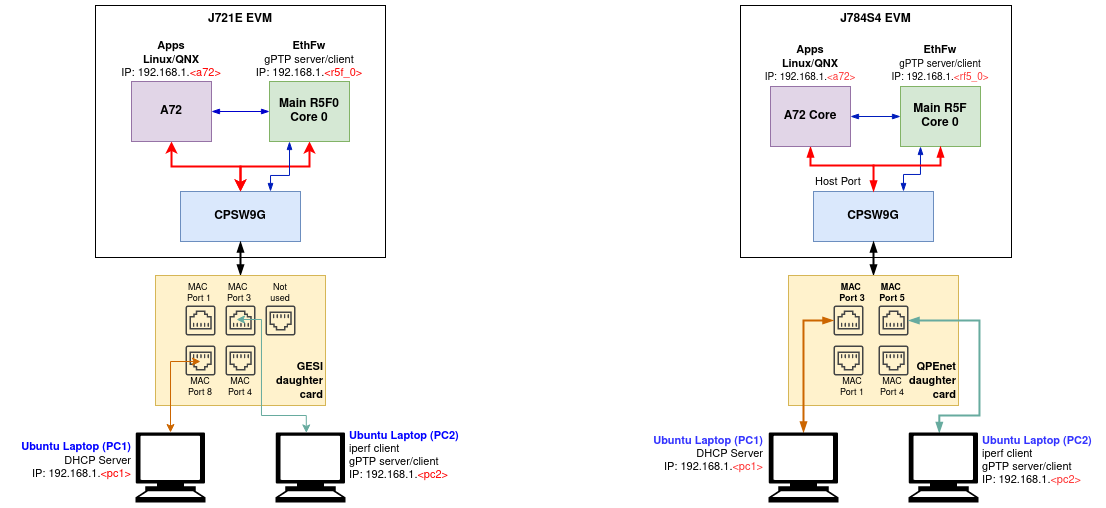
- Two PCs running Ubuntu connected to the GESI board (for J7ES) in order to demonstrate the L2 switching capabilities as well as to generate and monitor Ethernet traffic
- A pair of network cables, connected as shown in the setup diagram above (for J7ES)
- One cable connected to port8 (switch port) on the GESI card and other end connected to Linux machine (i.e. the DHCP server)
- Second cable connected to port3 (switch port) on the GESI card and other end connected to client machine
- UART cable connected to main UART port on the J7ES EVM
- 12V power supply for the EVM
- SD card
Software Setup
- Install and run a DHCP server on PC1 Ubuntu 22.04 machine by following the instructions here https://help.ubuntu.com/community/isc-dhcp-server This machine will provide IP to R5F (Main MCU2_0), A72 and any client connected via switch port of GESI/QSGMII card.
- iperf network performance tool is required on either PC1 or PC2. Install iperf in the selected Ubuntu PC(s):
sudo apt-get install iperf
- packETH tool is required only in PC1. Install packETH generator tool on Linux PC. The Ubuntu installation can be found in their website: https://packeth.sourceforge.net/packeth/Installation.html The packEth configurations used in this demo are included in the Ethernet Firmware package at <ETHFW_PATH>/docs/packeth_configurations/
Note: Please check licensing information and terms of usage of packETH tool and make sure it adheres to your organization's policy before using and configuring it.
- Wireshark packet analyser tool is required in both PC1 and PC2. Refer to the Wireshark installation instructions on Ubuntu in this website: https://linuxhint.com/install_wireshark_ubuntu/
- For testing gPTP time synchronisation we need to install ptp4l tool on PC2 which is connected to MAC port by following the instructions here https://tsn.readthedocs.io/timesync.html, we can configure PC2 to run either as master or slave by editing the config file.
Note: From 9.1 SDK any MAC port from gEthAppSwitchPorts supports gPTP, please connect to these MAC ports to avoid missing timestamps warnings.
static Enet_MacPort gEthAppSwitchPorts[]=
{
#if defined(SOC_J721E)
ENET_MAC_PORT_3,
ENET_MAC_PORT_8,
#if defined(ENABLE_QSGMII_PORTS)
ENET_MAC_PORT_2,
ENET_MAC_PORT_5,
#endif
#endif
#if defined(SOC_J784S4)
ENET_MAC_PORT_3,
ENET_MAC_PORT_5,
#endif
};
Running the demo (Linux + RTOS) or (QNX + RTOS)
- Build the application and related libraries as mentioned in Build Instructions
- After flashing binaries on SD card using
make linux_fs_install_sd insert in the SD card slot in the EVM
- Open UART client like minicom on /dev/ttyUSB0 (instance 0) where Linux logs usually appear.
- Power on the EVM and let the OS come up.
- Login with root and navigate to /opt/vision_apps on linux and /ti_fs/vision_apps on QNX, run the ./vision_apps_init.sh script.
- Upon sucessfull completion you should see EthFw initialization logs, gPTP initialization logs and version as given below.
j7-evm login: root
Last login: Mon Nov 29 14:43:33 UTC 2021
root@j7-evm:~# source /opt/vision_apps/vision_apps_init.sh
...
...
[MCU2_0] 17.235797 s: ETHFW: Init ... !!!
[MCU2_0] 13.992135 s: Warning: Using 6 MAC address(es) from static pool
[MCU2_0] 13.992450 s: ETHFW: Shared multicasts (software fanout):
[MCU2_0] 13.992492 s: 01:00:5e:00:00:01
[MCU2_0] 13.992538 s: 01:00:5e:00:00:fb
[MCU2_0] 13.992570 s: 01:00:5e:00:00:fc
[MCU2_0] 13.992597 s: 33:33:00:00:00:01
[MCU2_0] 13.992620 s: 33:33:ff:1d:92:c2
[MCU2_0] 13.992643 s: 01:80:c2:00:00:00
[MCU2_0] 13.992667 s: 01:80:c2:00:00:03
[MCU2_0] 13.992691 s: ETHFW: Reserved multicasts:
[MCU2_0] 13.992714 s: 01:80:c2:00:00:0e
[MCU2_0] 13.992737 s: 01:1b:19:00:00:00
[MCU2_0] 13.992951 s: EnetMcm: CPSW_9G on MAIN NAVSS
[MCU2_0] 14.000069 s: Mdio_open: MDIO manual mode enabled
[MCU2_0] 14.002454 s: PHY 0 is alive
[MCU2_0] 14.002749 s: PHY 3 is alive
[MCU2_0] 14.003372 s: PHY 12 is alive
[MCU2_0] 14.003615 s: PHY 15 is alive
[MCU2_0] 14.003714 s: PHY 16 is alive
[MCU2_0] 14.003813 s: PHY 17 is alive
[MCU2_0] 14.003911 s: PHY 18 is alive
[MCU2_0] 14.004006 s: PHY 19 is alive
[MCU2_0] 14.004295 s: PHY 23 is alive
[MCU2_0] 14.005237 s: EnetPhy_bindDriver: PHY 12: OUI:080028 Model:23 Ver:01 <-> 'dp83867' : OK
[MCU2_0] 14.005741 s: EnetPhy_bindDriver: PHY 0: OUI:080028 Model:23 Ver:01 <-> 'dp83867' : OK
[MCU2_0] 14.006221 s: EnetPhy_bindDriver: PHY 3: OUI:080028 Model:23 Ver:01 <-> 'dp83867' : OK
[MCU2_0] 14.006714 s: EnetPhy_bindDriver: PHY 15: OUI:080028 Model:23 Ver:01 <-> 'dp83867' : OK
[MCU2_0] 14.007208 s: EnetPhy_bindDriver: PHY 16: OUI:0001c1 Model:27 Ver:00 <-> 'vsc8514' : OK
[MCU2_0] 14.007710 s: EnetPhy_bindDriver: PHY 17: OUI:0001c1 Model:27 Ver:00 <-> 'vsc8514' : OK
[MCU2_0] 14.008201 s: EnetPhy_bindDriver: PHY 18: OUI:0001c1 Model:27 Ver:00 <-> 'vsc8514' : OK
[MCU2_0] 14.008708 s: EnetPhy_bindDriver: PHY 19: OUI:0001c1 Model:27 Ver:00 <-> 'vsc8514' : OK
[MCU2_0] 14.010550 s:
[MCU2_0] ETHFW Version : 0.04.00
[MCU2_0] 17.138849 s: ETHFW Build Date: Mar 25, 2024
[MCU2_0] 17.138868 s: ETHFW Build Time: 12:41:21
[MCU2_0] 17.138886 s: ETHFW Commit SHA: 089d6723
[MCU2_0] 17.138921 s: ETHFW: Init ... DONE !!!
[MCU2_0] 17.139118 s: unibase-1.1.5-jacinto
[MCU2_0] 17.139596 s: Starting lwIP, local interface IP is dhcp-enabled
[MCU2_0] 17.145179 s: ETHFW: Host MAC address: 70:54:f4:f2:cc:8e
[MCU2_0] 17.146387 s: ETHFW: ETHFW: Enable gPTP on MAC port 3 (tilld3)
[MCU2_0] 17.146424 s: ETHFW: ETHFW: Enable gPTP on MAC port 5 (tilld5)
[MCU2_0] 17.147229 s: [LWIPIF_LWIP] Enet LLD netif initialized successfully
[MCU2_0] 17.147283 s: Added interface 'ti0', IP is 0.0.0.0
[MCU2_0] 17.207305 s: ETHFW: EthFwTsn_gptpYangConfig:domain=0
[MCU2_0] 17.225564 s: ETHFW: ETHFW: TimeSync PTP enabled
[MCU2_0] 17.225591 s: ETHFW: Remove server Init ... !!!
[MCU2_0] 17.225888 s: ETHFW: Virtual port configuration:
[MCU2_0] 17.226416 s: ETHFW: CpswProxyServer: initialization completed (core: mcu2_0)
[MCU2_0] 17.226452 s: ETHFW: Remove server Init ... DONE !!!
[MCU2_0] 17.259211 s: INF:cbase:tilld3: has mac: 70:54:F4:F2:CC:8E
[MCU2_0] INF:cbase:tilld5: has mac: 70:54:F4:F2:CC:8E
[MCU2_0] INF:cbase:cb_lld_task_create: Uniconf Task stack_size=16384
[MCU2_0] INF:cbase:cb_rawsock_open:combase-1.1.4-jacinto
[MCU2_0] INF:cbase:cb_rawsock_open:dmaTxChId=-1 numRxChannel
[MCU2_0] 17.259329 s: =0 dmaRxChId=-1 nTxPkts=0 nRxPkts=0 pktSize=0
[MCU2_0] INF:cbase:cb_lld_task_create: uniconf_hwal_thread stack_size=16384
[MCU2_0] INF:cbase:cb_lld_task_create: gPTP Task stack_size=16384
[MCU2_0] INF:gptp:gptpman_run:max_domains=1, max_ports=2
[MCU2_0] INF:cbase:cb_rawsock_open:comba
[MCU2_0] 17.259432 s: e-1.1.4-jacinto
[MCU2_0] INF:cbase:cb_rawsock_open:dmaTxChId=-1 numRxChannels=0 dmaRxChId=-1 nTxPkts=0 nRxPkts=0 pktSize=0
[MCU2_0] INF:cbase:DmaOpen: TxChNum -1
[MCU2_0] INF:cbase:DmaOpen: Rx startIdx 114 flowId 6
[MCU2_0] INF:cbase:LLDEnetFilter:destmac:01:80:C2:00:00:0E, vlanId:0,
[MCU2_0] 17.259525 s: thType:0x88f7
[MCU2_0] INF:gptp:dev:tilld3 open success
[MCU2_0] INF:gptp:dev:tilld5 open success
[MCU2_0] INF:gptp:gptpnet_init:Open lldtsync OK!
[MCU2_0] INF:gptp:IEEE1588-2019 performance monitoring disabled.
[MCU2_0] INF:gptp:onenet_activate:tilld3 status=0, duplex=1, speed=0Mbps
[MCU2_0] INF:gptp:
[MCU2_0] 17.259610 s: nenet_activate:tilld5 status=0, duplex=1, speed=0Mbps
[MCU2_0] INF:ubase:GPTP_MEDIUM_ALLOC: fragsize=16 fragused/fragnum=835/1426 (58
[MCU2_0] INF:ubase:GPTP_SMALL_ALLOC: fragsize=4 fragused/fragnum=19/97 (19
[MCU2_0] INF:ubase:SM_DATA_INST: fragsize=8 fragused/fragnum=20
[MCU2_0] 17.259682 s: 2/3806 (52
[MCU2_0] INF:gptp:gptpman_run:GPTPNET_INTERVAL_TIMEOUT_NSEC=125000000
...
15.010696 s: INF:cbase:cb_rawsock_open:dmaTxChId=-1 dmaRxChId=-1 nTxPkts=0 nRxPkts=0 pktSize=0
[MCU2_0] INF:gptp:gptpnet_init:Open lldtsync OK!
[MCU2_0] INF:gptp:000009-625285:domainIndex=0, GM changed old=00:00:00:00:00:00:00:00, new=70:FF:76:FF:FE:1D:92:C3
[MCU2_0] INF:gptp:set_phase_offsetGM:domainNumber=0, New adjustment(New GM?)
[MCU2_0] domain=0, offset=0nsec, hw-adjrate=0ppb
[MCU2_0] gmsync=true, last_setts64=0nsec
- You should also see the IP addresses assigned to the R5F and A72 cores as shown below. Note that 'br4' IP is the IP address of the R5F core. The addresses shown in your logs may be different.
[MCU2_0] SNo. IP Address MAC Address
[MCU2_0] 20.599222 s: ------ ------------- -----------------
[MCU2_0] 20.599257 s: 1 10.24.69.43 70:ff:76:1d:92:c2
[MCU2_0] 20.601977 s: Function:CpswProxyServer_filterAddMacHandlerCb,HostId:0,Handle:a3ac1584,CoreKey:38acb7e6, MacAddress:1:0:5e:0:0:fc, vlanId:0, FlowIdx:173, FlowIdOffset:1
[MCU2_0] 20.603914 s: Function:CpswProxyServer_filterAddMacHandlerCb,HostId:0,Handle:a3ac1584,CoreKey:38acb7e6, MacAddress:1:0:5e:0:0:fb, vlanId:0, FlowIdx:173, FlowIdOffset:1
[MCU2_0] 22.010826 s: Added interface 'br4', IP is 10.24.68.137
[MCU2_0] 25.010796 s: domain=0, offset=0nsec, hw-adjrate=0ppb
[MCU2_0] gmsync=true, last_setts64=0nsec
Please refer ETHFW demo userguide for more details.
ping test
Once the EVM is booted along with Linux on A72, the virtual net driver module should be loaded and the eth1 network device corresponding to CPSW9G should be added.
- Verify this by running ifconfig -a on Linux terminal console of the EVM.
- Activate network interface on A72 core as follows:
- At this point, data transfer with other devices connected to the network should be possible. Ping the two PCs connected to the switch:
ping 10.24.69.<pc1>
ping 10.24.69.<pc2>
- Similarly, ping the A72 core from either PC connected to the switch:
TCP iperf test
The CPSW switch is capable of steering network traffic without CPU intervention by classifying it based on its characteristics. This can be demonstrated by running iperf server on Linux running on the A72 core and iperf client on any of the external devices, PC 1 or PC 2.
- Start iperf server on Linux running on A72.
- Run iperf client on the selected PC. Set test duration with -t option as needed.
iperf -c 10.24.69.<a72> -t 20 -i 1
Refer ETHFW userguide documentation for more details
gPTP logs for master and slave
After installing ptp4l on PC2, create a ptp config file (ptp_config.cfg) for setting different ptp params while testing gPTP. The contents of the file can be as follows:
[global]
gmCapable 1
priority1 238
priority2 248
logAnnounceInterval 0
logSyncInterval -3
syncReceiptTimeout 3
neighborPropDelayThresh 800
min_neighbor_prop_delay -20000000
assume_two_step 1
path_trace_enabled 1
follow_up_info 1
transportSpecific 0x1
ptp_dst_mac 01:80:C2:00:00:0E
network_transport L2
delay_mechanism P2P
By changing priority1 to 220 or 255 you can force your PC2 to run either as master or slave. Run the following command on PC2 for starting ptp4l:
sudo ptp4l -i <net-interface> -m -l 6 -q -f ~/ptp_config.cfg
If your EVM is running as master, the logs are as follows:
[MCU2_0] 45.213639 s: domain=0, offset=0nsec, hw-adjrate=0ppb
[MCU2_0] gmsync=true, last_setts64=0nsec
[MCU2_0] 55.213637 s: domain=0, offset=0nsec, hw-adjrate=0ppb
[MCU2_0] gmsync=true, last_setts64=0nsec
[MCU2_0] 65.213641 s: domain=0, offset=0nsec, hw-adjrate=0ppb
[MCU2_0] gmsync=true, last_setts64=0nsec
[MCU2_0] 75.213786 s: domain=0, offset=0nsec, hw-adjrate=0ppb
[MCU2_0] gmsync=true, last_setts64=0nsec
If your EVM is running as slave, your logs are as follows:
[MCU2_0] 39.115644 s: IFV:gptp:domainNumber=0, clock_master_sync_receive:the master clock rate to -4571ppb, GMdiff=239nsec
[MCU2_0] 40.115645 s: IFV:gptp:domainNumber=0, clock_master_sync_receive:the master clock rate to -4471ppb, GMdiff=620nsec
[MCU2_0] 41.115647 s: IFV:gptp:domainNumber=0, clock_master_sync_receive:the master clock rate to -4333ppb, GMdiff=1001nsec
[MCU2_0] 42.115646 s: IFV:gptp:domainNumber=0, clock_master_sync_receive:the master clock rate to -4159ppb, GMdiff=1372nsec
[MCU2_0] 43.115642 s: IFV:gptp:domainNumber=0, clock_master_sync_receive:the master clock rate to -3948ppb, GMdiff=1746nsec
[MCU2_0] 44.115646 s: IFV:gptp:domainNumber=0, clock_master_sync_receive:the master clock rate to -3737ppb, GMdiff=1930nsec
[MCU2_0] 45.115642 s: IFV:gptp:domainNumber=0, clock_master_sync_receive:the master clock rate to -3489ppb, GMdiff=2210nsec
[MCU2_0] domain=0, offset=0nsec, hw-adjrate=-3489ppb
[MCU2_0] gmsync=true, last_setts64=0nsec
[MCU2_0] 46.115644 s: IFV:gptp:domainNumber=0, clock_master_sync_receive:the master clock rate to -3252ppb, GMdiff=2296nsec
[MCU2_0] 47.115647 s: IFV:gptp:domainNumber=0, clock_master_sync_receive:the master clock rate to -3023ppb, GMdiff=2293nsec
[MCU2_0] 48.115642 s: IFV:gptp:domainNumber=0, clock_master_sync_receive:the master clock rate to -2797ppb, GMdiff=2275nsec
[MCU2_0] 49.115648 s: IFV:gptp:domainNumber=0, clock_master_sync_receive:the master clock rate to -2623ppb, GMdiff=2008nsec
[MCU2_0] 50.115641 s: IFV:gptp:domainNumber=0, clock_master_sync_receive:the master clock rate to -2455ppb, GMdiff=1846nsec
[MCU2_0] 51.115647 s: IFV:gptp:domainNumber=0, clock_master_sync_receive:the master clock rate to -2319ppb, GMdiff=1601nsec
[MCU2_0] 52.115643 s: IFV:gptp:domainNumber=0, clock_master_sync_receive:the master clock rate to -2210ppb, GMdiff=1348nsec
[MCU2_0] 53.115645 s: IFV:gptp:domainNumber=0, clock_master_sync_receive:the master clock rate to -2158ppb, GMdiff=930nsec
[MCU2_0] 54.115638 s: IFV:gptp:domainNumber=0, clock_master_sync_receive:the master clock rate to -2124ppb, GMdiff=630nsec
[MCU2_0] 55.115649 s: domain=0, offset=0nsec, hw-adjrate=-2124ppb
[MCU2_0] gmsync=true, last_setts64=0nsec
gPTP in ETHFW supports different log levels from information to debug, to limit the amount of ETHFW traces. However, user may want to see accuracy of the synchronization achieved on the slave device. Thi requires a change in logging level in ETHFW library, from from gptp:45 to gptp:55 in ethfw_tsn.c file as shown in the snippet:
static void EthFw_tsnInit(void)
{
unibase_init_para_t params;
...
/*refer to 'ub_logging.h for logging levels*/
ubb_default_initpara(¶ms);
params.ub_log_initstr = "4,ubase:45,cbase:45,uconf:45,gptp:45";
...
unibase_init(¶ms);
...
}
Please refer ETHFW demo/userguide for more details.
Enhanced Schedule Traffic(EST) demo support
This demo application demonstrates how to configure the 802.1 Qbv (EST) through the TSN yang interface.
Note: This demo is supported on MAC port 3 only for all the boards (J721E, J784S4), whose interface name is tilld3
- This application can only run as either listener or talker, where talker will be sending out AVTP packets based on the configured EST schedule and listener recieves those packets and validates if the packect has been recieved in the expected time interval. Out-of-box this demo supports 2 streams of traffic on talker side with traffic priorities 0 and 2 mapped to HW queue 0 and 2 respectively.
Configuration parameters
This demo uses EthFwEstDemoTestParam in ethfw_estdemo.c file structure which is populated by user as a static configuration.This structure contains all the params required for setting up EST, once the user fills the required configuration needed, this gets passed to the TSN stack for enabling and scheduling EST. In the demo application provided out-of-box, following are the config params for EST:
static EthFwEstDemoTestParam gEthFwEstDemoTestLists[] =
{
{
.list =
{
.baseTime = 0ULL,
.cycleTime = 4*MIN_INTERVAL_NS,
.gateCmdList =
{
{ .gateStateMask = ENET_TAS_GATE_MASK(1, 0, 0, 0, 0, 0, 0, 1),
.timeInterval = MIN_INTERVAL_NS
},
{ .gateStateMask = ENET_TAS_GATE_MASK(1, 0, 0, 0, 0, 1, 0, 0),
.timeInterval = MIN_INTERVAL_NS
},
{ .gateStateMask = ENET_TAS_GATE_MASK(1, 0, 0, 0, 0, 0, 0, 1),
.timeInterval = MIN_INTERVAL_NS
},
{ .gateStateMask = ENET_TAS_GATE_MASK(1, 0, 0, 0, 0, 1, 0, 0),
.timeInterval = MIN_INTERVAL_NS
},
},
.listLength = 4U,
},
.stParam =
{
.streamParams =
{
/* test appliction sends packet with interval 200us */
{.bitRateKbps = CALC_BITRATE_KBPS(AVTP_PKT_PAYLOAD_LEN, 200),
.payloadLen = AVTP_PKT_PAYLOAD_LEN,
.tc = 0U,
.priority = 0U,
},
/* test appliction sends packet with interval 200us */
{.bitRateKbps = CALC_BITRATE_KBPS(AVTP_PKT_PAYLOAD_LEN, 200),
.payloadLen = AVTP_PKT_PAYLOAD_LEN,
.tc = 2U,
.priority = 2U,
},
},
.nStreams = 2U,
}
},
};
The above structure holds the gate command list, interval time, cycle time and base time which are specific to EST configuration. Base time will however be calculated later as future time in multiples of cycle time. Additionally, one can set up the stream params (params per priority channel) with the bitrate (in kbps) where each packet's size is 1200 Bytes. Here 200us denotes the time interval between two consecutive priority packets. User can add/remove priorities from gameCmdList and streamParams based on their requirement. But the seventh priority channel should always be open for gPTP traffic, which is required for keeping listener and talker in sync.
Build EST Demo
Following build flags are defined in <sdk_builder/vision_apps_build_flags.mak>
ETHFW_EST_DEMO_SUPPORT : To enabled EST demo App
Following build flags are defined in <ethfw>/ethfw_build_flags.mak file as:
ETHFW_EST_DEMO_SUPPORT : To enabled EST demo AppETHFW_EST_DEMO_TALKER : To run EST demo app in talker modeETHFW_EST_DEMO_LISTENER : To run demo app in listener mode
One cannot build EST demo app with both listener/talker enabled or disabled. It is necessary to state in which mode you want to run EST.
In a nutshell to run EST demo app, you need to have the following build flags in ethfw_build_flags.mak:
ETHFW_EST_DEMO_SUPPORT: yesETHFW_EST_DEMO_TALKER OR ETHFW_EST_DEMO_LISTENER : yesETHFW_GPTP_SUPPORT: yes
And following build flags in vision_apps_build_flags.mak:
ETHFW_EST_DEMO_SUPPORT: yesETHFW_GPTP_SUPPORT: yes
Note : This demo is supported only is gPTP is enabled in EthFw, so make sure ETHFW_GPTP_SUPPORT is yes
Run EST Demo App
- We need any two EVMs for running this demo (J721E-EVM or J784S4-EVM).
- Build one EVM as talker and one EVM as listener and connect both of them via MAC port 3.
- Once both the boards have been synchronized and in stable state, the talker will start sending packets.
- Once both the boards have been synchronized, listener is ready to recieve packets.
- Listener starts printing the stats everytime it recieves 20000 packets of priority 0 or 2.
EST Logs
Talker:
Waiting for PTP clock to be synchronized!
The following AdminList param will be configured for EST:
GateMask[7..0]=oCCCCCCo (0x81), start=0 ns, end=61999 ns, dur=62000 ns
GateMask[7..0]=oCCCCoCC (0x84), start=62000 ns, end=123999 ns, dur=62000 ns
GateMask[7..0]=oCCCCCCo (0x81), start=124000 ns, end=185999 ns, dur=62000 ns
GateMask[7..0]=oCCCCoCC (0x84), start=186000 ns, end=247999 ns, dur=62000 ns
Base time=24800000000ns,Cycle time=248000ns
Set admin control list succesfully
INF:cbase:TAS state is set to 2
INF:cbase:TAS operational list status updated:
INF:cbase:TAS state is set to 1
INF:cbase:Successfully configure TAS
Talker: starting stream 0 with, payloadLen: 1200, bitrate: 24360 kbps, priority: 0
Talker: starting stream 1 with, payloadLen: 1200, bitrate: 24360 kbps, priority: 2
Talker[0], payloadLen: 1200 bytes, bitRate: 24360 kbps
Talker[1], payloadLen: 1200 bytes, bitRate: 24360 kbps
Start the talker successfully!
INF:cbase:cb_lld_task_create: EthFw EST demo Talker stack_size=16384
INF:cbase:task_fxn:task (EthFw EST demo Task) terminated.
Listener:
TimeSlots of PacketPriority: 0: [0, 62000]ns, [124000, 186000]ns,
TimeSlots of PacketPriority: 2: [62000, 124000]ns, [186000, 248000]ns,
The following AdminList param will be configured for EST:
GateMask[7..0]=oCCCCCCo (0x81), start=0 ns, end=61999 ns, dur=62000 ns
GateMask[7..0]=oCCCCoCC (0x84), start=62000 ns, end=123999 ns, dur=62000 ns
GateMask[7..0]=oCCCCCCo (0x81), start=124000 ns, end=185999 ns, dur=62000 ns
GateMask[7..0]=oCCCCoCC (0x84), start=186000 ns, end=247999 ns, dur=62000 ns
Base time=24800000000ns,Cycle time=248000ns
Set admin control list succesfully
Create listener task succesfully!
INF:cbase:TAS state is set to 2
INF:cbase:TAS operational list status updated:
INF:cbase:TAS state is set to 1
INF:cbase:Successfully configure TAS
INF:cbase:cb_lld_task_create: EthFw EST demo Listener stack_size=16384
INF:cbase:LLDEnetFilter:destmc:91:E0:F0:00:FE:00, vlanId:110, ethType:0x22f0
INF:cbase:task_fxn:task (EthFw EST demo Task) terminated.
INF:gptp:domainIndex=0, clock_master_sync_receive:stable rate, 15687msec from unstable
PacketPriority[0], frameLength: 1218B, receivedBitrate: 0Kbps
PacketPriority[2], frameLength: 1218B, receivedBitrate: 0Kbps
PacketPriority: 0, nGoodPackets: 20000, nBadPackets: 150, percentage of bad packets: 0%
PacketPriority: 2, nGoodPackets: 19532, nBadPackets: 146, percentage of bad packets: 0%
PacketPriority: 0, nGoodPackets: 20483, nBadPackets: 153, percentage of bad packets: 0%
PacketPriority: 2, nGoodPackets: 20000, nBadPackets: 153, percentage of bad packets: 0%
PacketPriority: 0, nGoodPackets: 40000, nBadPackets: 301, percentage of bad packets: 0%
PacketPriority: 2, nGoodPackets: 39013, nBadPackets: 291, percentage of bad packets: 0%
PacketPriority: 0, nGoodPackets: 41009, nBadPackets: 310, percentage of bad packets: 0%
PacketPriority: 2, nGoodPackets: 40000, nBadPackets: 301, percentage of bad packets: 0%
PacketPriority[0], frameLength: 1218B, receivedBitrate: 20498Kbps
PacketPriority[2], frameLength: 1218B, receivedBitrate: 19990Kbps
Both the listener and talker logs print the EST schedule which has been configured on each side along with admin base time and cycle time. Talker prints the streams which are sending the traffic long with the size and bit rate of the packets which can be cross-checked on the listener side later. Whereas on the listener side same info as on talker side is printed along with the number of good packets, bad packets and the percentage of bad packets per stream, where good packets are the packets which have been received in the expected time slot and bad ones being the one received out of time slot. High bad packet number will be observed if the listener and talker are not synchronized properly, suggested GMdiff < 1000nsecs. The bitrate of the received traffic stream is printed roughly around every 20 secs.
Please refer ETHFW demo guide for more details
For QNX after running the vision_apps_init.sh script bring up the CPSW ethernet virtual driver as below,
slog2info -c
slog2info -w &
io-pkt-v6-hc -d cpsw9g verbose=0x0
dhclient -nw an0
ifconfig -v
Known Issues
- The GESI card uses the same connector pins as infotainment card so only one of them can be connected
- With EthFw enabled by default, if infotainment board is connected it results in HDMI display corruption. eDP to HDMI adaptors also cannot be used with EthFw enabled. To workaround this issue disable EthFw if required or switch display to eDP.
How to disable ETHFW
- In file vision_apps_build_flags.mak, set BUILD_ENABLE_ETHFW?=no
- Run "make vision_apps_scrub" prior to re-building
- Note: Ethernet Firmware must be disabled in order to use the HDMI display
How to disable gPTP in ETHFW
- In file vision_apps_build_flags.mak, set ETHFW_GPTP_SUPPORT?=no
- Run "make vision_apps_scrub" prior to re-building
- Note: You can't run gPTP if ETHFW is disabled


 1.8.14