About this project
================
The HostTest project provides serial port access to the TI BLE Stack APIs, such as GAP, GATT and ATT, and allows PC software such as `BTool` and `TI BLE Device Monitor` to emulate a BLE device and connect to and browse other BLE devices within range.
Using the project
===================
To use BTool or BLE Device Monitor, a kit must be programmed with this project. You must import the project, build it, and download the stack and app portions to the device.
Additionally, when using CCS with more than one debugger / kit connected, you must manually specify the serial number of the debugger you want to use on a per-project basis.
Import HostTest
---------------------------------
For the CC1350DK/CC2650DK and the CC2650-LAUNCHXL you can find this in the BLE SDK projects in Resource Explorer. Find 'BLE-Stack for SimpleLink wireless MCUs' in Resource Explorer, expand it to find your board, expand this to find `Host Test` and import both `host_test_xxx_app` and `_stack` projects.
[[y! SensorTag
There is no SDK project for the HostTest out of the box for SensorTag. However you can import the project for CC2650-LAUNCHXL and change the board file to SensorTag.
You do this by going to the project options for the App project (right click → Properties), and navigating to Build → ARM Compiler → Advanced Options → Predefined Symbols, finding the entry called `CC2650_LAUNCHXL`, double clicking on it to edit it, and replacing the text with `CC2650STK`.
]]
When the projects are imported, you must build them. Right-click on host_test_xxx_**app** and select Build, then do the same for host_test_xxx_**stack**.
Connect and configure second debugger
---------------------------------
By now you should have already connected the board you want to develop on to your computer via USB and noted the serial port number used by this board.
Now connect the board you want to run HostTest on, and make a note of the `Application/User` COM port (for SensorTag/Launchpad) or the `USB Serial` COM port number (for SmartRF06) exposed by that board.
With several debuggers connected, you will need to manually configure `targetConfigs/CC2650F128.ccxml` of both the HostTestStack and HostTestApp projects to use the serial number of the debugger on the board you will be running HostTest on.
### Find the serial number
The correct debugger type (XDS100v3 for SmartRF06, XDS110 for SensorTag and Launchpad) is selected by default when you import the project. However, you may sometimes have to manually select exactly which debugger out of several connected to your computer should be used.
Follow the steps below, with only one debugger connected, or with knowledge of the serial numbers of the already connected debuggers.
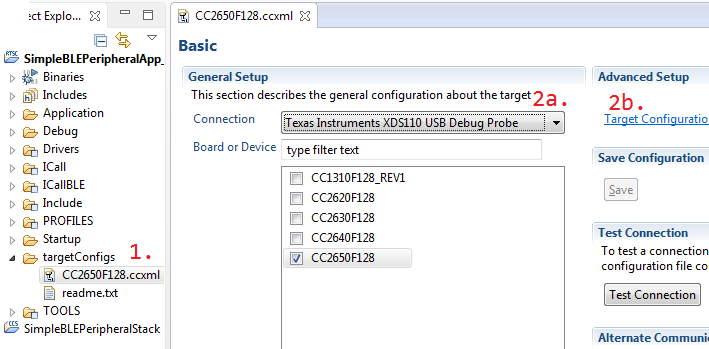
* Open the file `targetConfigs/CC2650F128.ccxml`.
* Change the connection to `XDS110 USB Debug Probe` if needed (for Launchpad and SensorTag), or to `XDS100v3 USB Debug probe` (for SmartRF06).
* Click on `Target Configuration`
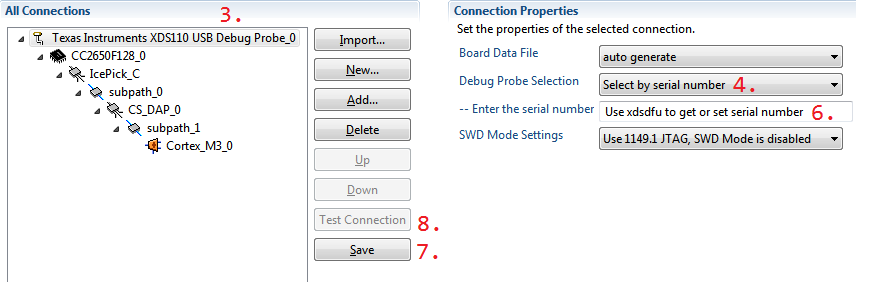
* Click on the top-level node (XDS110/XDS100v3 USB Debug Probe)
* Choose 'Select by serial number'
* Start command prompt and call `c:\ti\ccs\ccs_base\common\uscif\xds110\xdsdfu.exe -e` to enumerate the connected debugger.
[[b XDS100v3 Serial number
These instructions are for the XDS110 debugger. For the XDS100v3 on the SmartRF06 board, find the serial number tool at `c:\ti\ccs\ccs_base\common\uscif\xds100serial.exe`.
]]
<div class="pre-container"><pre><div class="hljs"><span class="hljs-constant">C:\ti>c:\ti\ccs\ccs_base\common\uscif\xds110\xdsdfu.exe -e
USB Device Firmware Upgrade Utility
Copyright (c) 2008-2014 Texas Instruments Incorporated. All rights reserved.
Scanning USB buses for supported XDS110 devices...
<<<< Device 0 >>>>
VID: 0x0451 PID: 0xbef3
Device Name: XDS110 with CMSIS-DAP
Version: 2.2.4.2
Manufacturer: Texas Instruments
<span class="hljs-number">Serial Num: 0000FF01</span>
Mode: Runtime
Found 1 device.
C:\ti>
</span></div></pre>Finding XDS110 serial number</div>
* Insert the serial number. Above it's `0000FF01`.
* Save the settings.
* Test the connection.
* Do this for both the `App` and the `Stack` projects.
Flash the device with HostTest
------------------
Do the following:
1. Compile the `host_test_xx_app` project by right-clicking and selecting `Build project`
2. Do the same for the `_stack` project.
3. Select `host_test_xx_stack` project by left-clicking, and debug by clicking on the green bug icon.
4. Terminate the debug session by clicking the red square icon.
5. Debug the `host_test_xx_app` project (<kbd>F11</kbd>)
6. Terminate the debug session.
You can now use BTool or Device Monitor to connect to the virtual COM port connected to this board.