 |
 |
Installation and Setup for DSP/BIOS 5.41
This version
of DSP/BIOS is delivered as a component of Code
Composer Studio v4 (CCStudio). It is available for Microsoft Windows.
It includes support for all DSP families supported by DSP/BIOS: C28x,
C55x, and C6x.
For the
latest information about what’s new in this
release and any known issues, see the release
notes (which, in turn, has links to other documents).
This document
describes how to perform the following
tasks:
- Installing DSP/BIOS
- Setting System Variables
- Coordinating with CCStudio
- DSP/BIOS Examples
- More Information About DSP/BIOS
Installing DSP/BIOS
DSP/BIOS 5.41 is installed as part of the CCSv4 installation process.
If you ever
need to uninstall
DSP/BIOS, an uninstaller is provided for Windows (Control Panel
->
Add/Remove Programs).
Setting
System Variables
If
you want to build with DSP/BIOS 5.41 outside the CCSv4 environment,
follow these steps:
1. Create the BIOS_INSTALL_DIR system environment variable, and set it to <install_dir>/bios_5_41.
2. Insert the location of the XDCtools 3.15 installation at the beginning of your PATH system environment variable. (Remove any DSP/BIOS or XDCtools locations that were put in for earlier DSP/BIOS or XDCtools installations.) For Windows use back slashes (“\”) and a semicolon (;) between each system environment variable you add to the PATH. For example:
C:\Program Files\Texas Instruments\xdctools_3_15
Coordinating
with CCStudio v4
In order to correctly build DSP/BIOS 5.41 applications, you need to enable DSP/BIOS support when creating a DSP/BIOS project. To watch a demo that creates a CCSv4 project that uses DSP/BIOS, see the Hello World DSP/BIOS 5 demo. See Section 2.1 of the TMS320 DSP/BIOS v5.41 User’s Guide (SPRU423) for descriptions of the steps in this demo. You can perform this demo yourself to test your installation.
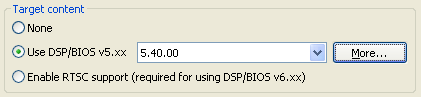
When you are creating a CCSv4 project, the key step is to select the "Use DSP/BIOS v5.xx" option in the Target Content area of the "CCS Project Settings" page.
Converting CCSv3.3 Projects to
CCSv4 Projects
To import a
CCSv3.3 project, choose Project
> Import Legacy CCSv3.3 Project
in CCSv4. Follow the instructions in the import wizard. For more
information about converting CCSv3.3 projects to CCSv4 projects, go to
the Code
Composer Studio Mediawiki and read the "Migration" section of
the page.
If
you are importing a project that uses DSP/BIOS, the import wizard asks
you to select the version of DSP/BIOS you want the imported project to
use. It is recommended that you select DSP/BIOS 5.41. This version of
DSP/BIOS is compatible with previous 5.x versions. If you select a
DSP/BIOS 6.x version, you will need to make changes to your source code
and configuration. If you select a DSP/BIOS version prior to 5.41, you
will not have access to the ROV tool and Real-time Analysis debugging
features.
DSP/BIOS
Examples
You can use
the following sources
for example DSP/BIOS applications:
DSP/BIOS Examples
Some DSP/BIOS examples are now provided through the CCSv4.2 project wizard (Requires CCSv4.2 or higher). For previous CCSv4 (v4.0, v4.0.1, v4.0.2, v4.1, v4.1.1, v4.1.2 or v4.1.3) the source code and configurations are provided with DSP/BIOS in the <install_dir>\packages\ti\bios\examples directory. You can create your own CCSv4 projects and add the example .c and .tcf files. The source code contains comments about each example.
The DSP/BIOS examples come preconfigured for a variety of platforms. If you have a platform that is not included, you should use a text editor to modify the .tcf file for the platform that is most closely related to yours. In particular, you will likely need to modify the platform named in the utils.loadPlatform() statement and the MEM module settings. See the DSP/BIOS Textual Configuration (Tconf) User’s Guide(SPRU007) for more information about platforms and .tcf files
See the release notes for known issues.
To create an example in CCSv4.0 or CCSv4.1 versions follow these steps:
- Create a new CCS project. Open CCSv4 and select File --> New --> CCS project.
- This will start the project wizard. Step through each window pane and answer the questions to create your project for your device.
- In the first pane, give the project a name. For example, hello_example.
- Next, select the project type from the dropdown menu
- Additional project settings pane, for your first project select "next" for this pane.
- CCS project settings pane. Select your device variant. If you do not find your device listed in the drop down menu, you may use the generic device for your target device. For the "Target Content" section on this pane select the radio button to "Use DSP/BIOS v5.xx".
- Click the
"finish" button at the bottom of the window pane.
- An empty project will now show up named "hello_example" under the "C/C++ Projects" tab in CCSv4.
- Right click on the project name and select "Add Files to Project...". Navigate to the <install_dir>\packages\ti\bios\examples and select the example hello.c file to add to your project. Repeat this process and under the examples folder select your device folder and add the hello.tcf file to the project (Additional changes may be needed in the build properties for specific devices, see note in preceding paragraph).
- To build the example, select from the CCS menu Project --> Build Project.
To create an example in CCSv4.2 or higher follow these steps:
- Create a new CCS project. Open CCSv4 and select File --> New --> CCS project.
- This will start the project wizard. Step through each window pane and answer the questions to create your project for your device.
- In the first pane, give the project a name. For example, hello_example.
- Next, select the project type from the dropdown menu
- Additional project settings pane, for your first project select "next" for this pane.
- CCS project settings pane. Select your device variant. If you do not find your device listed in the drop down menu, you may use the generic device for your target device. Select "Next".
- Expand the "+ DSP/BIOS v5.xx Examples" tree. Select the folder for your device and expand. Select the hello Example.
- There
are more examples in
<install_dir>\packages\ti\bios\examples
that are not listed in the
project wizard. It possible to create these other
examples by selecting "Empty Project" at this point and add the .c and
.tcf
files to your project manually via the steps listed above for
CCSv4/CCSv4.1 projects.
- After the example is selected, click the "Finish" pane at the bottom of the pane.
- A project will now show up named "hello_example" under the "C/C++ Projects" tab in CCSv4.
- To build the example, select from the CCS menu Project --> Build Project.
Makefiles for DSP/BIOS Applications
If you do not
use CCStudio
to build your application, you can build from the command line using
gmake and
makefiles.
The best way
to create build files
for your application is to copy and revise the makefile shipped with
this product. The relevant files for the
examples shipped with DSP/BIOS 5.41 are:
- makefile_hello in each example target directory
- config.mak in <install_dir>\packages\ti\bios\examples\
- cNNrules.mak
in <install_dir>\packages\ti\bios\examples\
(NN is the DSP family)
IMPORTANT: Only use forward slashes (“/”) in all makefiles and files included by makefiles regardless of the OS you are using.
Typical
things you might need to
change in config.mak are:
- INSTALL_ROOT and XDCTOOLS_ROOT should point to the location where you installed DSP/BIOS and XDCtools.
- If you want to use a version of RTDX or PSL other than the version provided with the DSP/BIOS installation, change the variable for that component. For example, you might set PSL_ROOT to C:/ti/c5500/psl.
- The CnnX_CODEGEN_ROOT variable for your DSP platform should point to the location of the codegen tools you want to use. For example, C6X_CODEGEN_ROOT = C:/Program Files/Texas Instruments/ccsv4/tools/compiler/c6000. (If you use multiple operating systems, note that the codegen tools are OS-specific.)
- If
you are using UNIX, comment out the REMOVE
definition for Windows and uncomment the corresponding definitions for
UNIX.
- Currently all examples are built for debug (-g). To change this, remove the “-g” from the CCNNOPTS line.
- Change or add any compiler, assembler, or linker options as needed in the definitions of CCNNOPTS, ASNNOPTS, and LDNNOPTS.
- Location of config.mak and cNNrules.mak if they are not in the default examples location.
- TCONFOPTS should be the –D option for use on the tconf command line. See the instructions for defining the config.importPath for CCStudio and the DSP/BIOS Textual Configuration (Tconf) User’s Guide (SPRU007H).
- CCNNFLAGS,
ASNNFLAGS, and LDNNFLAGS
allow you to specify any additional compiler, assembler,
and linker flags specific to this application.
For example, to have a map file created for the hello example, add “-m hello.map” to LD55FLAGS. To build with the C55x large model, first change the configuration in the tcf file, and then add the “-ml” flag to the C55FLAGS and AS55FLAGS definitions in the makefile. - PROG, OBJS, and CMDS should reference your source files, object files, and linker command files.
- If the application uses CSL directly, add the “-i” option to CCNNFLAGS to point to the directory that contains the CSL header files.
In order to use gmake to build using the supplied makefiles you may have to add the XDCtools install directory to your PATH. Once this is setup, you can build the hello example using the following syntax from the command line "gmake -f makefile_hello".
Windows:
Open the Environment Variables setting and add the XDCtools directory to the PATH
Right click on "My Computer" and select properties --> Advanced --> Environment Variables
Under "System Variables" scroll down to Path and double click on it
Scroll to the beginning of the line for "Variable Value" and add the XDCtools install dir followed by a semi-colon.
Linux:
If
you are using bash on Linux, change the PATH with teh following command:
export PATH=<XDCtools_install_dir>:$PATH
If you are using
bash on Linux, change the PATH with the following command:
Set PATH =(<XDCtools_install_dir> $PATH)
-
Application Notes
A number of application notes have been provided about various aspects of DSP/BIOS. Go to www.dspvillage.com and choose Technical Documents > Application Notes . Choose the "View by Software" tab and select the "Operating Systems (OS/RTOS)" item.
More
Information About DSP/BIOS
See
the
following documents
available with this release and also on www.dspvillage.com
to
learn about DSP/BIOS:
- TMS320 DSP/BIOS User’s Guide (SPRU423)
- TMS320C5000 DSP/BIOS API Reference Guide (SPRU404)
- TMS320C6000 DSP/BIOS API Reference Guide (SPRU403)
- TMS320C28x DSP/BIOS API Reference Guide (SPRU625)
- DSP/BIOS Textual Configuration (Tconf) User’s Guide (SPRU007)
- DSP/BIOS Driver Developer’s Guide (SPRU616)
- Online help in the DSP/BIOS Configuration Tool
- TI eXpressDSP Wiki
- Release notes
- Application notes
- DSP/BIOS Link documentation and application notes (for multiprocessor or OMAP applications)
- RTSC-Pedia
for wiki-based information on RTSC and XDCtools

Copyright © 2010, Texas Instruments
Incorporated
Code Composer Studio,
DSP/BIOS,
eXpressDSP, and TMS320 are
among the trademarks of Texas Instruments. See www.ti.com for a list of
trademarks
and registered trademarks belonging to Texas Instruments.